
This page describes how to connect Salesforce to Agentspace.
We recommend using the Salesforce V2 (Recommended) connector to ingest Salesforce data into Agentspace. The existing Salesforce connector will be deprecated. If you are using an existing data store that uses the Salesforce connector, create a new data store using the Salesforce V2 connector.
Connect Salesforce V2 (Recommended)
Supported versions
The Salesforce V2 connector supports SOAP API version 30.0 or later.
Before you begin
Before setting up your connection, do the following:
-
Use either a Salesforce enterprise or a Salesforce developer plan. Trial accounts are not supported.
-
Configure Salesforce for connectivity based on your chosen authentication type. Supported authentication types are:
Generate a service attachment
Use the following steps to generate a service attachment:
-
For Publicendpoint: If the Salesforce data center Destination typeis Public, you are not required to create the setup for service attachment. Instead, you can use your public URL in the Domain URLfield of the Google Cloud console.
-
For Privateendpoint:
- Use PSC to enable connections from private instances to Google Cloud.
- Create a Virtual Private Cloud network and the required subnets.
- Create a Virtual Machine (VM) instance and install the backend service.
- Optional: Set up a health check probe to monitor backend health.
- Add a load balancer to route traffic to the VM or backend.
- Define firewall rules to allow traffic between the PSC endpoint and the backend.
- Publish the endpoint by creating a PSC service attachment.
Configure Salesforce for connectivity
To connect a Salesforce data source to Agentspace, you must complete specific configurations within Salesforce. These configurations vary based on the authentication type you choose.
Set up for username and password authentication
For username-password authentication, use an existing security token, or reset the security token to receive a new one in your registered email.
To reset your security token:
-
Click your profile icon and select Settings.

Settings -
Navigate to the Reset my security tokentab and click Reset security token.

Reset security token Salesforce sends the new security token to your registered email.
Set up for OAuth 2.0 - JWT bearer authentication
You must set up Vertex AI Search as a connected app in Salesforce for API integration.
After you connect Vertex AI Search as a connected app, you can obtain the following authentication information that is needed to create a Salesforce connector in Agentspace.
- Customer key
- Public key
- Username (pre-authorized to use the application)
Generate private key and public certificate
-
Execute the following OpenSSL command to generate a 2048-bit RSA private key.
openssl genrsa -out server.key 2048This command creates a file named
server.key, which contains your private key. Keep this file secure and confidential. -
Execute the following OpenSSL command to generate a self-signed public certificate using the private key.
openssl req -new -x509 -sha256 -days 3650 -key server.key -out server.crtThis command generates a file named
server.crt, which is your public certificate. You can upload this certificate to Salesforce during the connected app configuration.
Create and configure connected app in Salesforce
-
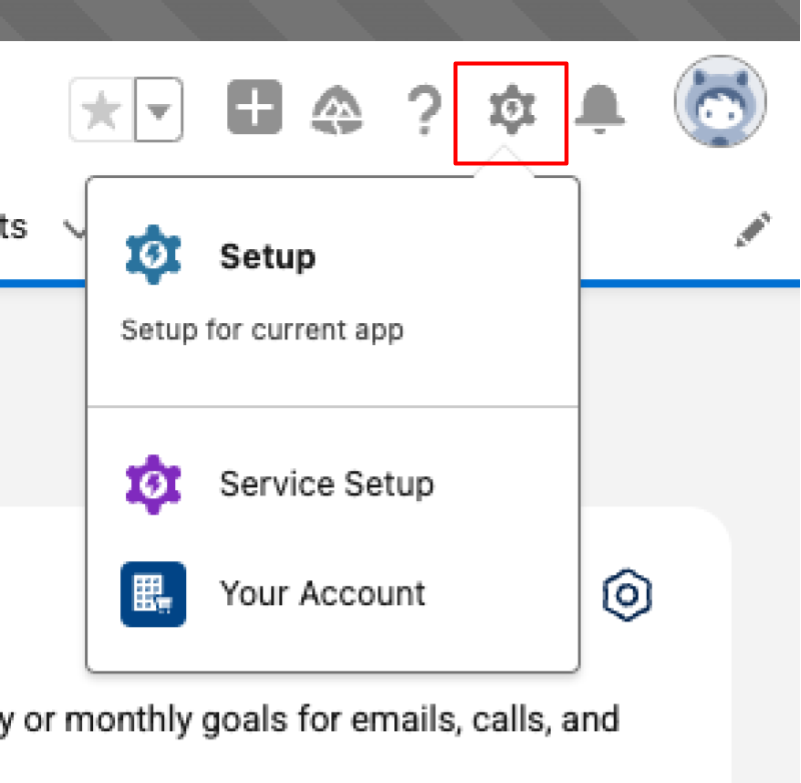
In your Salesforce app, click the setup icon, and then select Setup.
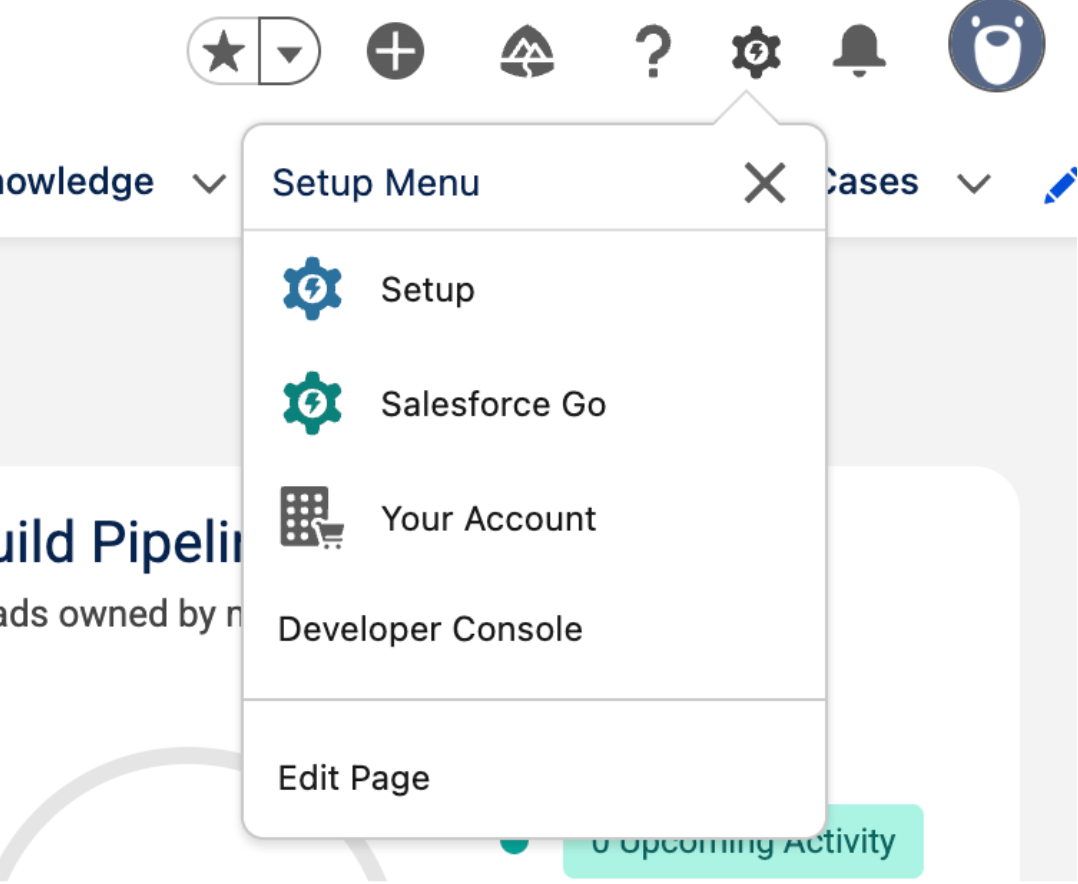
Setup -
Enter
Appsin the quick find box and select App manager. -
Select New external client app.

New external client app -
Enter the required basic information for your connected app, such as the External client app name, API name, and Contact email.
-
In the API (Enable OAuth settings)section, configure the following OAuth settings. For more information, see Enable OAuth Settings for API Integration .
- Select the Enable OAuthcheckbox.
- Enter the Callback URLas
https://vertexaisearch.cloud.google.com/console/oauth/salesforce_oauth.html. - In the Selected OAuth scopessection, add Full access(full), Manage user data via APIs (api), and Perform requests at any time (refresh_token, offline_access). For more information, see OAuth Tokens and Scopes .
-
In the Flow enablement section:
-
Select the Enable JWT bearer flowcheckbox.
-
Upload the public certificate created in Generate private key and public certificate .
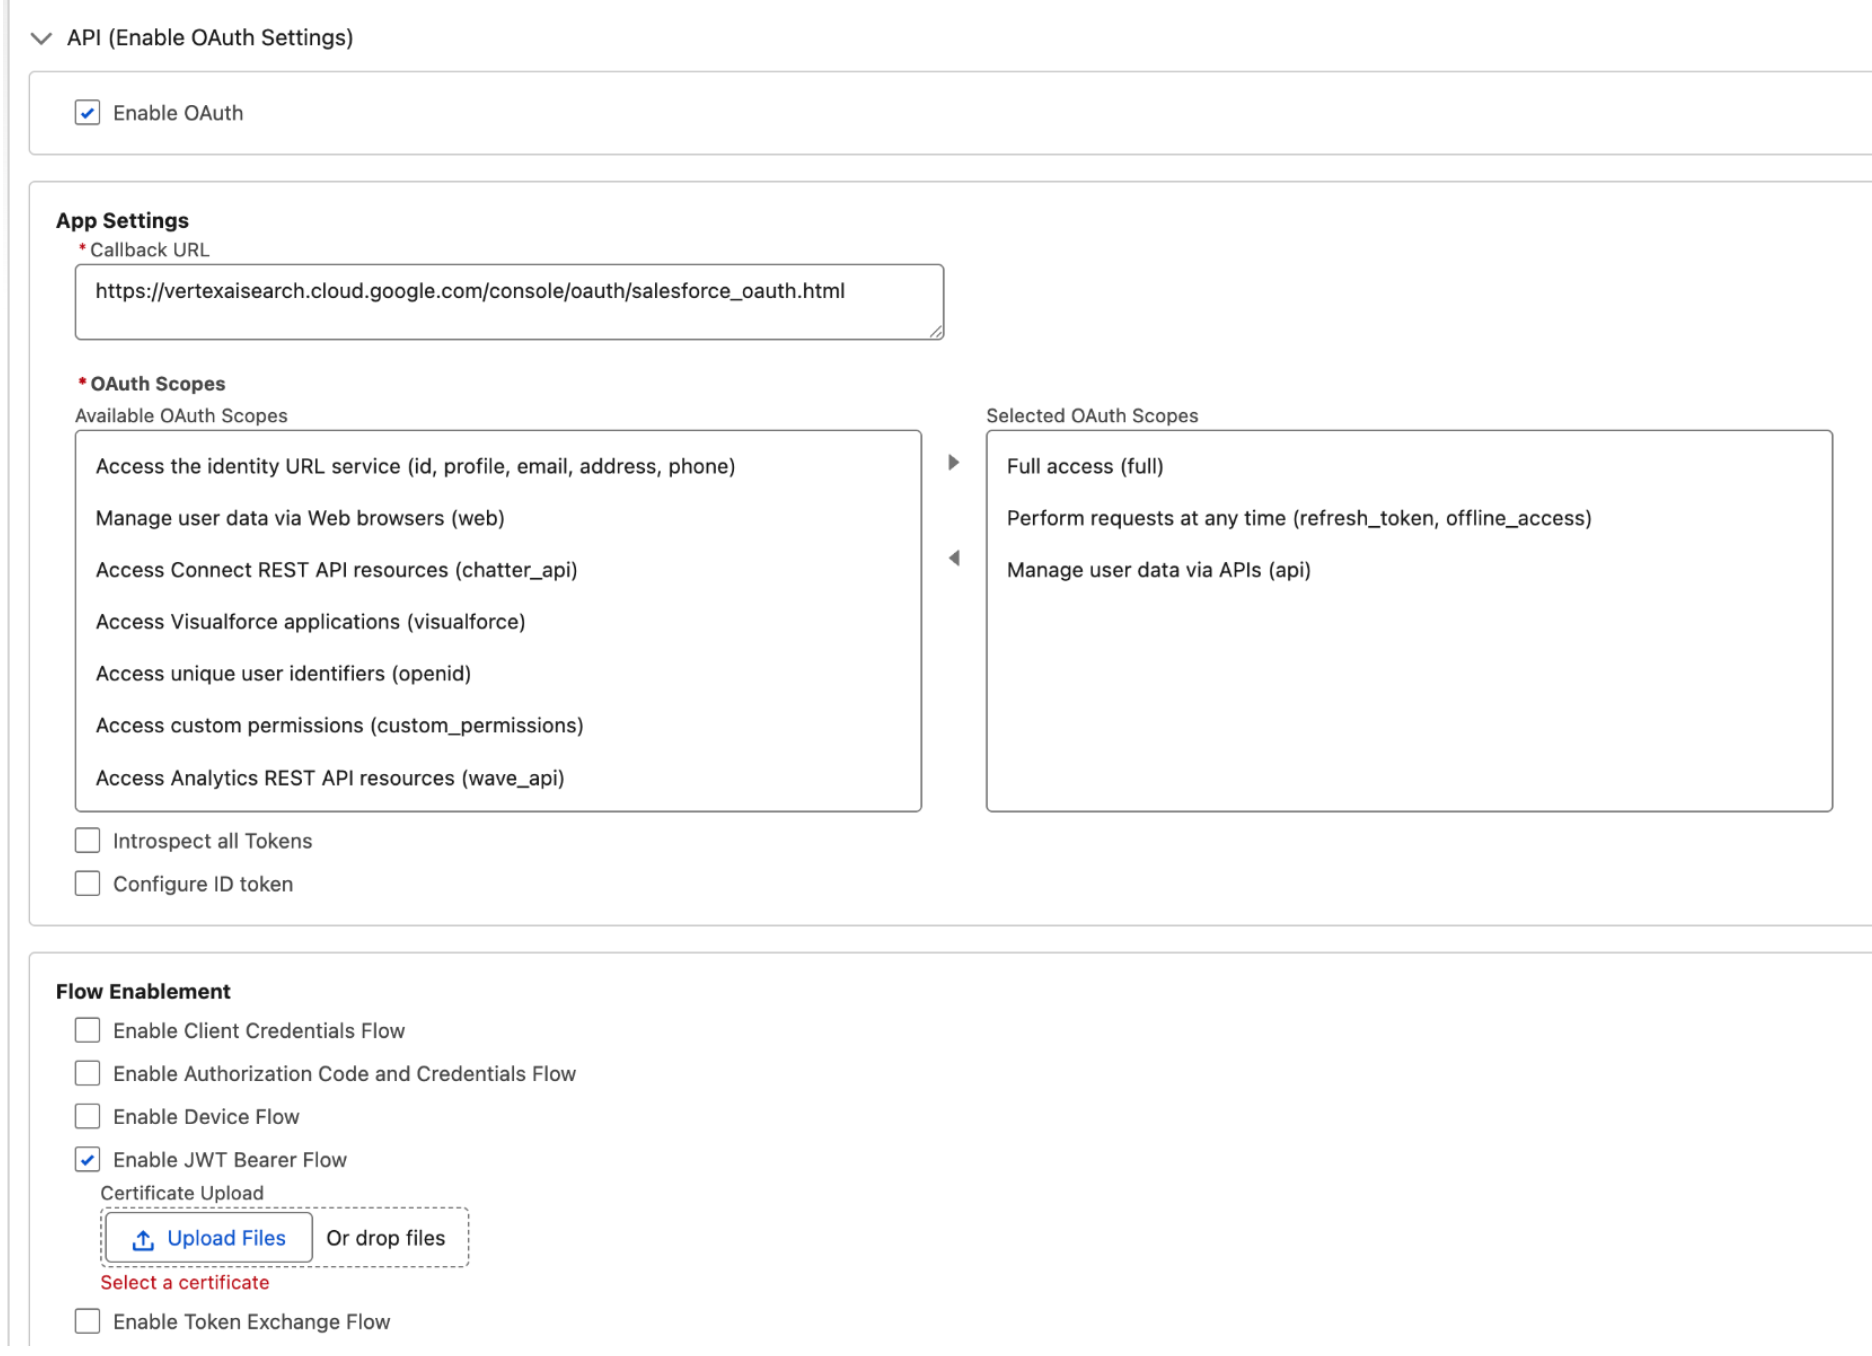
Enable OAuth settings - OAuth2 JWT -
Click Create.
Pre-authorize external client app access
After creating the Connected App, you must explicitly authorize specific users or permission sets to access it.
- Enter
External client appin the quick find box and select External client app manager. - Locate and open the external client app that you created earlier.
- In the Policiestab, click Editto modify the app details.
-
In the OAuth policiessection, do the following:
- In the Permitted usersfield, select Admin approved users are pre-authorized.
- In the Refresh token policyfield, select Refresh token is valid until revoked.
- In the IP relaxationfield, select Relax IP restrictions.
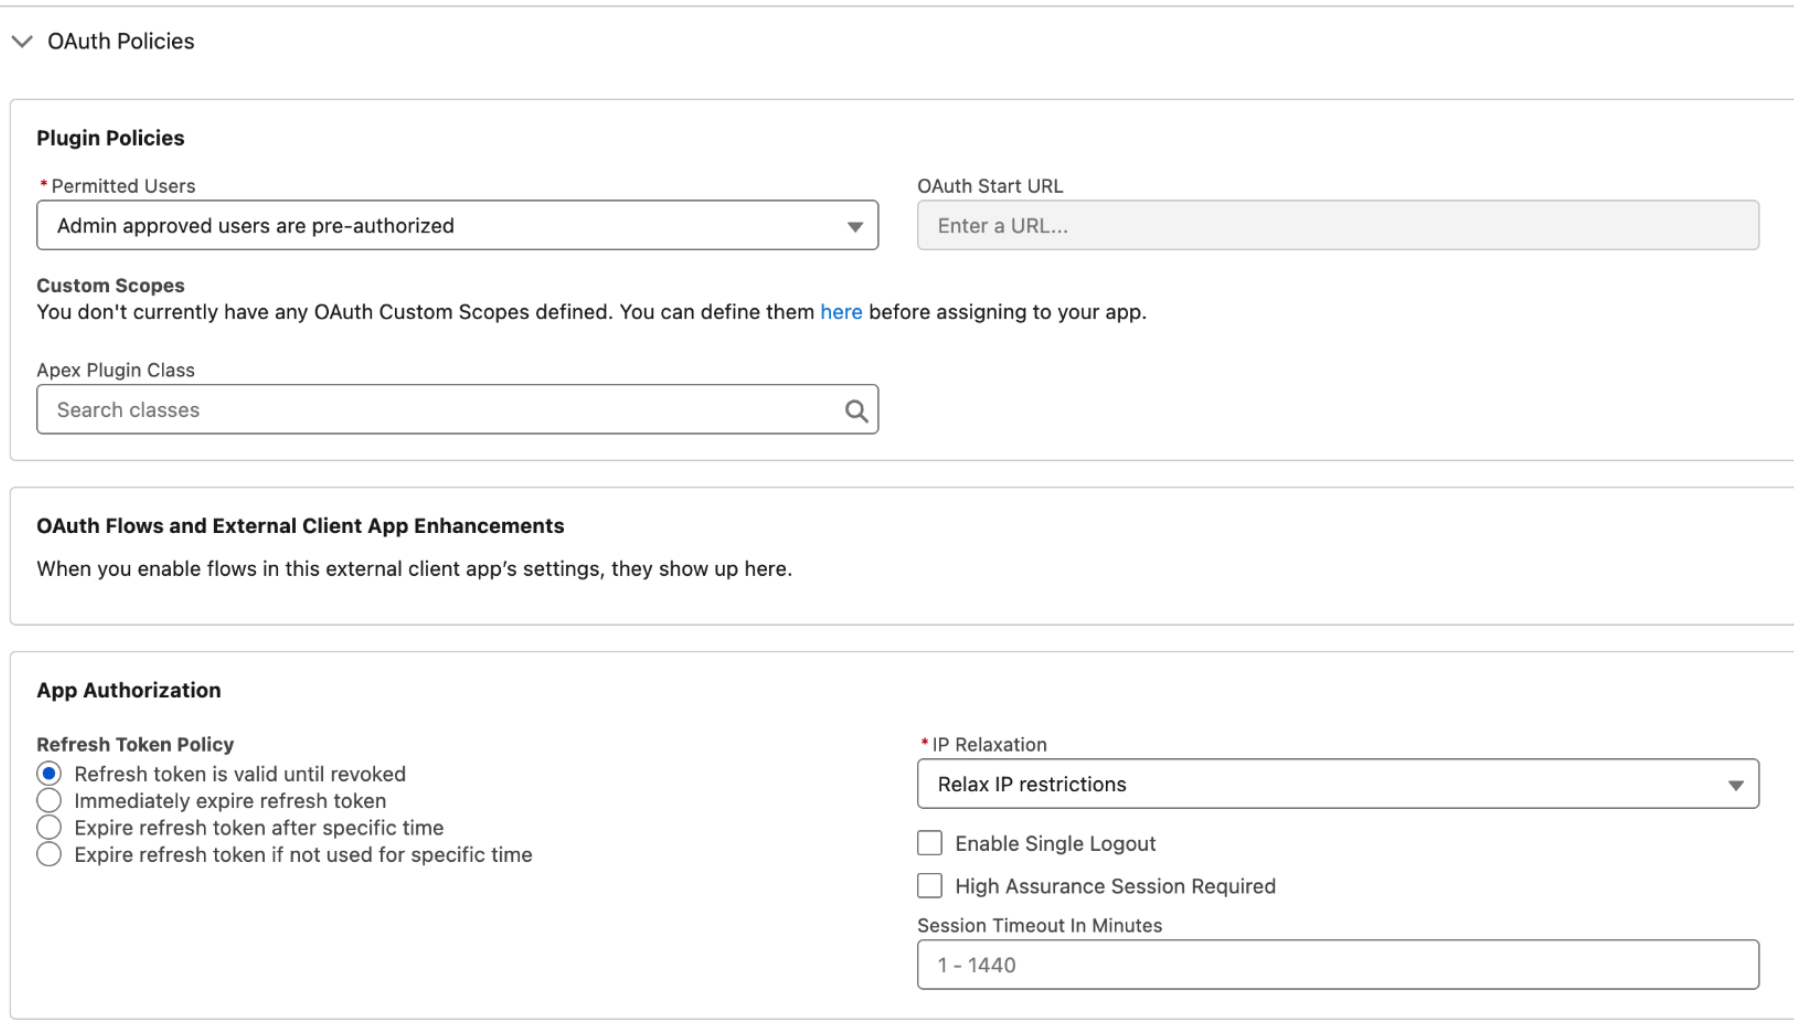
OAuth policies - OAuth2 JWT Bearer
The IP relaxation option controls whether the connected app's access is limited by IP ranges. IP restrictions are enforced based on the user profile settings. You must verify if an organization-wide IP range enforcement is active in the user settings. If Enforce login IP ranges on every requestis enabled, then setting IP Relaxation to Relax IP restrictionsdoes not override the existing IP restrictions. For more information, see Connected App IP Relaxation and Continuous IP Enforcement .
- If you want to enforce IP restrictions in the connected app, set up a trusted IP. For more information, see Configure Trusted IP Ranges for a Connected App .
- If you don't want to have any IP access restrictions, verify that the Enforce login IP ranges on every requestisn't selected.
-
In the App policiessection, select the profiles and permission sets for which this authentication type needs to be authorized.
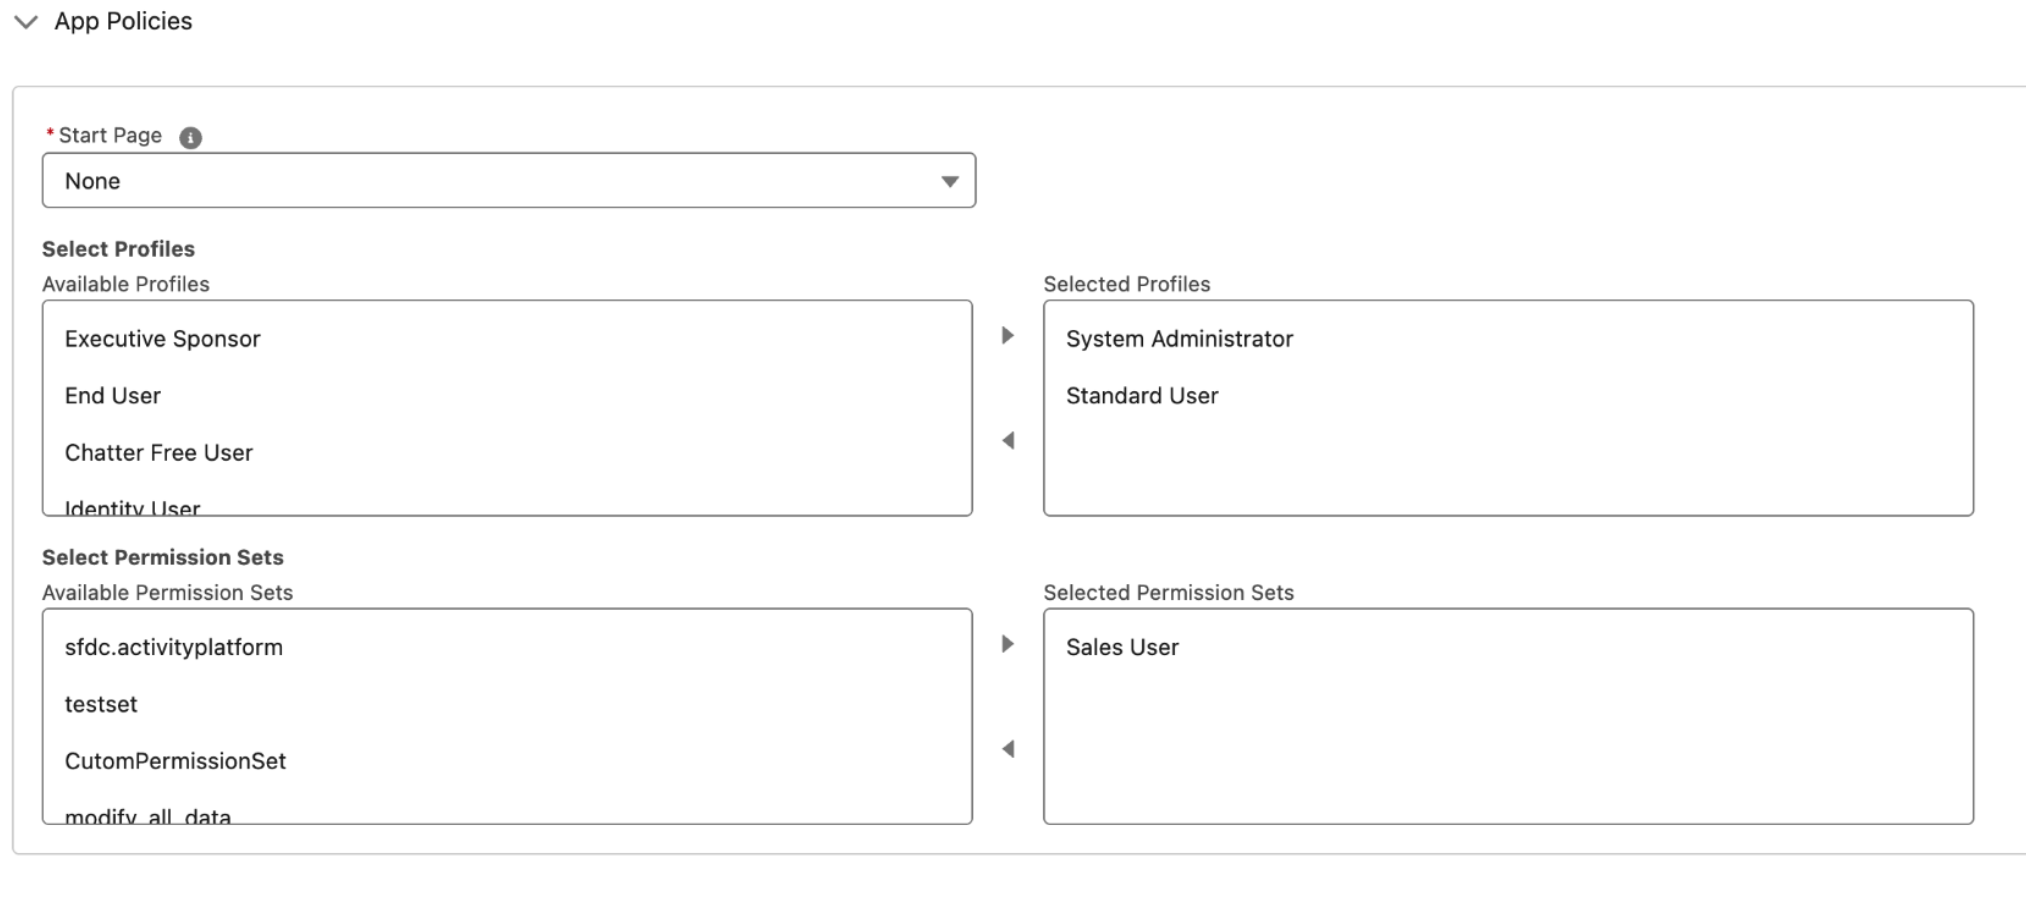
App policies -
Click Save.
-
Navigate to the Settingstab.
-
In the OAuth settingssection, click Consumer key and secretand copy the
Consumer keyandConsumer secret.
Set up for OAuth 2.0 - Client credentials authentication
You must set up Agentspace as a connected app in Salesforce for API integration.
After you connect Agentspace as a connected app, you can obtain the following authentication information that is needed to create a Salesforce connector in Agentspace.
- Consumer ID or client ID
- Consumer secret or client key
Create and configure an external client app
-
In your Salesforce app, click the setup icon, and then select Setup.
-
Enter
Appsin the quick find box and select App manager. -
Select New external client app.
-
Enter the required basic information for your connected app, such as the External client app name, API name, and Contact email.
-
In the API (Enable OAuth settings)section, configure the following OAuth settings. For more information, see Enable OAuth Settings for API Integration .
- Select the Enable OAuthcheckbox.
- Enter the Callback URLas
https://vertexaisearch.cloud.google.com/console/oauth/salesforce_oauth.html. - In the Selected OAuth scopessection, select Full access(full), Manage user data via APIs (api), and Perform requests at any time (refresh_token, offline_access). For more information, see OAuth Tokens and Scopes .
- In the Flow enablement section, select the Enable client credentials flowcheckbox.
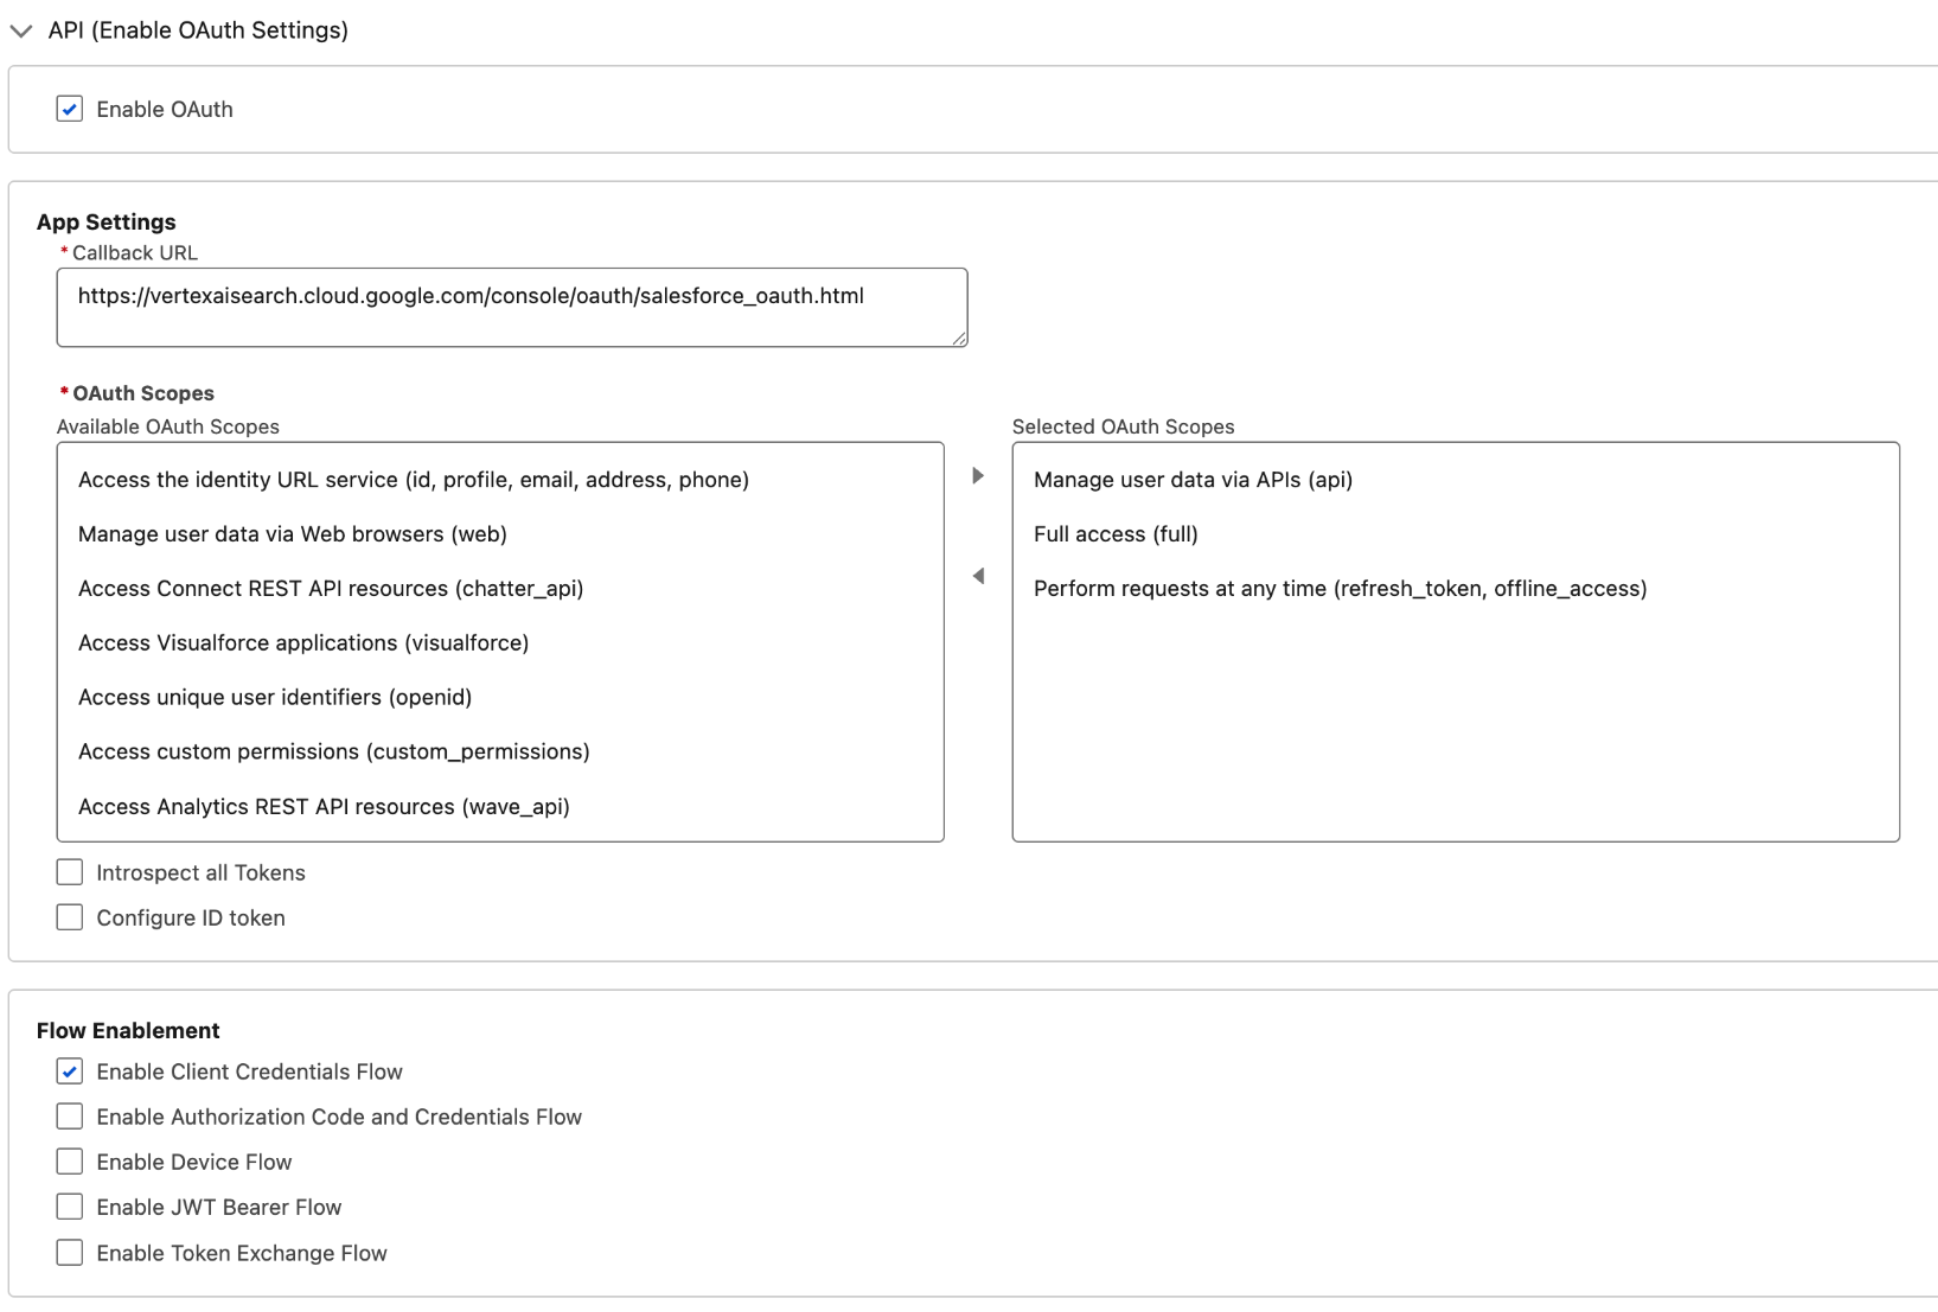
Enable OAuth settings- OAuth2 client credentials
-
Click Create.
Pre-authorize external client app access
After creating the external client app, you must explicitly authorize specific users or permission sets to access it.
- Enter
External client appin the quick find box and select External client app manager. - Click the name of the external client app that you created.
- In the Policiestab, click Editto modify the app details.
-
In the OAuth policiessection, do the following:
- In the Permitted usersfield, select Admin approved users are pre-authorized.
-
In the OAuth flow and external client enhancementsection:
- Select the Enable client credentials flowcheckbox.
- Enter the user's email ID.
-
In the Refresh token policyfield, select Refresh token is valid until revoked.
-
In the IP relaxationfield, select Relax IP restrictions.

OAuth policies - OAuth2 client credentials
The IP relaxation option controls whether the connected app's access is limited by IP ranges. IP restrictions are enforced based on the user profile settings. You must verify if an organization-wide IP range enforcement is active in the user settings. If Enforce login IP ranges on every requestis enabled, then setting IP Relaxation to Relax IP restrictionsdoes not override the existing IP restrictions. For more information, see Connected App IP Relaxation and Continuous IP Enforcement .
- If you want to enforce IP restrictions in the connected app, set up a trusted IP. For more information, see Configure Trusted IP Ranges for a Connected App .
- If you don't want to have any IP access restrictions, verify that the Enforce login IP ranges on every requestisn't selected.
-
In the App policiessection, select the profiles and permission sets for which this authentication type needs to be authorized.
App policies -
Click Save.
-
Navigate to the Settingstab.
-
In the OAuth settingssection, click Consumer key and secret, then copy the
Consumer keyandConsumer secret.
Get login URL
To get the Login URL for your Salesforce instance, do the following:
- Enter
My domainin the quick find box and select My domain. - Copy the domain that ends in
my.salesforce.com. - Add
https://to the beginning of the copied domain. This is the instance URL that you need when you create the Salesforce connector in Agentspace. The instance URL must be in the following format:https:// DOMAIN_NAME .my.salesforce.com.
Configure user minimum permissions
To verify that the user configuring the connector has the required minimum data fetching permissions, complete the following steps:
- Enter
Profilesin the quick find box and select Profiles. - Select the user profile running the connector.
- Navigate to the Standard object permissionssection and verify the permissions.
Verify that the selected user has access to the permissions. This process must be repeated for each entity you intend to ingest. This involves checking whether the default access at the user's profile level is set to Private
. When an entity's access is set to Private
, your Google Cloud connector can't access the required object and registers an error in Cloud Logging. To allow access, do the following:
-
Create a permission set and share it with the user
-
Enter
Permission setsin the quick find box and select Permission sets. -
Click New.
-
Enter a name and save the permission set.
-
Open the created permission set and navigate to the Appssection.
-
Select Object settings.
-
Select the View all recordscheckbox.
-
In the Field permissionssection, grant read access to all fields you want to synchronize.

Object Settings -
Save the settings and navigate back.
-
In the System section, select System permissions.
-
Enable the following minimum permissions:
-
API enabled -
View all users -
View roles and role hierarchy -
View setup and configuration
-
-
-
Add the user to the permission set:
- Enter
Usersin the quick find box and select Users. -
Select the user.
-
In the Permission set assignmentssection, select Edit assignments.
-
Add the recently created permission set to the Enabled permission setssection.
- Enter
For more information, see Data access in Salesforce and Organization-Wide Sharing Defaults .
Create a Salesforce V2 data store
Console
To use the Google Cloud console to sync data from Salesforce to Agentspace , follow these steps:
-
In the Google Cloud console, go to the Agentspacepage.
-
In the navigation menu, click Data stores.
-
Click Create data store.
-
On the Select a data sourcepage, scroll or search for Salesforce V2to connect your third-party source.
-
In the Authenticationssection, select the authentication method and enter the authentication information.
-
In the Destinationssection, select Publicor Private.
-
For the Publicdestination type, you are not required to create the setup for service attachment. In the Login URLfield, enter your login URL to the Salesforce server.
-
For the Privatedestination type, enter all the required information:
- Service attachment: Enter your service attachment.
- Base domain name: Enter your base domain.
- Login URL: Enter your login URL to the Salesforce server.
-
-
Click Continue.
-
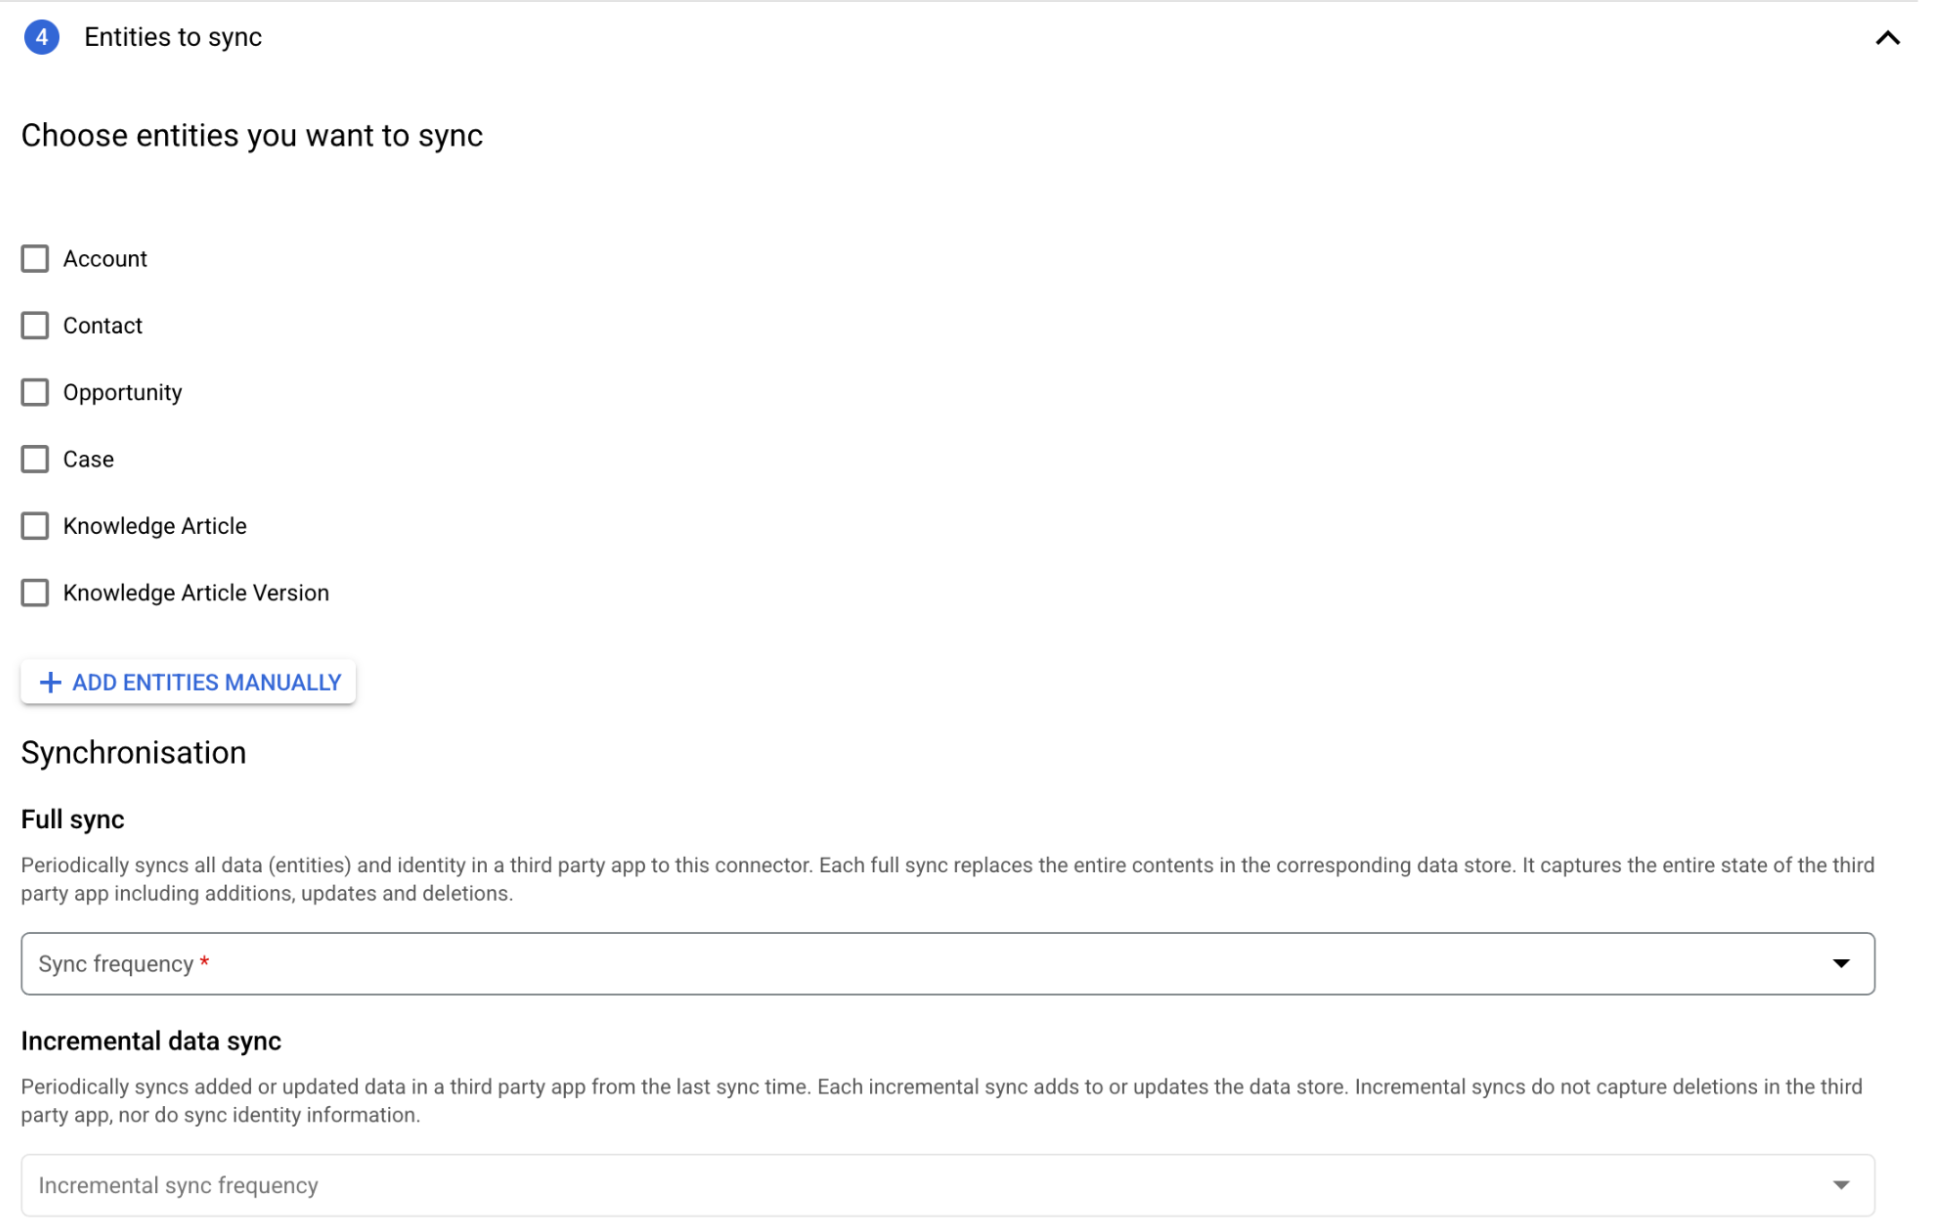
In the Entities to syncsection, do the following:
- Select the entities you want to sync.
- Optional. Add custom entities. The custom entity must be in the following format
 custom_object_name
__c
. For example:MyObject__c. -
Select the Sync frequencyfor Full syncand the Incremental sync frequencyfor Incremental data sync. For more information, see Sync schedules .
If you want to schedule separate full syncs of entity and identity data, expand the menu under Full sync and then select Custom options .
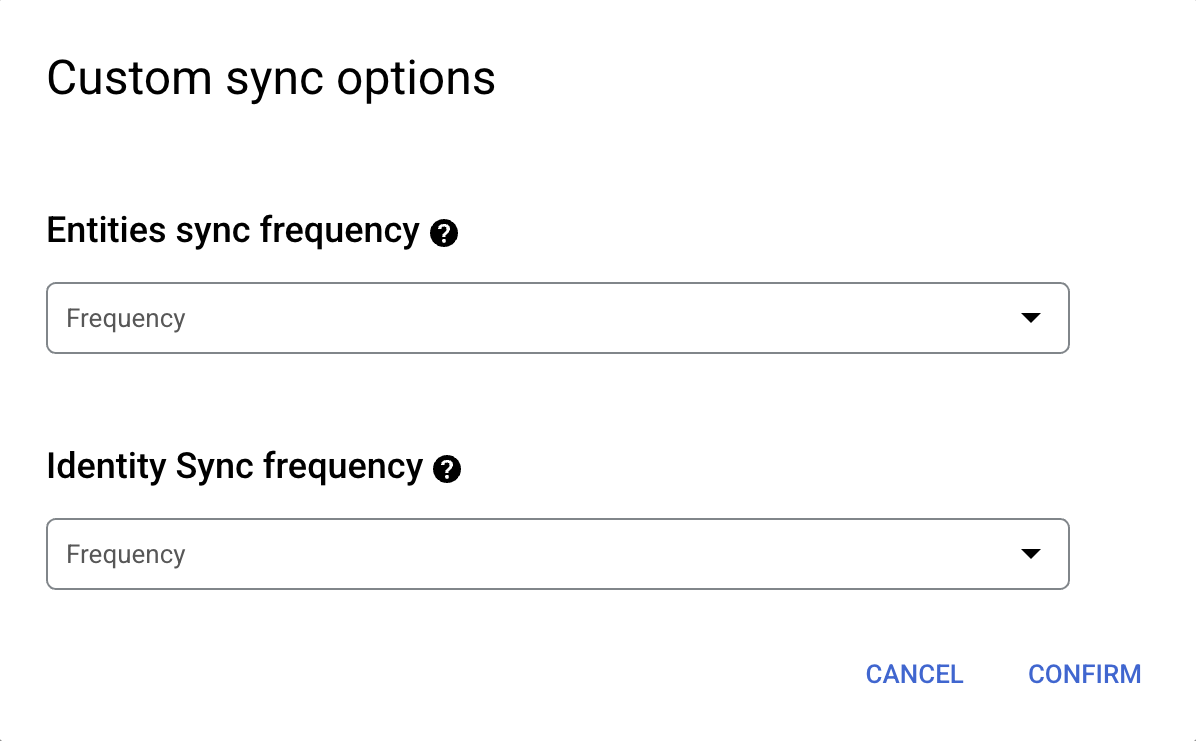
Setting separate schedules for full entity sync and full identity sync. - Click Continue.
Entities to sync
-
In the Configure your data connectorsection, do the following:
- Select a region for your data store.
- Enter a name for your data store.
- Click Create. Agentspace
creates your data store and
displays your data stores on the Data storespage.
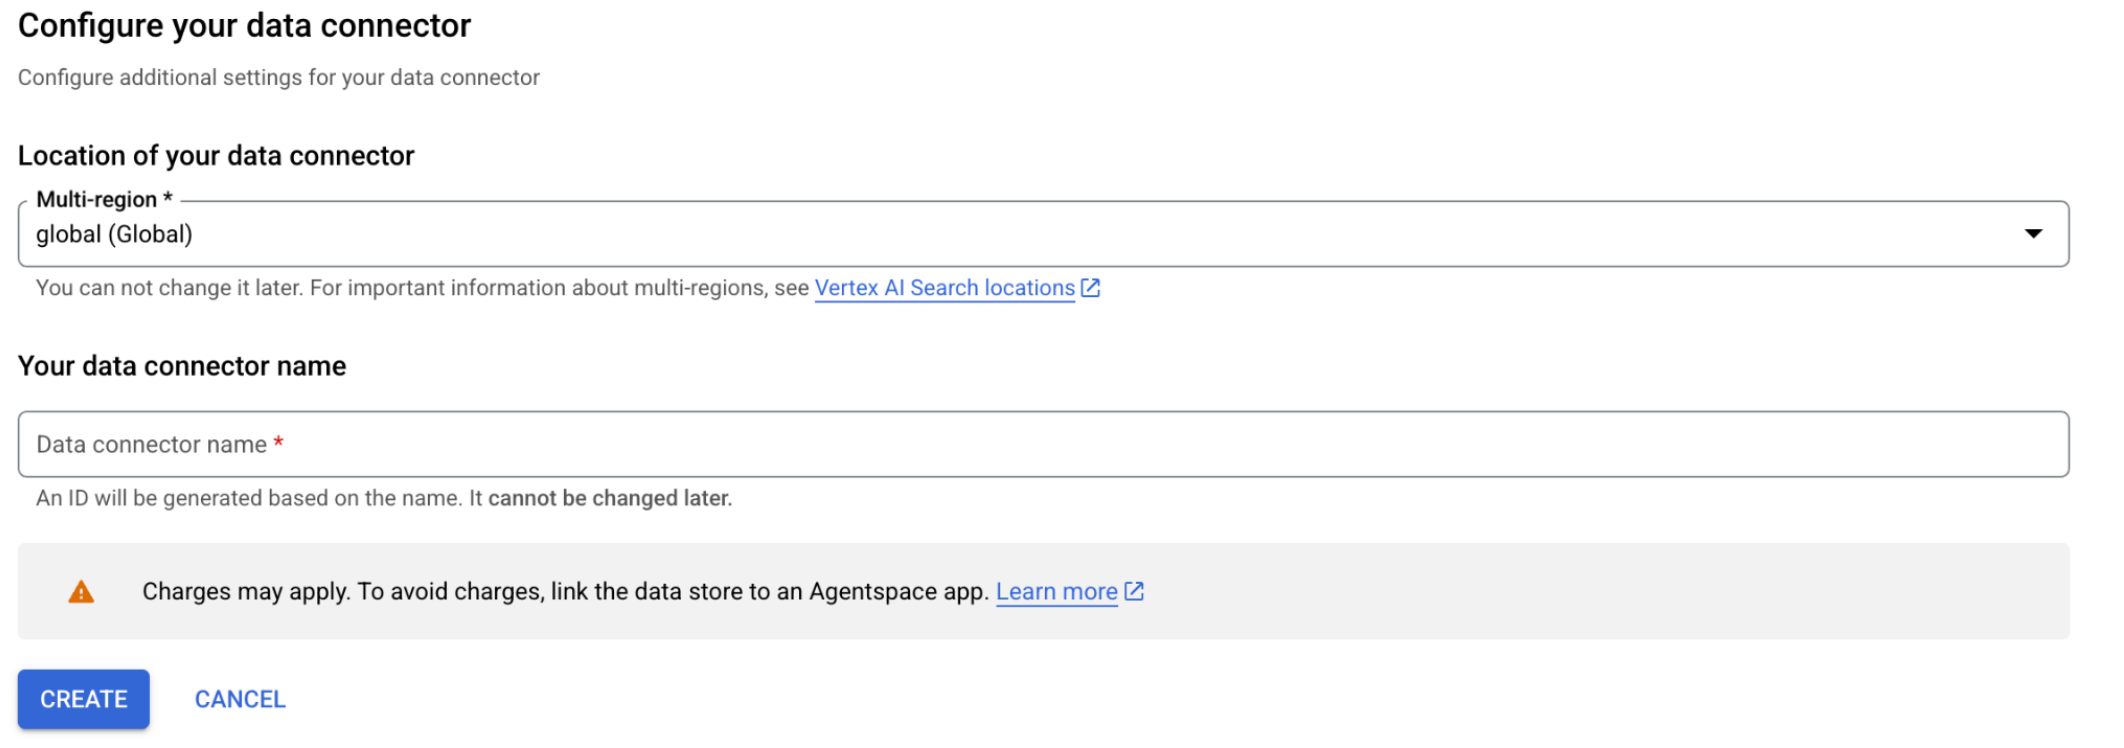
Configure your data connector
-
To check the status of your ingestion, go to the Data storespage and click your data store name to see details about it on its Datapage. The Connector statechanges from Creatingto Runningwhen it starts synchronizing data. When ingestion is complete, the state changes to Activeto indicate that the connection to your data source is set up and awaiting the next scheduled synchronization.
Depending on the size of your data, ingestion can take minutes or hours.
Rate limits
The default rate limit for the Salesforce connector is 5 requests per second.
Error messages
The following table lists the error messages that you might get when you use the Salesforce connector:
- In the Salesforce instance navigate to the external client app and find the client app used for the data store. In the Client credentials flow section, add the email of a user with the necessary permissions to the Run as user field . Click Save.
- In the Google Cloud console delete, and then re-create the data store.
- Verify that the username and password are correct. Username is usually an email address, such as user@company.com.
- Confirm that the security token is correct and up to date. Each time you reset your password, your security token becomes invalid. If your security token is invalid, you can reset it.
- Navigate to Salesforce settings and ensure that Lock sessions to the IP address from which they originated is set to Off .
- In the user's profile settings, verify that Session Security Level Required at Login is set to None .
Known limitations
-
Category based access control lists for knowledge article versions are not supported.
-
Tasks are only visible to users with View All Datapermission, task owners, and those who have access through the hierarchy.
-
When you add a project to a VPC Service Controls (VPC-SC) perimeter after you create a connection, the connector sync run fails.
Connect Salesforce (V1)
Before you begin
Before setting up your connection, do the following:
- Use either an Enterprise or a Developer plan. Trial accounts are not supported.
- Set up access control for your data source. For information about setting up access control, see Use data source access control .
- Verify that the Salesforce CORS allowlist contains Google Cloud.
- To configure the allowlist, see Enable CORS for OAuth Endpoints .
- To include Google Cloud, add
https://console.cloud.google.com/as the source URL, and save your configuration.
Create a connected app in Salesforce
You must set up Vertex AI Search as a connected app in Salesforce for API integration.
After you connect Vertex AI Search as a connected app, you can obtain the following authentication information that is needed to create a Salesforce connector in Agentspace.
- Instance URL
- Consumer ID or client ID
- Consumer secret or client key
To enable OAuth 2.0 and obtain the authentication information, do the following:
-
In your Salesforce app, click the setup icon, and then select Setup.
Select Setup for your Salesforce app -
Enter
External Client Appin the Quick Findbox and select External Client App Manager. -
In the menu, go to Settings.
-
Turn the Allow creation of connected appstoggle to the on position and click New Connected App.
To do so, you must have the correct permissions for external client apps. Verify whether you have the following permissions:
- Create, edit, and delete external client apps
- View all external client apps
- View all external client apps, view their settings, and edit their policies

Find your App Manager and create new connected app -
In the creation page for the new connected app, add the basic information for your app, such as the app name, your contact details, and a logo to identify your app. For more information, see Configure Basic Connected App Settings .
-
In the API (Enable OAuth Settings)section, configure the following OAuth settings. For more information, see Enable OAuth Settings for API Integration .
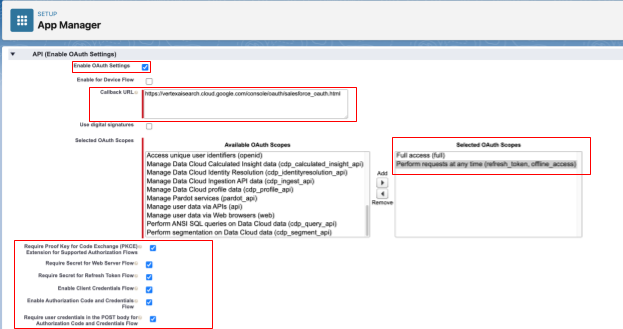
Enable and configure OAuth settings - Select Enable OAuth Settings.
-
Specify the callback URL as
https://vertexaisearch.cloud.google.com/console/oauth/salesforce_oauth.html. -
In the Selected OAuth scopessection, add Full Access(full)and Perform request at any time (refresh_token, offline_access). For more information, see OAuth Tokens and Scopes .
-
Select Enable Client Credentials Flow.
-
Select Enable Authorization Code and Credentials Flow.
-
Select the Require user credentials in the POST body for Authorization Code and Credentials Flow.
-
In Custom connected app handler, specify a Run asuser. This user must have read permissions to all the entities that the user needs the connector to extract.
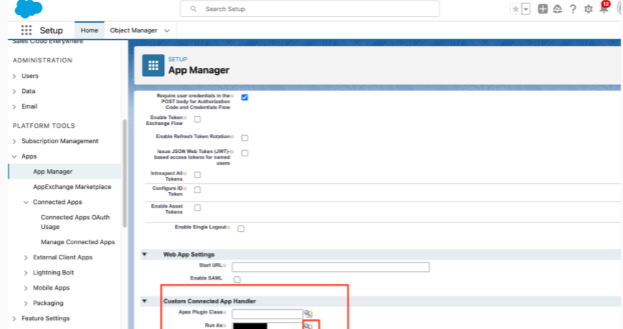
Specify a Run as user who has read permissions
-
Click Saveto create the connected app.
-
Enter
Manage connected appsin the Quick Find box and select Manage connected apps. -
Find your app in the list, select Edit, and then on the connected app details page select Edit policiesto configure the following details:
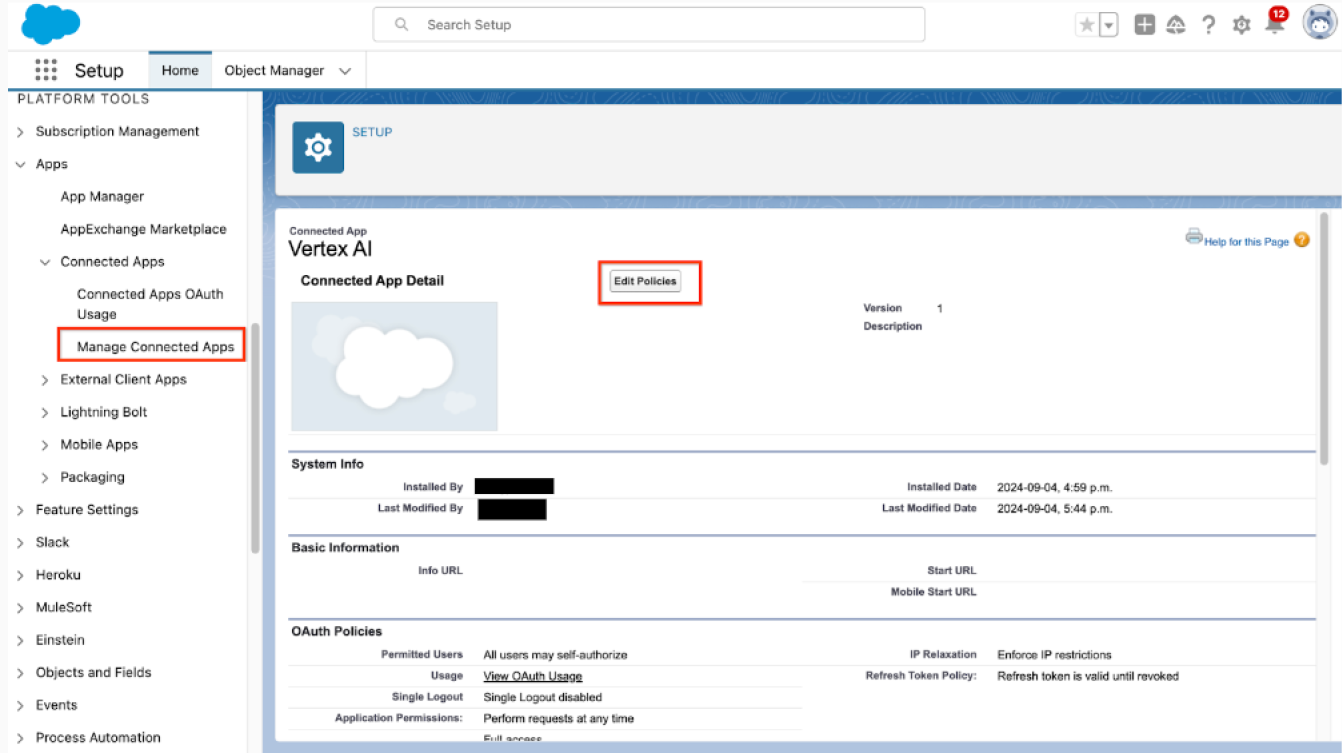
Manage the connected app and edit its policies -
Set IP Relaxationto Relax IP restrictions.
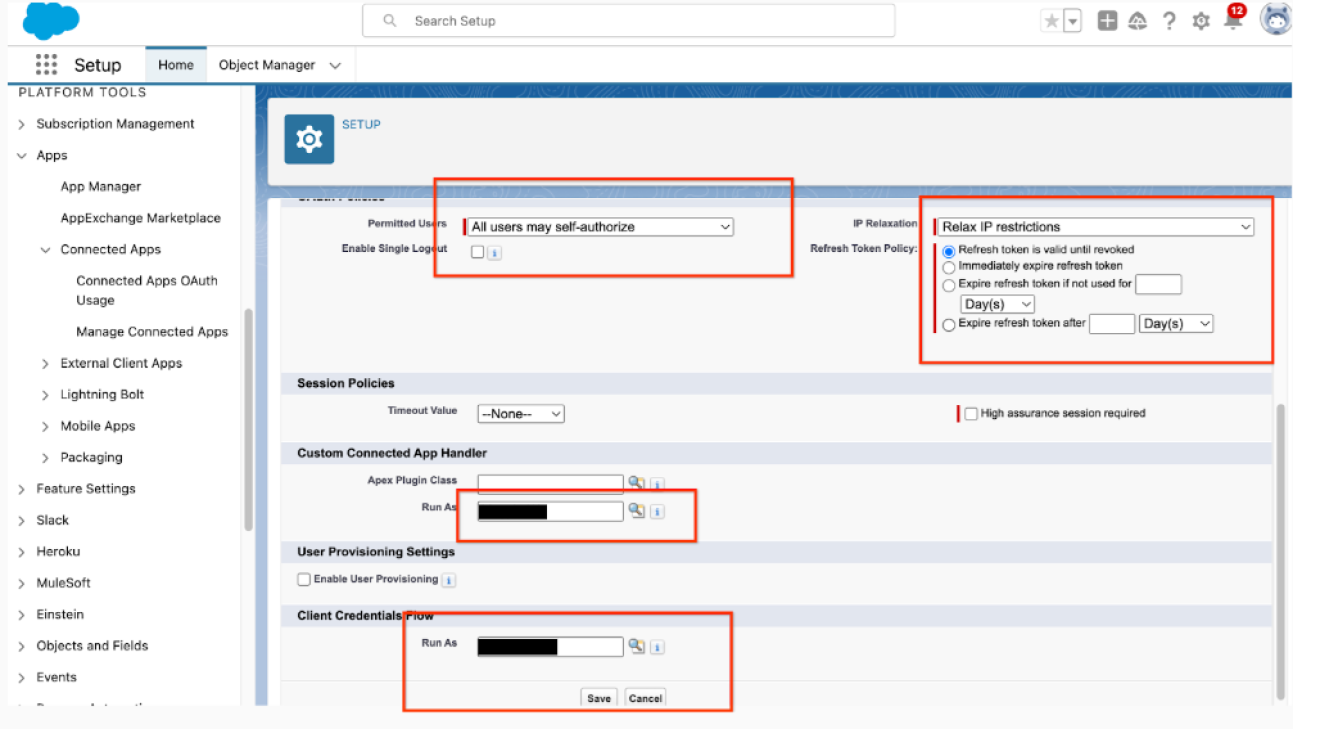
Additional setup for the connected app and client credentials flow This option determines whether the access to the connected app is restricted by IP ranges. IP restrictions are enforced based on how they're set in the user profile. You must verify whether an organization-wide IP ranges enforcement is configured in the user settings. If Enforce login IP ranges on every requestis enabled, then setting the IP Relaxationoption to Relax IP restrictionsdoesn't remove the IP restrictions. For more information, see Connected App IP Relaxation and Continuous IP Enforcement . If you want to enforce IP restrictions in the connected app, set up trusted IP. For more information, see Configure Trusted IP Ranges for a Connected App If you don't want to have any IP access restrictions, verify that the Enforce login IP ranges on every requestisn't selected.
-
Set Refresh Token Policyto Refresh token is valid until revoked.
-
Set Permitted Usersto All users may self-authorize.
-
In the Client Credentials Flowsection, specify a Run Asuser. The specified user must have read permissions to all the entities that they need the connector to extract. To check whether the user you selected has all the required permissions, do the one of the following:
- In your Salesforce app, click the setup icon, and then select Setup.
- In the main menu, click Usersand click the username whose permissions you want to verify.
- Click Profiles, go to the Standard object permissionssection and verify the permissions.
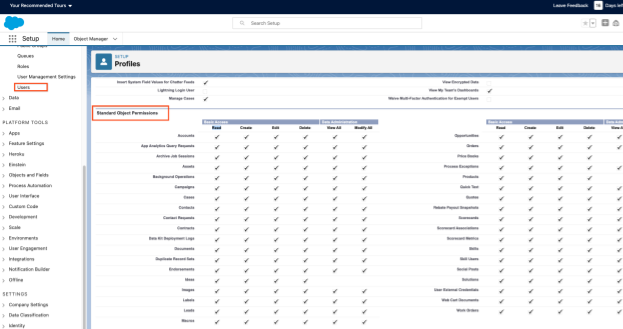
Verify the user's permissions
-
Verify that the selected user has access to the permissions. This involves checking whether the default access at the user's profile level is set to
Private. When an entity's access is set toPrivate, your Google Cloud connector can't access the required object and registers an error in Cloud Logging. To allow access, do one of the following:- Change the default profile permission to
Public. - Configure the access to each entity separately in Sharing settings.
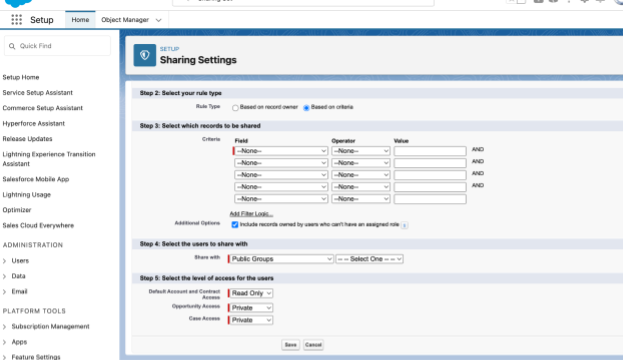
Configure sharing settings for entities - Create a permission set and share the permission set with the user:
- Enter
Permission setsin the Quick Find box and select Permission sets. - Click New.
- Enter a name and save the permission set.
- Under System, click System permissions.
- Click Edit, select View setup and configuration, and save.
- On the Permission setspage, click Manage assignments
- Click Add assignments, select the user that you want to assign the permission set to, and then click Assign.
- Enter
- For more information, see Data access in Salesforce and Organization-Wide Sharing Defaults .
- Change the default profile permission to
-
-
Click Save.
-
Enter
OAuth and openID connect settingsin the Quick Find box, select OAuth and OpenId Connect Settings, and then enable Allow Authorization Code and Credentials Flows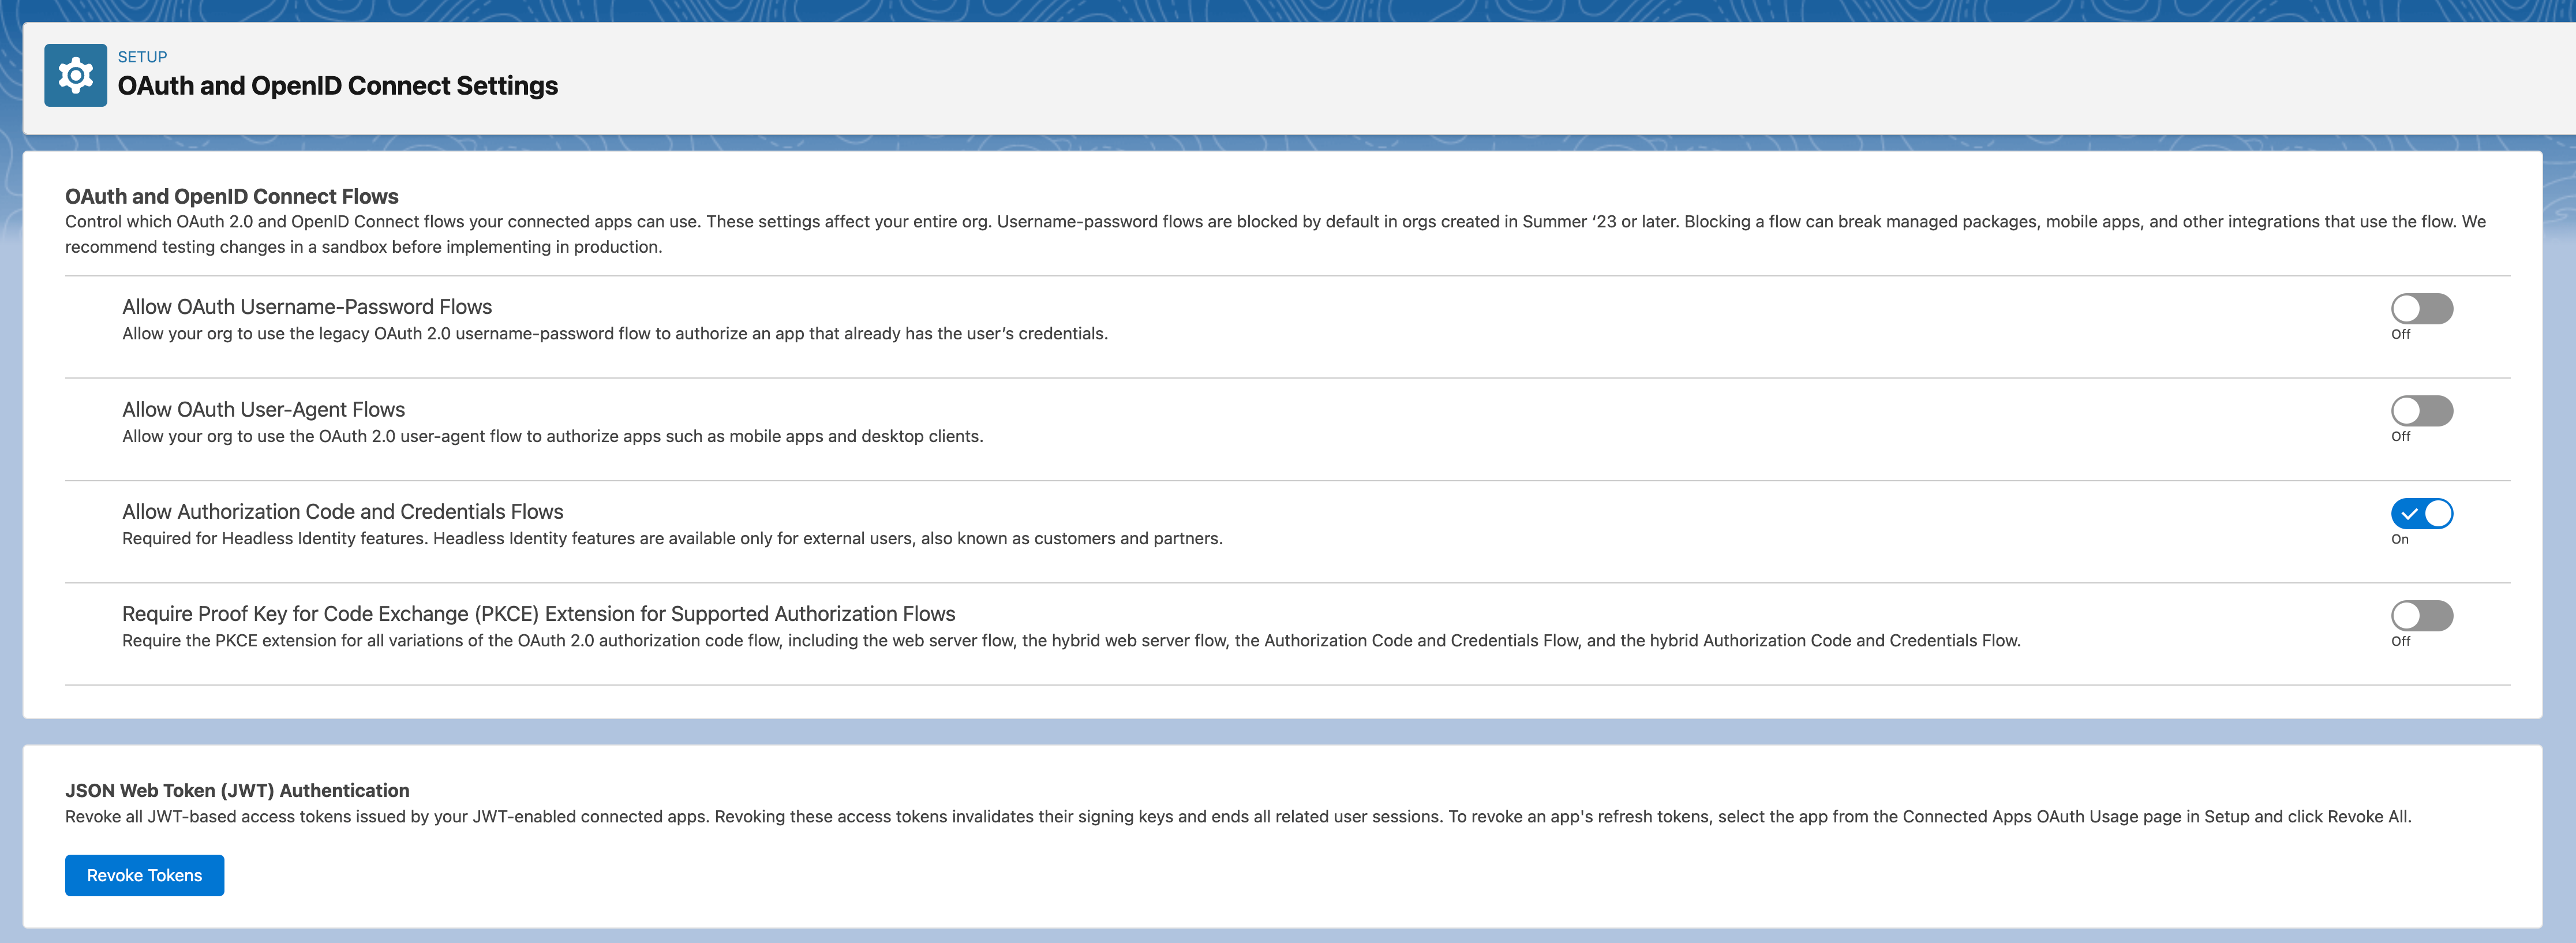
Set OAuth and openID connect settings -
Get the instance URL:
- Enter
My domainin the Quick Find box and select My Domain.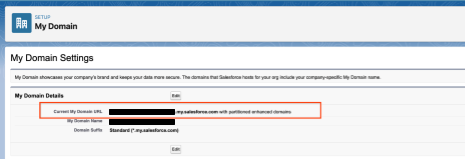
Copy your app's domain name - Copy the domain that ends in
my.salesforce.com. - Add
https://to the beginning of the copied domain. This is the instance URL that you need when you create the Salesforce connector in Agentspace. The instance URL must be in the following format:https://<var>DOMAIN_NAME</var>.my.salesforce.com</var>.
- Enter
-
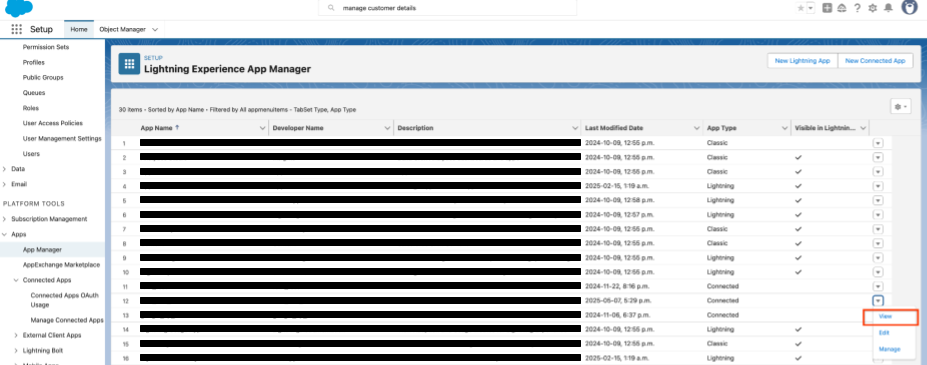
Get the consumer ID and consumer key.
- Go to App manager, locate your app, and in the options, select View.
View app details - Click Manage Customer Details.
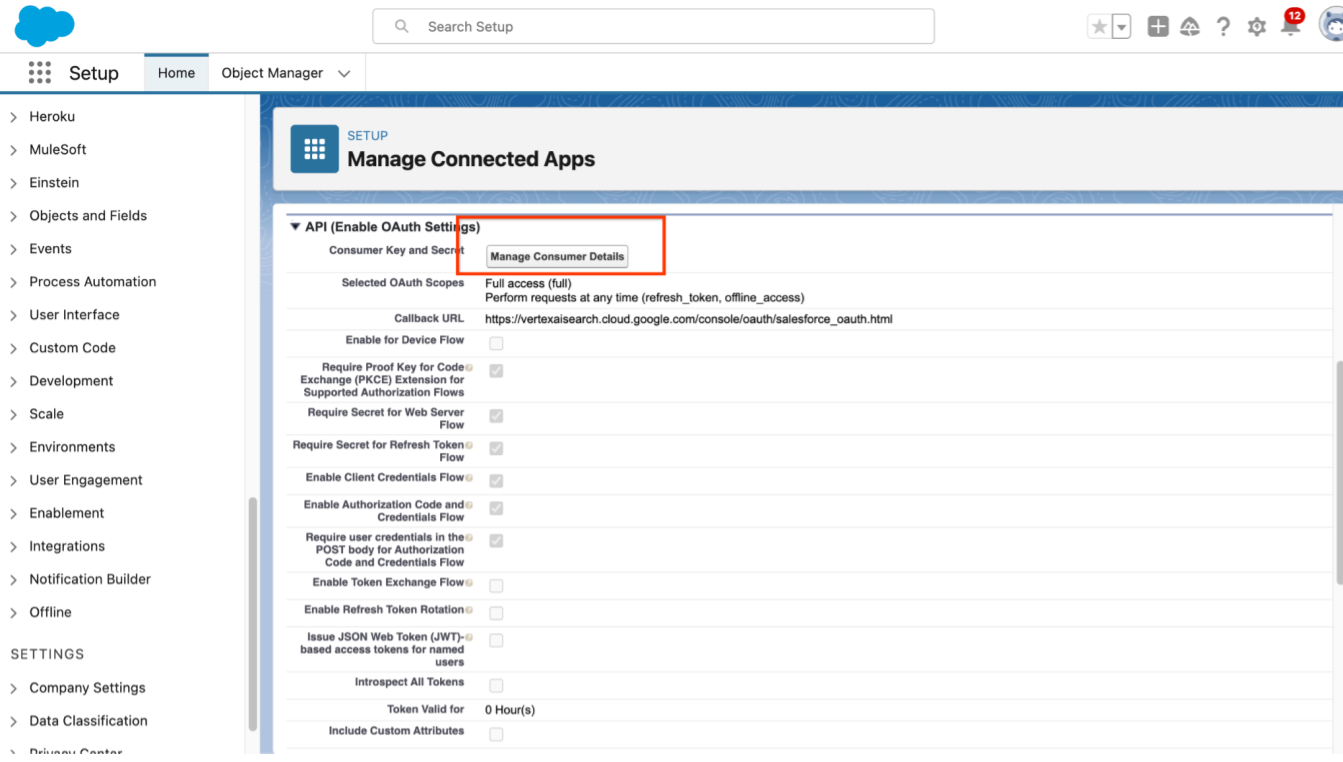
Click Manage Consumer Details button - If prompted, verify your identity.
-
Copy the consumer details.
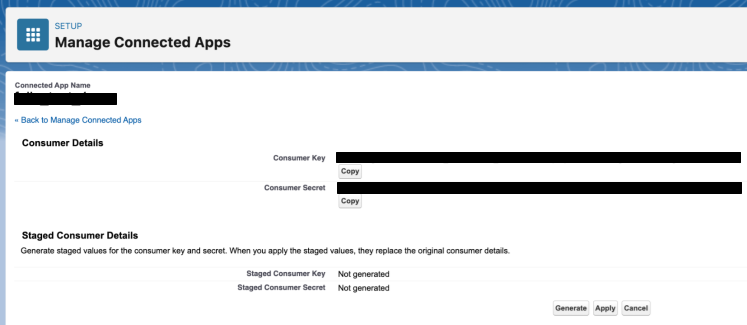
Copy the consumer key and secret This is the instance URL that you need when you create the Salesforce connector in Agentspace.
If Refresh tokenis enabled, ensure that the token is refreshed and that you copy the latest token when you create the Salesforce connector in the Agentspace.
- Go to App manager, locate your app, and in the options, select View.
Create a Salesforce (V1) data store
Console
To use the Google Cloud console to sync data from Salesforce to Agentspace , follow these steps:
-
In the Google Cloud console, go to the Agentspacepage.
-
In the navigation menu, click Data stores.
-
Click Create data store.
-
On the Select a data sourcepage, scroll or search for Salesforceto connect your third-party source.
-
Enter your Salesforce authentication information.
-
Select which entities to sync and click Continue.
-
Select the Sync frequencyfor Full syncand the Incremental sync frequencyfor Incremental data sync. For more information, see Sync schedules .
If you want to schedule separate full syncs of entity and identity data, expand the menu under Full sync and then select Custom options .
Setting separate schedules for full entity sync and full identity sync. -
Select a region for your data store.
-
Enter a name for your data store.
-
Click Create. Agentspace creates your data store and displays your data stores on the Data storespage.
-
To check the status of your ingestion, go to the Data storespage and click your data store name to see details about it on its Datapage. The Connector statechanges from Creatingto Runningwhen it starts synchronizing data. When ingestion is complete, the state changes to Activeto indicate that the connection to your data source is set up and awaiting the next scheduled synchronization.
Depending on the size of your data, ingestion can take minutes or hours.
Next steps
-
To attach your data store to an app, create an app and select your data store following the steps in Create an app .
-
To preview how your search results appear after your app and data store are set up, see Preview search results . If you used third-party access control, see Preview results for apps with third-party access control .
-
To enable alerts for the data store, see Configure alerts for third-party data stores .