
This page describes the process to create a SharePoint Data Center on-premises connector.
Sync data from SharePoint Data Center on-premises
Use the following procedure to sync data from SharePoint Data Center on-premises.
After setting up your data source and importing data for the first time, the data store synchronizes data from the source at the frequency specified during configuration.
Before you begin
Before setting up your connection, do the following:
-
Service attachment (required for private destination type only): Use the following steps to generate a service attachment for secure data transfer.
- Decide endpoint type: Select Publicor Privateendpoint.
-
For Publicendpoint: If the SharePoint Data Center Destination typeis Public, you are not required to create the setup for service attachment. Instead, you can use your public URL in the Domain URLfield of the Google Cloud console when creating your connector.
-
For Privateendpoint:
- Use private service connect (PSC) to enable connections from private instances to Google Cloud
- Create a Virtual Private Cloud network and required subnets.
- Create a virtual machine (VM) instance and install the backend service.
- Optional: Set up a health check probe to monitor backend health.
- Add a load balancer to route traffic to the VM or backend.
- Define firewall rules to allow traffic between the PSC endpoint and the backend
- Publish the endpoint by creating a PSC service attachment.
-
Username and password: Obtain valid credentials for authentication from your SharePoint administrator.
-
Optional for the private destination type: Domain URL: Keep the domain URL of the SharePoint Data Center instance if the instance is behind a proxy or SSL-based connection.
-
Optional: Base domain name: Provide the base domain name for the SharePoint instance.
-
Optional: Destination port: Identify the port used for communication with the SharePoint Data Center.
-
Use the following configuration guidelines to establish connections with Private Service Connect (PSC). Adjust or add resources as needed. Make sure the PSC service attachment is properly configured to connect to the private instance and meets the requirements for a published service.
-
Configure network settings:
-
Place the PSC service attachment and load balancer in different subnets within the same Virtual Private Cloud network.
-
The backend system must remain closed to the public network for security reasons. However, ensure it can accept traffic from the following sources:
-
For proxy-based/HTTP(s) load balancers (L4 proxy ILB, L7 ILB), configure the backend to accept requests from the proxy subnet in the Virtual Private Cloud network.
-
For more information, see the Proxy-only subnets for Envoy-based load balancers documentation.
-
-
-
Adjust firewall rules:
-
Ingress rules:
- Allow traffic from the PSC service attachment subnet to the internal load balancer (ILB) subnet.
- Make sure that the ILB can send traffic to the backend.
- Permit health check probes to reach the backend.
-
Egress rules: Enable egress traffic by default, unless specific deny rules apply.
-
-
-
Additional considerations: Make sure to keep all the components, including the PSC service attachment and load balancer, in the same region.
Create a SharePoint minimum access permission user and set up permissions
To create a SharePoint minimum access permission user, obtain a username and password from an administrator. The administrator must sign in and follow these steps to create a new user in the SharePoint Data Center instance:
- Click the Startmenu and navigate to Windows administrative tools> Active directory users and computers.
- Launch the Active directory users and computersapplication.
- Expand the organization unit and navigate to the Userscontainer where the new user is added.
- Right-click on Usersand select New> User.
- In the New object:Userwindow, enter the following details:
- First name (do not use a comma or dot)
- Full name
- User logon name
- Click Next.
- Enter and confirm the password, then select:
- User cannot change password
- Password never expires
- Click Next, then Finish.
- Locate the created user in the Userssection, double-click on it, and select Properties.
- In the Propertieswindow, add an email for the user and click Apply.
Assign minimum access permissions to the SharePoint user
- Navigate to the Site collection.
- Click Settings(gear icon menu).
- Go to Site Permissions.
- Select Advanced permissions settings.
- Locate and select the SiteName visitorsgroup (this group is automatically created when the site is set up and has default read access).
- Add the user to the SiteName visitorsgroup to grant them read-only access.
Note:This access inherits all permissions for lists, libraries, pages, and events that have read permissions.
Configure the site collection in SharePoint
- Sign in to the SharePoint admin consoleusing the administrator username and password.
- In the Central administrationpage, navigate to Application management.
- Click Create site collections.
- In the Create site collectionpage:
- Enter the required details in the Titleand Descriptionfields.
- In the Web site addresssection, enter the URL name for the site.
- In the Primary site collection administratorsection:
- Click the Browsebutton next to the User namefield.
- In the Select peopledialog, enter the administrator username and click the search icon.
- Select the user and click Ok.
- The Site successfully createdpage appears, displaying the site URL.
- Copy the URL and open it in a new tab to access the site.
Sign in with the created user
- Use the created user's credentials to sign in to the SharePoint site.
- Verify access and permissions for the user.
Create a SharePoint Data Center On-premises connector
Console
-
In the Google Cloud console, go to the Agentspacepage.
-
In the navigation menu, click Data stores.
-
Click Create data store.
-
On the Select a data sourcepage, scroll or search for SharePoint data centerto connect your third-party source.
-
Enter your authentication information and click Continue.
-
From the Destination typedrop-down list, select Publicor Private.
-
For Publicdestination type, you are not required to create the setup for service attachment. Instead, you can use your public URL in the Domain URLfield of the Google Cloud console.
-
For Privatedestination type, enter all the required information:
- If your instance has a domain URL:
- Service attachment: Enter your service attachment.
- Optional: Base domain name: Enter your base domain.
- Domain URL: Enter your domain URL.
- Optional: Destination port: Enter your destination port.
- If your instance does not have a domain URL:
- Service attachment: Enter your service attachment.
- Optional: Destination port: Enter your destination port.
- If your instance has a domain URL:
-
-
Click Continue.
-
Optional: Advanced options: Select and enable Proxy settingsand SSL settings, if required.
-
Under the Entities to sync, select all the required entities to sync and click Continue.
-
Select the Sync frequencyfor Full syncand the Incremental sync frequencyfor Incremental data sync. For more information, see Sync schedules .
If you want to schedule separate full syncs of entity and identity data, expand the menu under Full sync and then select Custom options .
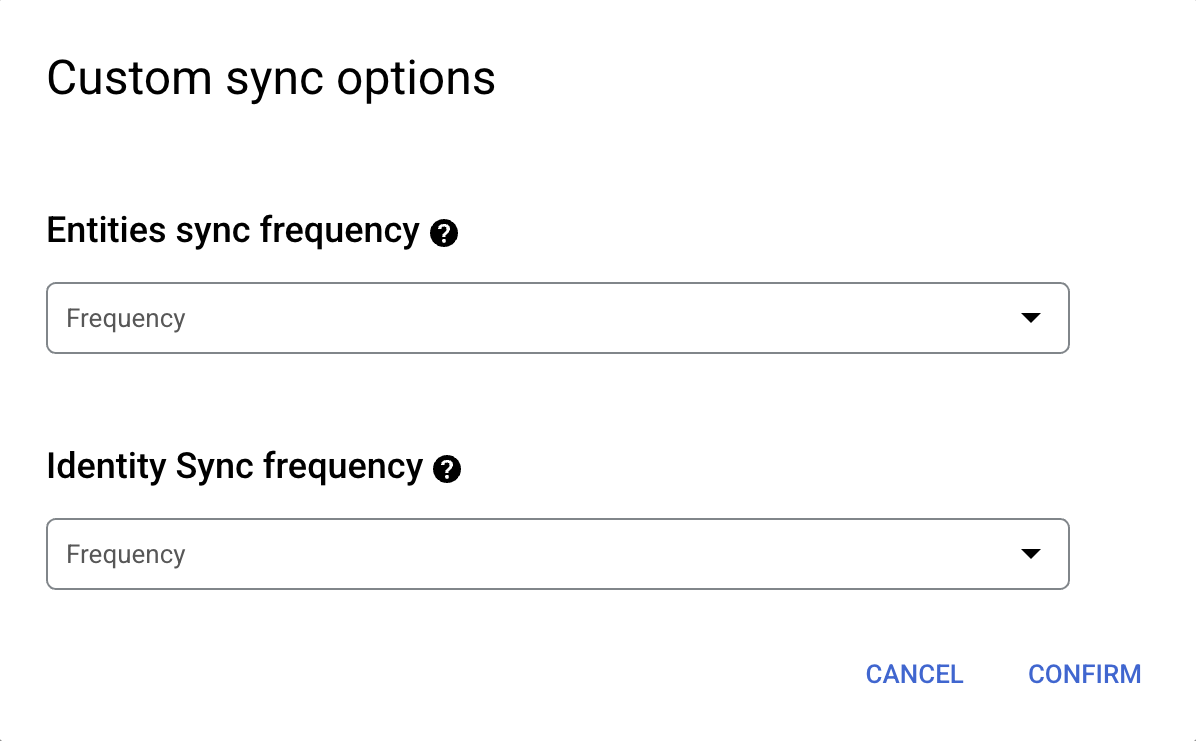
Setting separate schedules for full entity sync and full identity sync. -
Select a region for your data connector and enter a name for your data connector.
To manage connector states, do the following:
-
For private destination type:
- Submit the connector details.
- VAIS sends a connection request to your PSC.
- Navigate to your connector to see a message to allowlist a
projectIdin the PSC. - Allow the connection in PSC:
- The connector remains in the Errorstate until you approve the request.
- After approval, the connector moves to the Activestate during the next sync run.
- If your PSC is configured to accept all connections, the connector automatically moves to the Activestate after creation.
-
For public destination type:
- Submit the connector details.
- The connector automatically enters the Activestate after submission.
To verify the state of the data store and the ingestion activity, do the following:
- Navigate to the connector in the data store list and monitor its state until it changes to Active.
- After the connector state changes to Active, click the required entity and confirm that all selected entities are ingested. The data store state transitions from Creatingto Runningwhen synchronization begins and changes to Activeonce ingestion completes, indicating that the data store is set up. Depending on the size of your data, ingestion can take several hours.
Next steps
-
To attach your data store to an app, create an app and select your data store following the steps in Create an app .
-
To preview how your search results appear after your app and data store are set up, see Preview search results .
-
To enable alerts for the data store, see Configure alerts for third-party data stores .