


This page describes how to set up and configure a third-party configuration before creating the Jira Cloud data store.
Set up authentication and permissions
You need to set up authentication and permissions in the Atlassian administrator account center. This is crucial for allowing the connector to access and synchronize data. The Jira Cloud connector supports various authentication methods, such as OAuth client credentials or API tokens.
Create an OAuth 2.0 app
To create an OAuth 2.0 app for authentication, follow these steps to set up the application in your Atlassian Developer Console and obtain the necessary client ID and client secret.
Verify Jira organization administrator access
To verify Jira organization administrator access, do the following:
-
Sign-in to Atlassian with your user credentials.
-
Select the Jiraapp.
-
Click Settings.
If you see the Systemoption under Jira settings, you have Jira organization administrator access. Otherwise, request your Jira organization administrator to provide access.
Create OAuth 2.0 app
To create an OAuth 2.0 app, do the following:
-
Sign in to the Atlassian Developer Console .
-
Click the profile icon and select Developer console.
-
In the Consolepage, click Createand select OAuth 2.0 Integration.
-
In the app creation page, do the following:
-
Enter a name for the app.
-
Select the checkbox to agree to Atlassian's developer terms.
-
Click Create.
-
-
In the app page, do the following:
-
From the navigation menu, click Authorization.
-
In the Authorization typetable, select Addfor OAuth 2.0 (3LO).
-
-
In the Callback URLfield, enter
https://vertexaisearch.cloud.google.com/console/oauth/jira_oauth.html. -
Click Save changes.
Obtain client ID and client secret
To obtain the client ID and client secret, do the following:
- In the app page, from the navigation menu click Distribution.
-
In the Distributionpage, do the following:
- In the Distribution controlssection, select Edit.
- In the Distribution statussection, select Sharingto enable editing other fields.
- Enter information in the following mandatory fields:
- For Vendor, enter
Google. - For Privacy policy, enter
https://policies.google.com. - For Does your app store personal data?, select Yes.
- Select I confirm that I've implemented the personal data reporting APIcheckbox. For more information, see Personal data reporting API .
- For Vendor, enter
- Click Save changes.
-
In the app page, do the following:
- From the navigation menu, click Settings.
- From the settings page, copy your Client IDand Client secret.
Obtain an instance ID and instance URL
-
Obtain the instance ID:
- Open a new tab, copy the instance URL, and append
/_edge/tenant_infoto the instance URL. For example,https:// YOUR_INSTANCE .atlassian.net/_edge/tenant_info. - Navigate to the link to find the
cloudIdvalue. ThecloudIdis your instance ID.
- Open a new tab, copy the instance URL, and append
-
Obtain the instance URL:
- Go to atlassian.net and sign in with your administrator account.
- Select the app you want to sync. For example, sync the first app.
- Find the instance URL (the subdomain in the address bar).
Grant administrator roles
To grant the Jira administrator the Discovery Engine Editor role in the Google Cloud console, do the following:
- In the Google Cloud console, go to the Gemini Enterprisepage.
-
Navigate to IAM.
-
Locate the user account which has administrator access in Jira and click the Editicon .
-
Grant the Discovery Engine Editor role to the administrator .
To grant a user an administrator role in Atlassian, do the following:
-
Sign in to Atlassian using an organization administrator account.
-
Click the menu icon and select your organization. Alternatively, you can go to admin.atlassian.com .
-
On the Adminpage, click the product and select the Manage usersbutton.

Manage users -
Click Groupsunder User management.
-
On the Groupspage:
- Click Create group.
- Enter a name for the group.
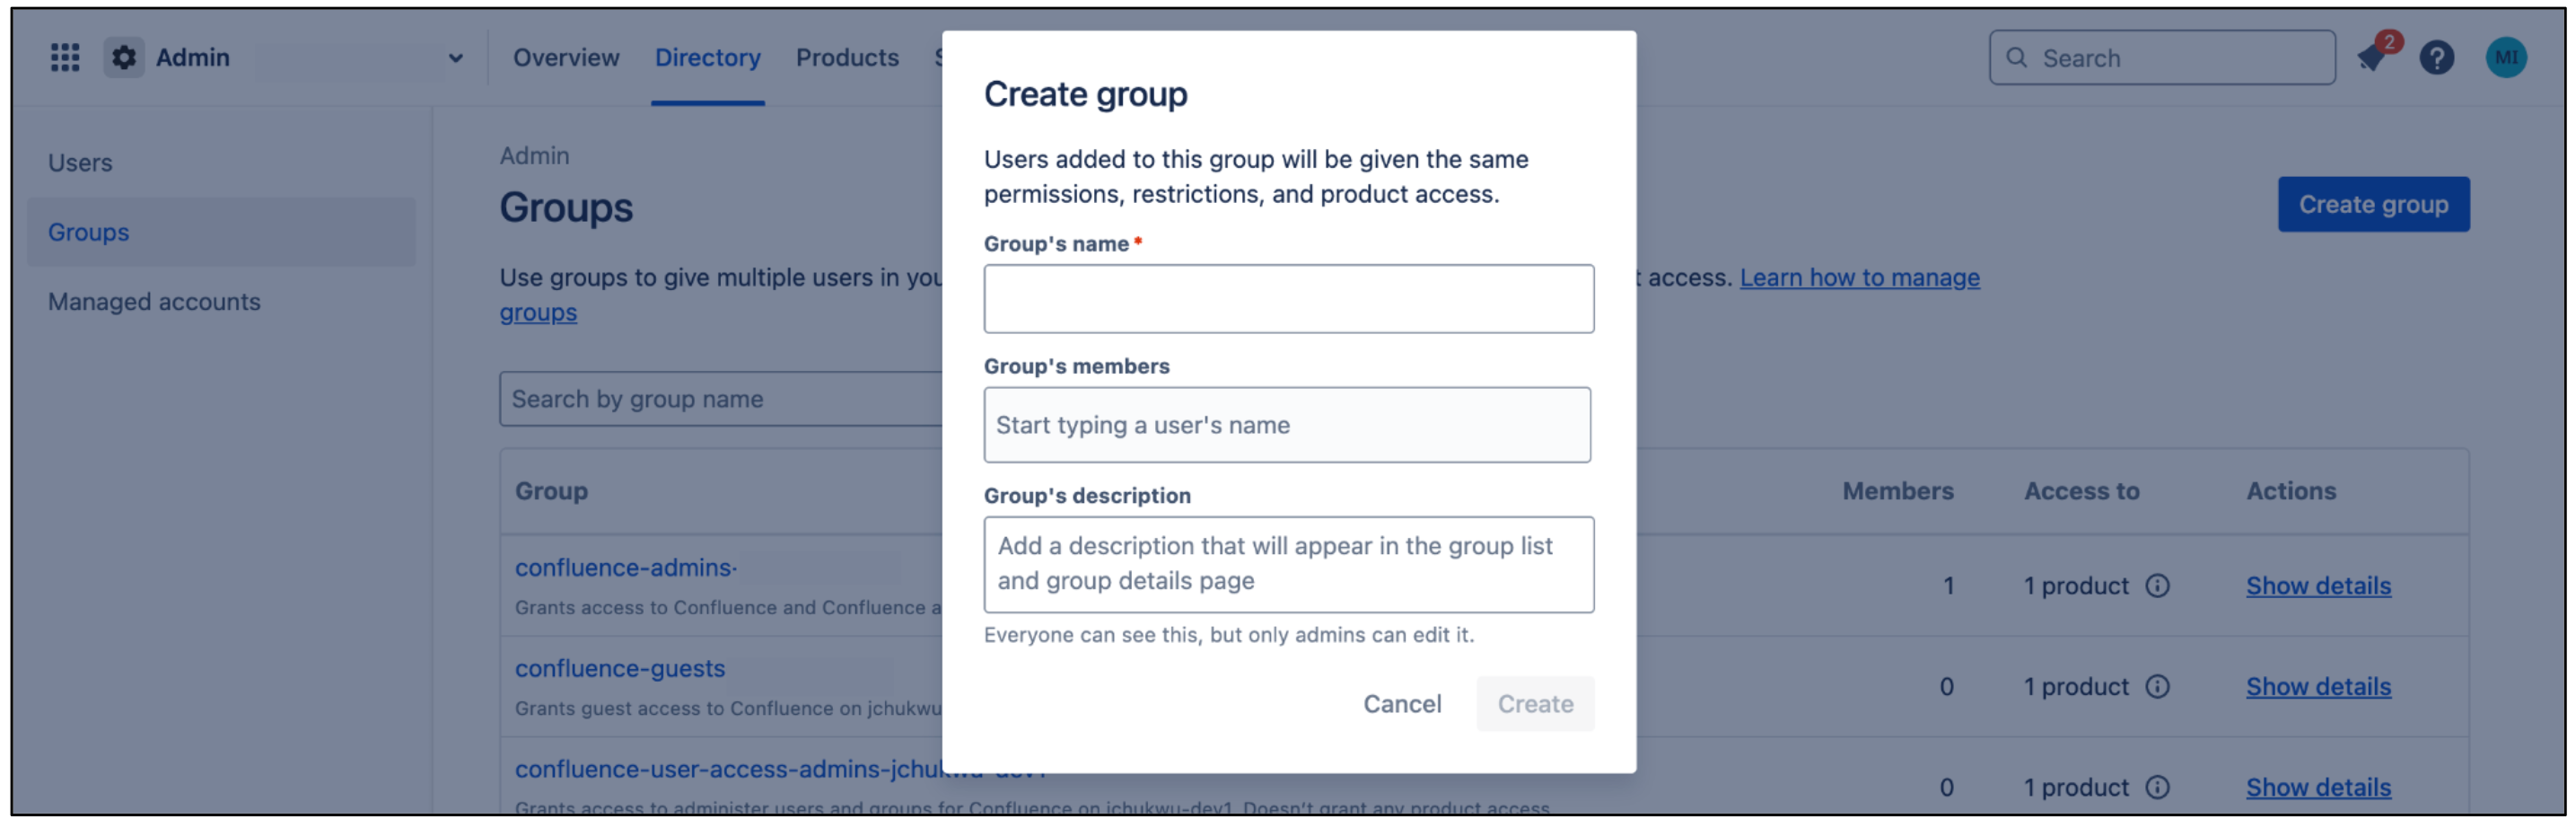
Create group
This group receives permissions required by the connector. Users added to this group inherit these permissions. The connector uses this group to authenticate and fetch documents.
-
On the Group page, click Add product.
-
Select User access adminas the role for Jira.
-
Select Product adminas the role for Jira administration.
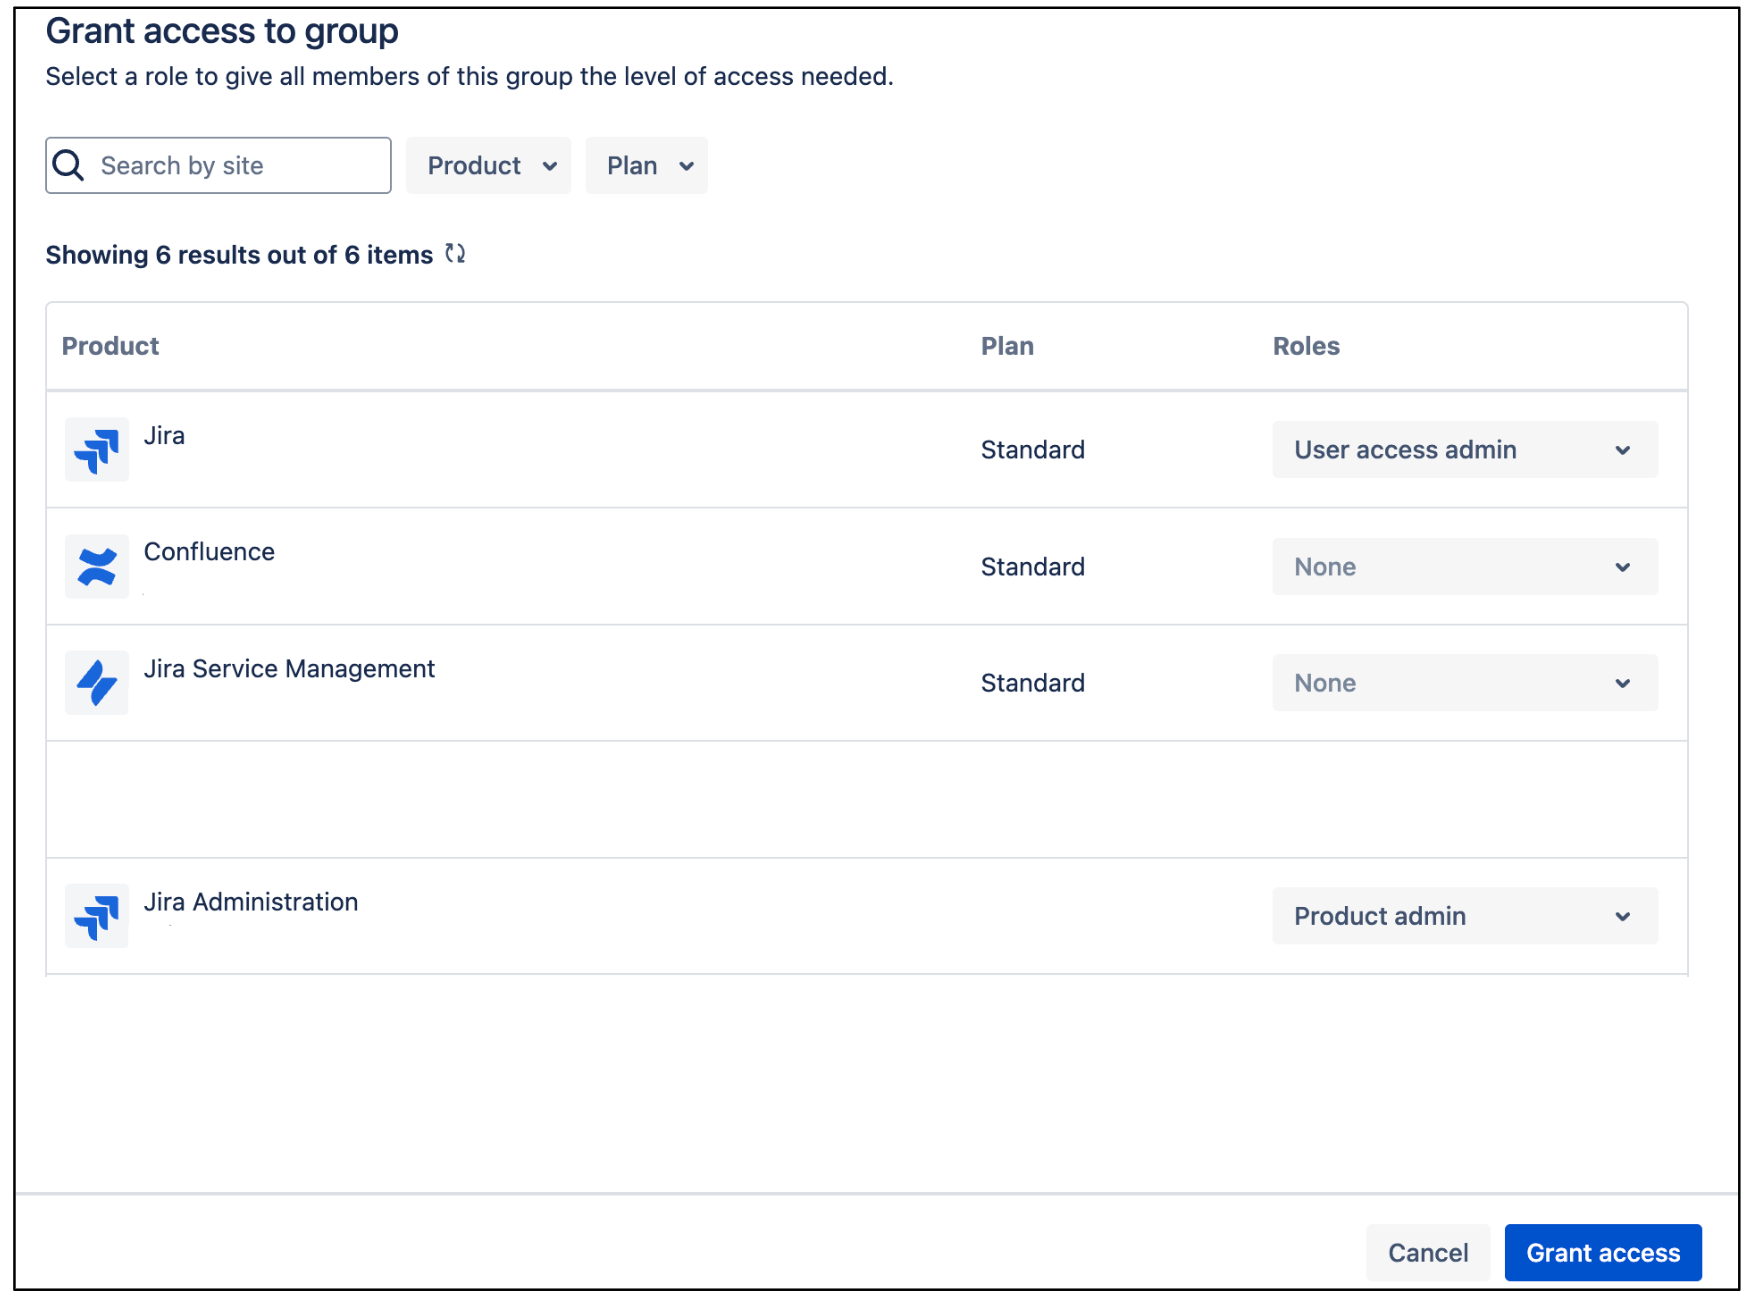
Jira user access administrator -
Click Grant Access.
-
Click Add group membersto add a user account or group members that the connector uses to authenticate and access the required resources.
Add group members
Manage user visibility
To make the user's email visible to anyone in the Atlassian account, do the following:
-
Sign in to the Atlassian Developer Console .
-
Click the profile icon and select Developer console.
-
Click the user profile icon and select Manage account.
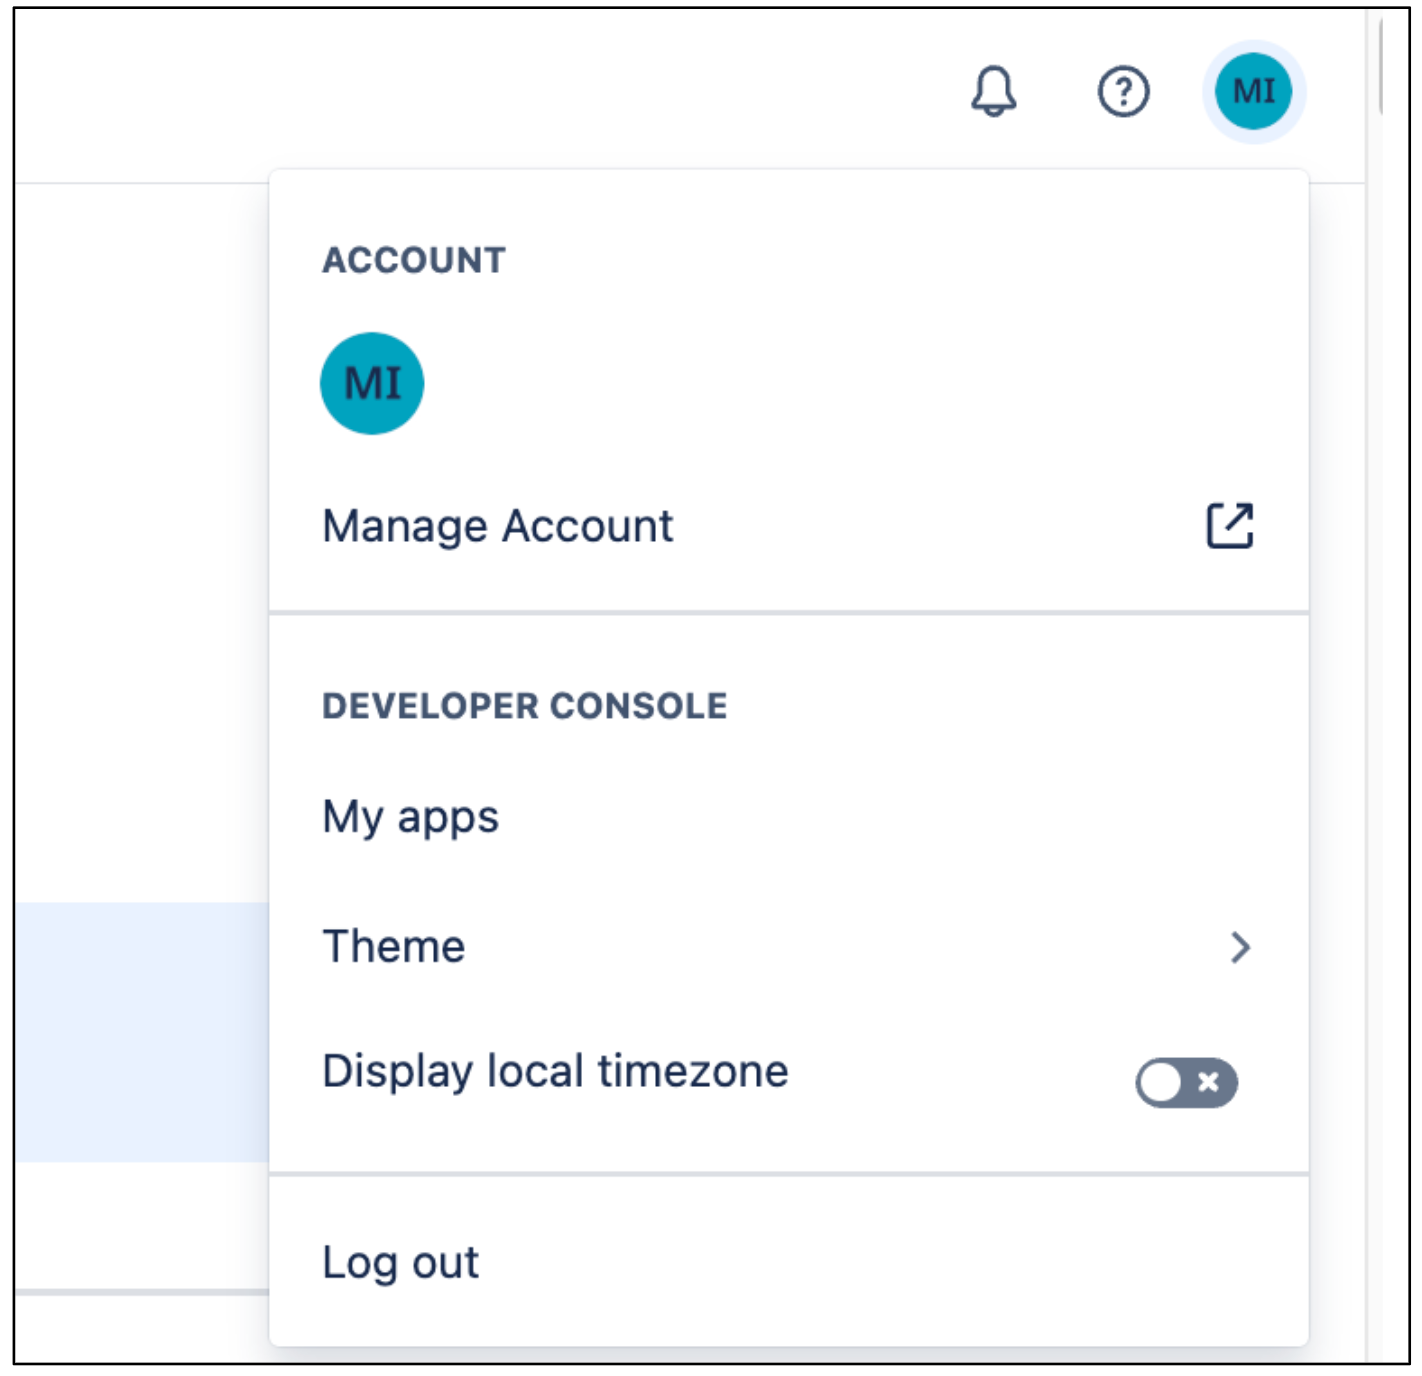
Manage account -
Navigate to the Profile and visibility.
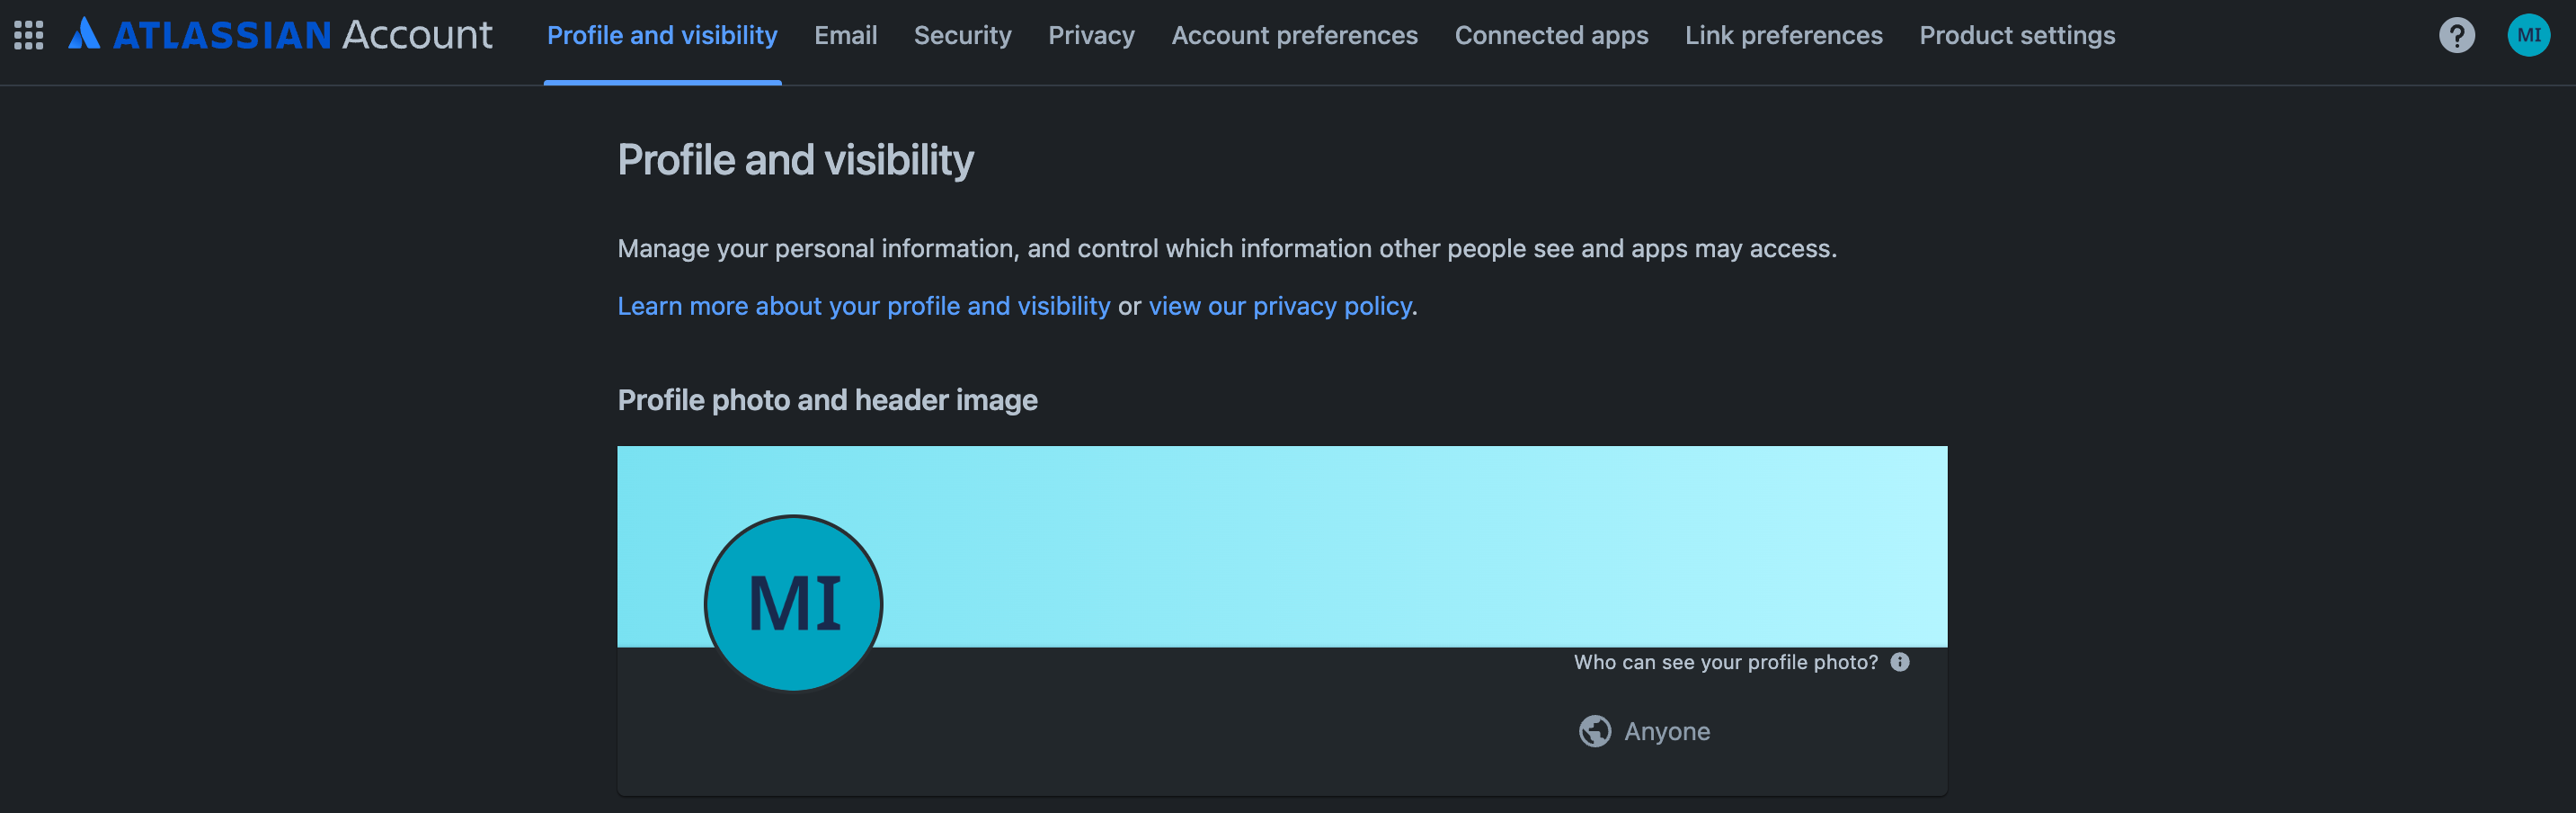
Profile and visibility -
Go to Contactand set the Who can see thisas Anyone.

Contact
To make the user's email visible to anyone in Jira, do the following:
-
Sign in to Atlassian with your user credentials.
-
Select a Jira app.
-
Click Settings> System.
-
Select General Configurationin the left pane.
-
Click Edit Settings.
-
For User email visibility, select Public.

Select email visibility -
Click Update.
Configure minimum application scopes
To perform the defined actions , you need to set up the following permissions for the Jira Cloud connector in the Atlassian platform.
-
On the application page, click Permissions.
-
Go to Jira APIand click Add.
-
Click Configure.
-
Go to the Classic scopestab.
-
Click Edit scopesand select the classic scopes as per your requirement from the following table:
Connection modePermissionPurposeFederated search and actionsread:jira-user,read:jira-workRequired to fetch and display search results and user details in real-time.write:jira-workAllows the assistant to modify work items (e.g., updating issue fields) and manage comments or issues.Federated search onlyread:jira-user,read:jira-workRequired to search for and view issues, projects, and user profiles.Data ingestion and actionsread:jira-workRequired for broad data crawling and indexing of work items.write:jira-workNecessary to perform write actions (creation, updates, comments) on work items within the ingested environment.Data ingestionread:jira-workRequired to crawl and index Jira content for search availability. -
Confirm all the scopes are selected, and click Save.
-
Go to the Granular scopestab.
-
Click Edit scopesand select the granular scopes as per your requirement from the following table:
Connection modePermissionPurposeFederated search and actionswrite:comment:jiraEnables the assistant to post new comments or replies directly from the search interface.write:issue:jiraNecessary to create new issues or perform major edits to existing ones.Data ingestion and actionsread:user:jira,read:group:jira,read:avatar:jiraRequired for syncing user/group metadata and displaying user profiles.read:issue-security-level:jira,read:issue-security-scheme:jiraCritical for access control; ensures the ingested data respects Jira's security boundaries.read:audit-log:jiraUsed to track changes and perform incremental syncs to keep ingested data up to date.write:comment:jiraRequired to add comments to issues using the assistant.write:issue:jiraEnables creating or modifying issues.Data ingestionread:user:jira,read:group:jira,read:avatar:jiraRequired to crawl and index Jira content and user relationships.read:issue-security-level:jira,read:issue-security-scheme:jiraRequired to map permissions so only authorized users can search the ingested data.read:audit-log:jiraNecessary for the sync engine to identify which items have been updated or deleted. -
Confirm all the scopes are selected, and click Save.
Install User Identity Accessor
To install the User Identity Accessor for Jira Cloudapp on your Jira Cloud site, follow these steps:
- Navigate to Atlassian Developer Console .
-
Review the Read Email Addressand App Storage scopepermissions and click Get app.
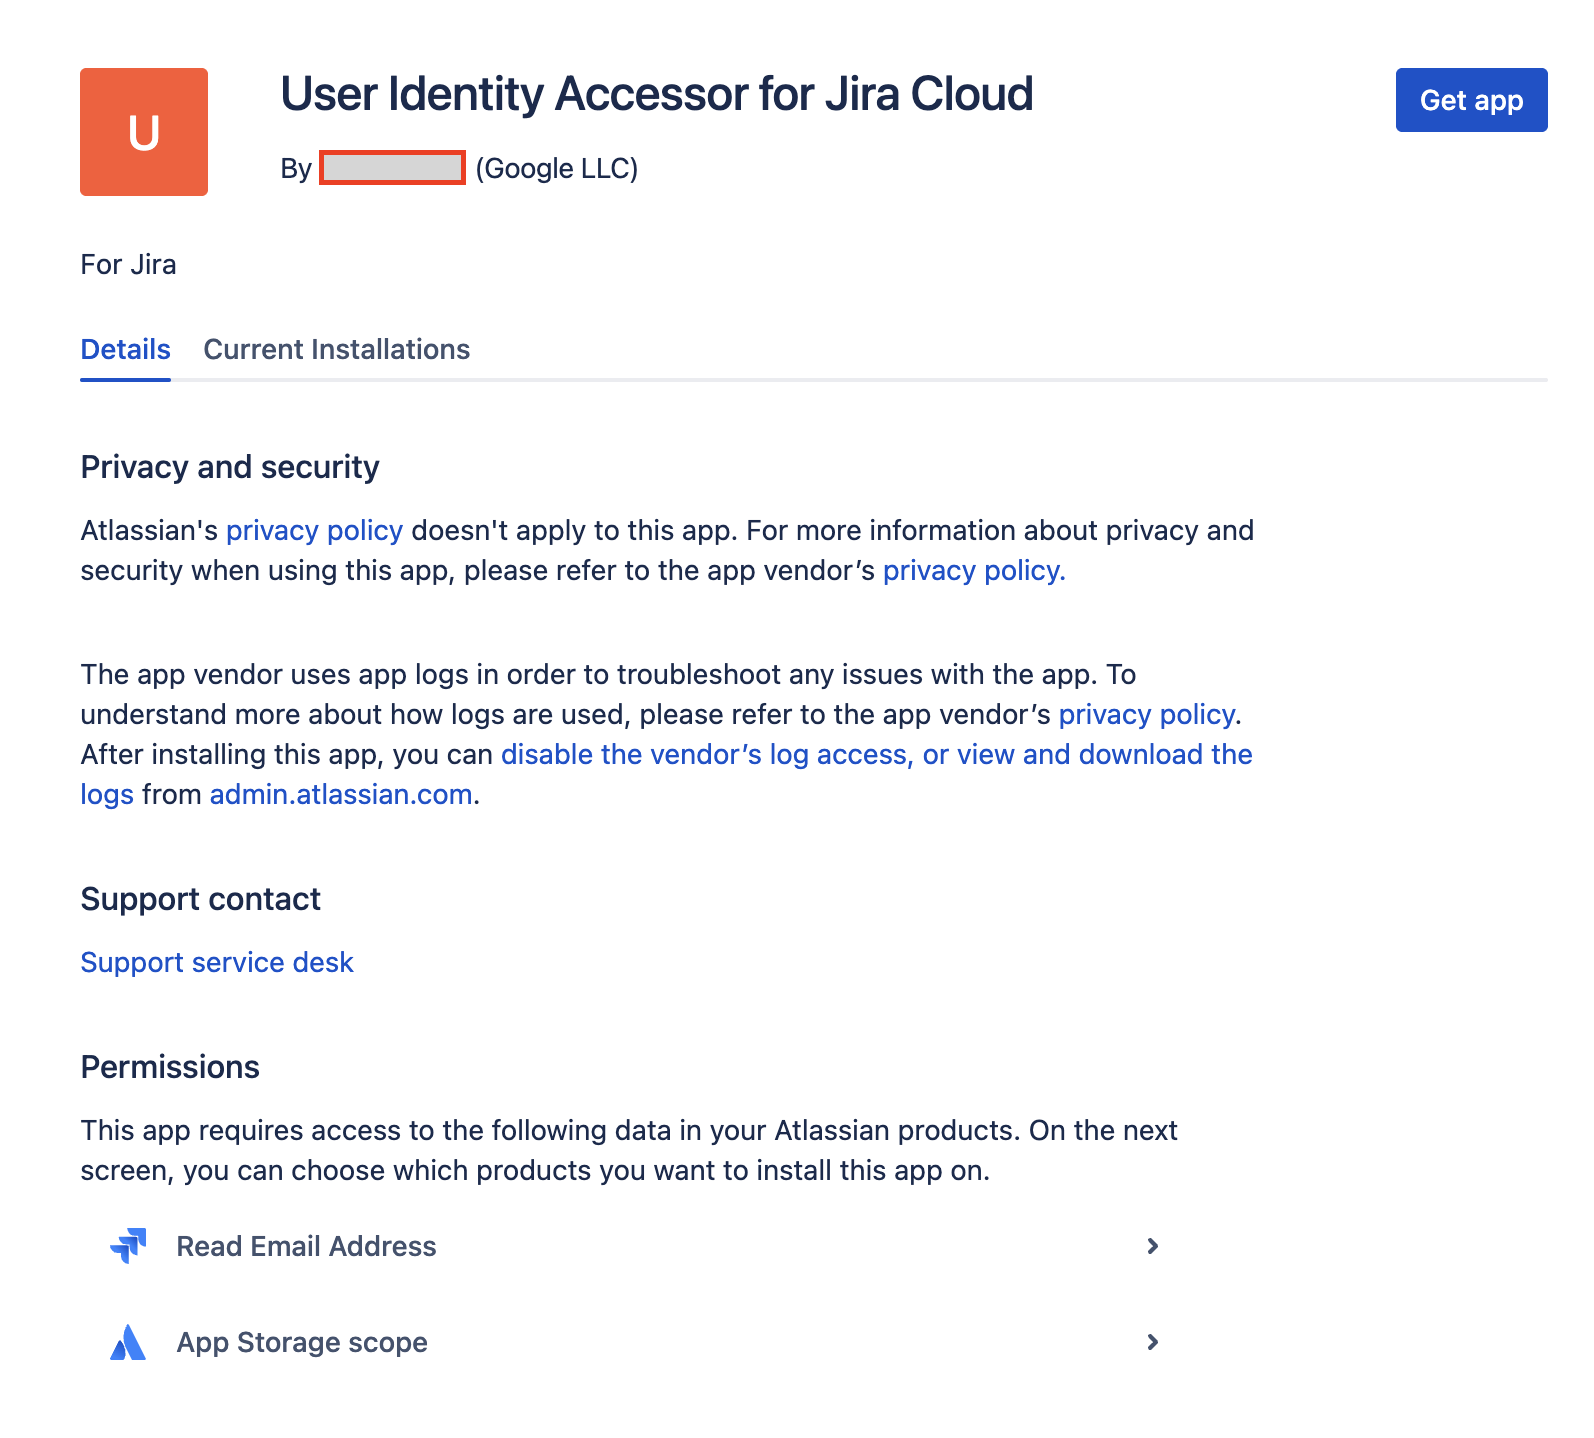
Review permissions and get app -
From the Select a site to install this app onlist, select the Jira site where you want to install the app. This list displays only the sites for which you have administrator access.
-
Click Installto complete the app installation.
Configure User Identity Accessor
After you've installed the User Identity Accessor for Jira Cloudapp, configure an API key that your external system (for example, your Jira Cloud Connector) uses to securely call the app's web trigger to fetch emails.
Access the configuration page
To access the User Identity Accessor for Jira Cloudapp's configuration page, do the following:
- In your Jira Cloud instance, click the Settings⚙️ icon in the navigation menu.
- Select Appsfrom the menu.
- On the Apps administrationpage, locate your app, User Identity Accessor for Jira Cloud, in the Manage appslist.
-
Click Configureor the link associated with your app. The app's dedicated configuration page opens within Jira Cloud.
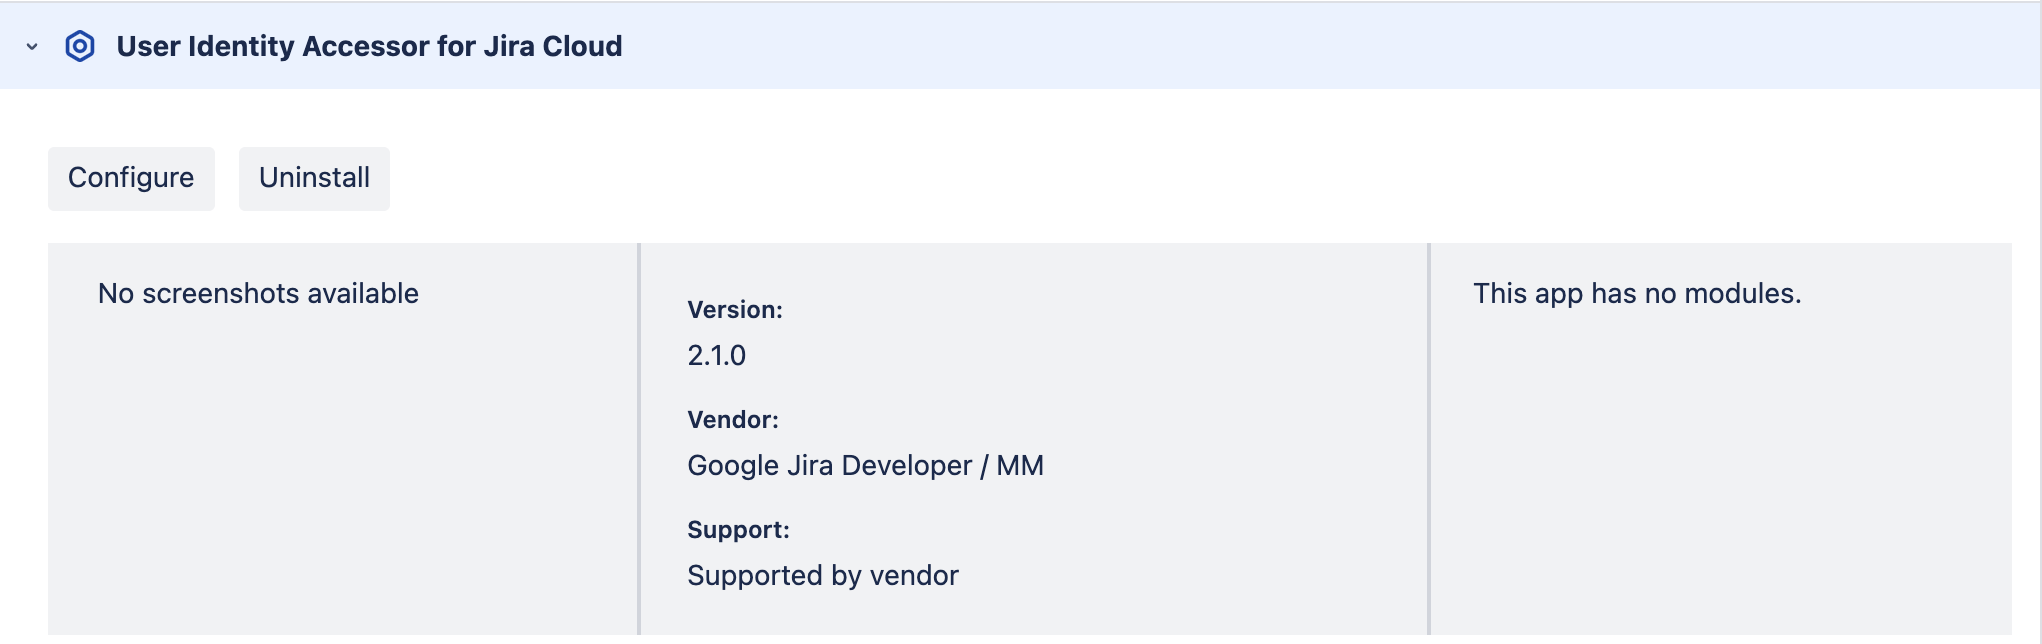
Configure the User Identity Accessor for Jira Cloud app
Set up the API key
To set up the API key on the configuration page, do the following:
-
In the API Key Configurationsection, specify the secret key for authenticating requests to the app's web trigger. You can authenticate requests using either of the following methods:
-
Enter your own key: Type or paste your own strong, unique API key into the API Keyfield. Use a key of at least 20–30 characters with a mix of uppercase letters, lowercase letters, numbers, and symbols.
Enter your own key -
Generate a key: Click the Generate New Keybutton. The system generates and displays a strong, random key in the field.
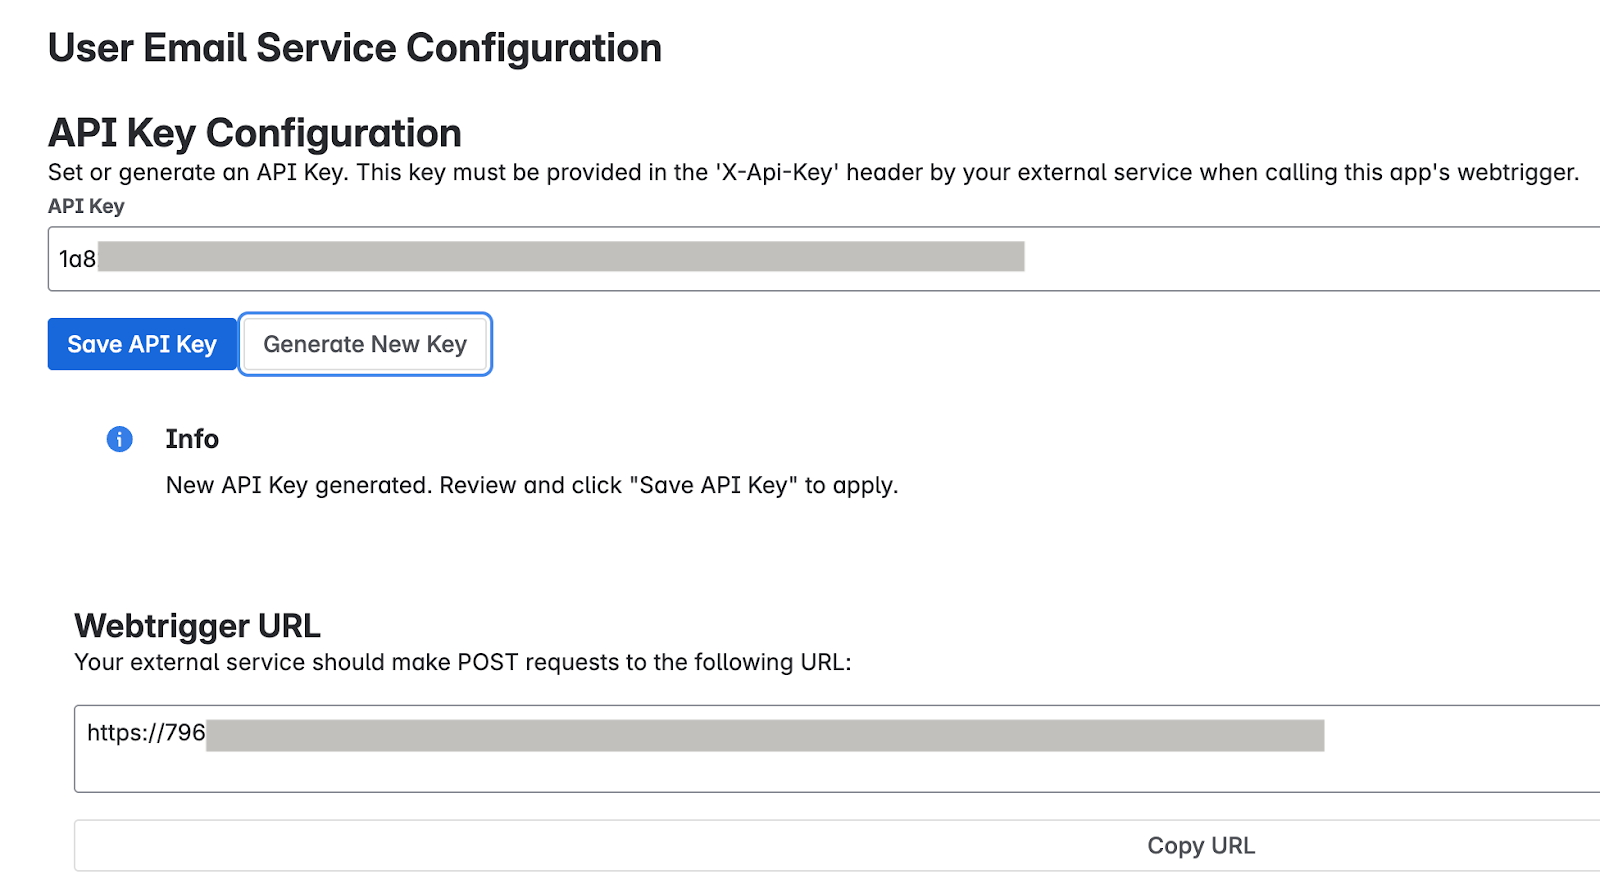
Generate a key Important: Immediately copy the API key displayed in the field. For security reasons, you might be unable to view the full key again after saving or navigating away. If lost, you need to set or generate a new one.
-
-
Click Save API Key. A success message confirms that the key is securely saved.
Test the app configuration
Verify if the User Identity Accessor for Jira Cloudapp is configured correctly by sending a request from your external system and confirming that user email addresses are returned successfully.
Get the web trigger URL
- On the Apps administrationpage, locate the Webtrigger URLsection, which displays the
unique URL specific to your Jira site and this app installation:
- Your external system must call this URL to request user emails.
- URL example:
https:// YOUR_INSTANCE_ID
.hello.atlassian-dev.net/x1/ WEBTRIGGER_ID
, whereYOUR_INSTANCE_IDis your Jira Cloud instance identifier andWEBTRIGGER_IDis the unique identifier for the web trigger endpoint generated for your app.
- Click the Copy URLbutton or copy the entire URL.
Configure your external system
-
Configure your external system that needs to fetch Jira user emails with the API key and web trigger URL obtained in the previous steps.
-
Endpoint URL: The web trigger URL you copied.
-
HTTP Method:
POST -
Required Headers:
- Content-Type:
application/json -
X-Api-Key:
YOUR_API_KEYReplace
YOUR_API_KEYwith the API key you set or generated in the Set up the API key section.
- Content-Type:
Example curl command
This example demonstrates calling the User Identity Accessor for Jira Cloudweb trigger, which accepts an array of account IDs and returns the email addresses.
 curl
--location
--request
POST
 'https:// YOUR_INSTANCE_ID
.hello.atlassian-dev.net/x1/ ENDPOINT_PATH
'

 \
--header
 'X-Api-Key: YOUR-API-KEY
'

 \
--header
 'Content-Type: application/json'

 \
--data-raw
 '{
 "accountIds": [
 " ACCOUNT_ID_1
",
 " ACCOUNT_ID_2
"
 ]
 }'
Replace:
-
YOUR_INSTANCE_IDwith your Jira Cloud instance ID -
ENDPOINT_PATHwith the API endpoint path -
YOUR_API_KEYwith the API key you set or generated in the Set up the API key section -
ACCOUNT_IDwith Atlassian account IDs that you want to target
Expected response
  [{
 "accountId"
 :
 " ACCOUNT_ID_1
"
 ,
 "emailAddress"
 :
 " EMAIL_ADDRESS_1
"
 },

 {
 "accountId"
 :
 " ACCOUNT_ID_2
"
 ,
 "emailAddress"
 :
 " EMAIL_ADDRESS_2
"
 }]
Replace:
-
ACCOUNT_ID_Xwith actual Atlassian account IDs -
USER_EMAIL_Xwith user email addresses returned from your API call
Implement security best practices
To confirm the security of your API key, follow these recommendations:
- Store the API key securely within your Jira Cloud Connector's configuration.
- Verify that all communication with the webhook URL occurs over HTTPS. This is the default for User Identity Accessor for Jira Cloudweb triggers.
Support for User Identity Accessor for Jira Cloud
Support offerings are available from Google for the User Identity Accessor for Jira Cloudapp that can include maintenance and regular updates to keep the app up-to-date. If you encounter any issues or have questions specific to the app functionality, contact Google Cloud Support . For more information, see Getting Cloud Customer Care .