

This page describes how to insert objects into an image, a process also known as inpainting . Imagen on Vertex AI lets you specify a mask area to insert objects into an image. You can bring your own mask, or you can let Imagen generate a mask for you.
Content insertion example
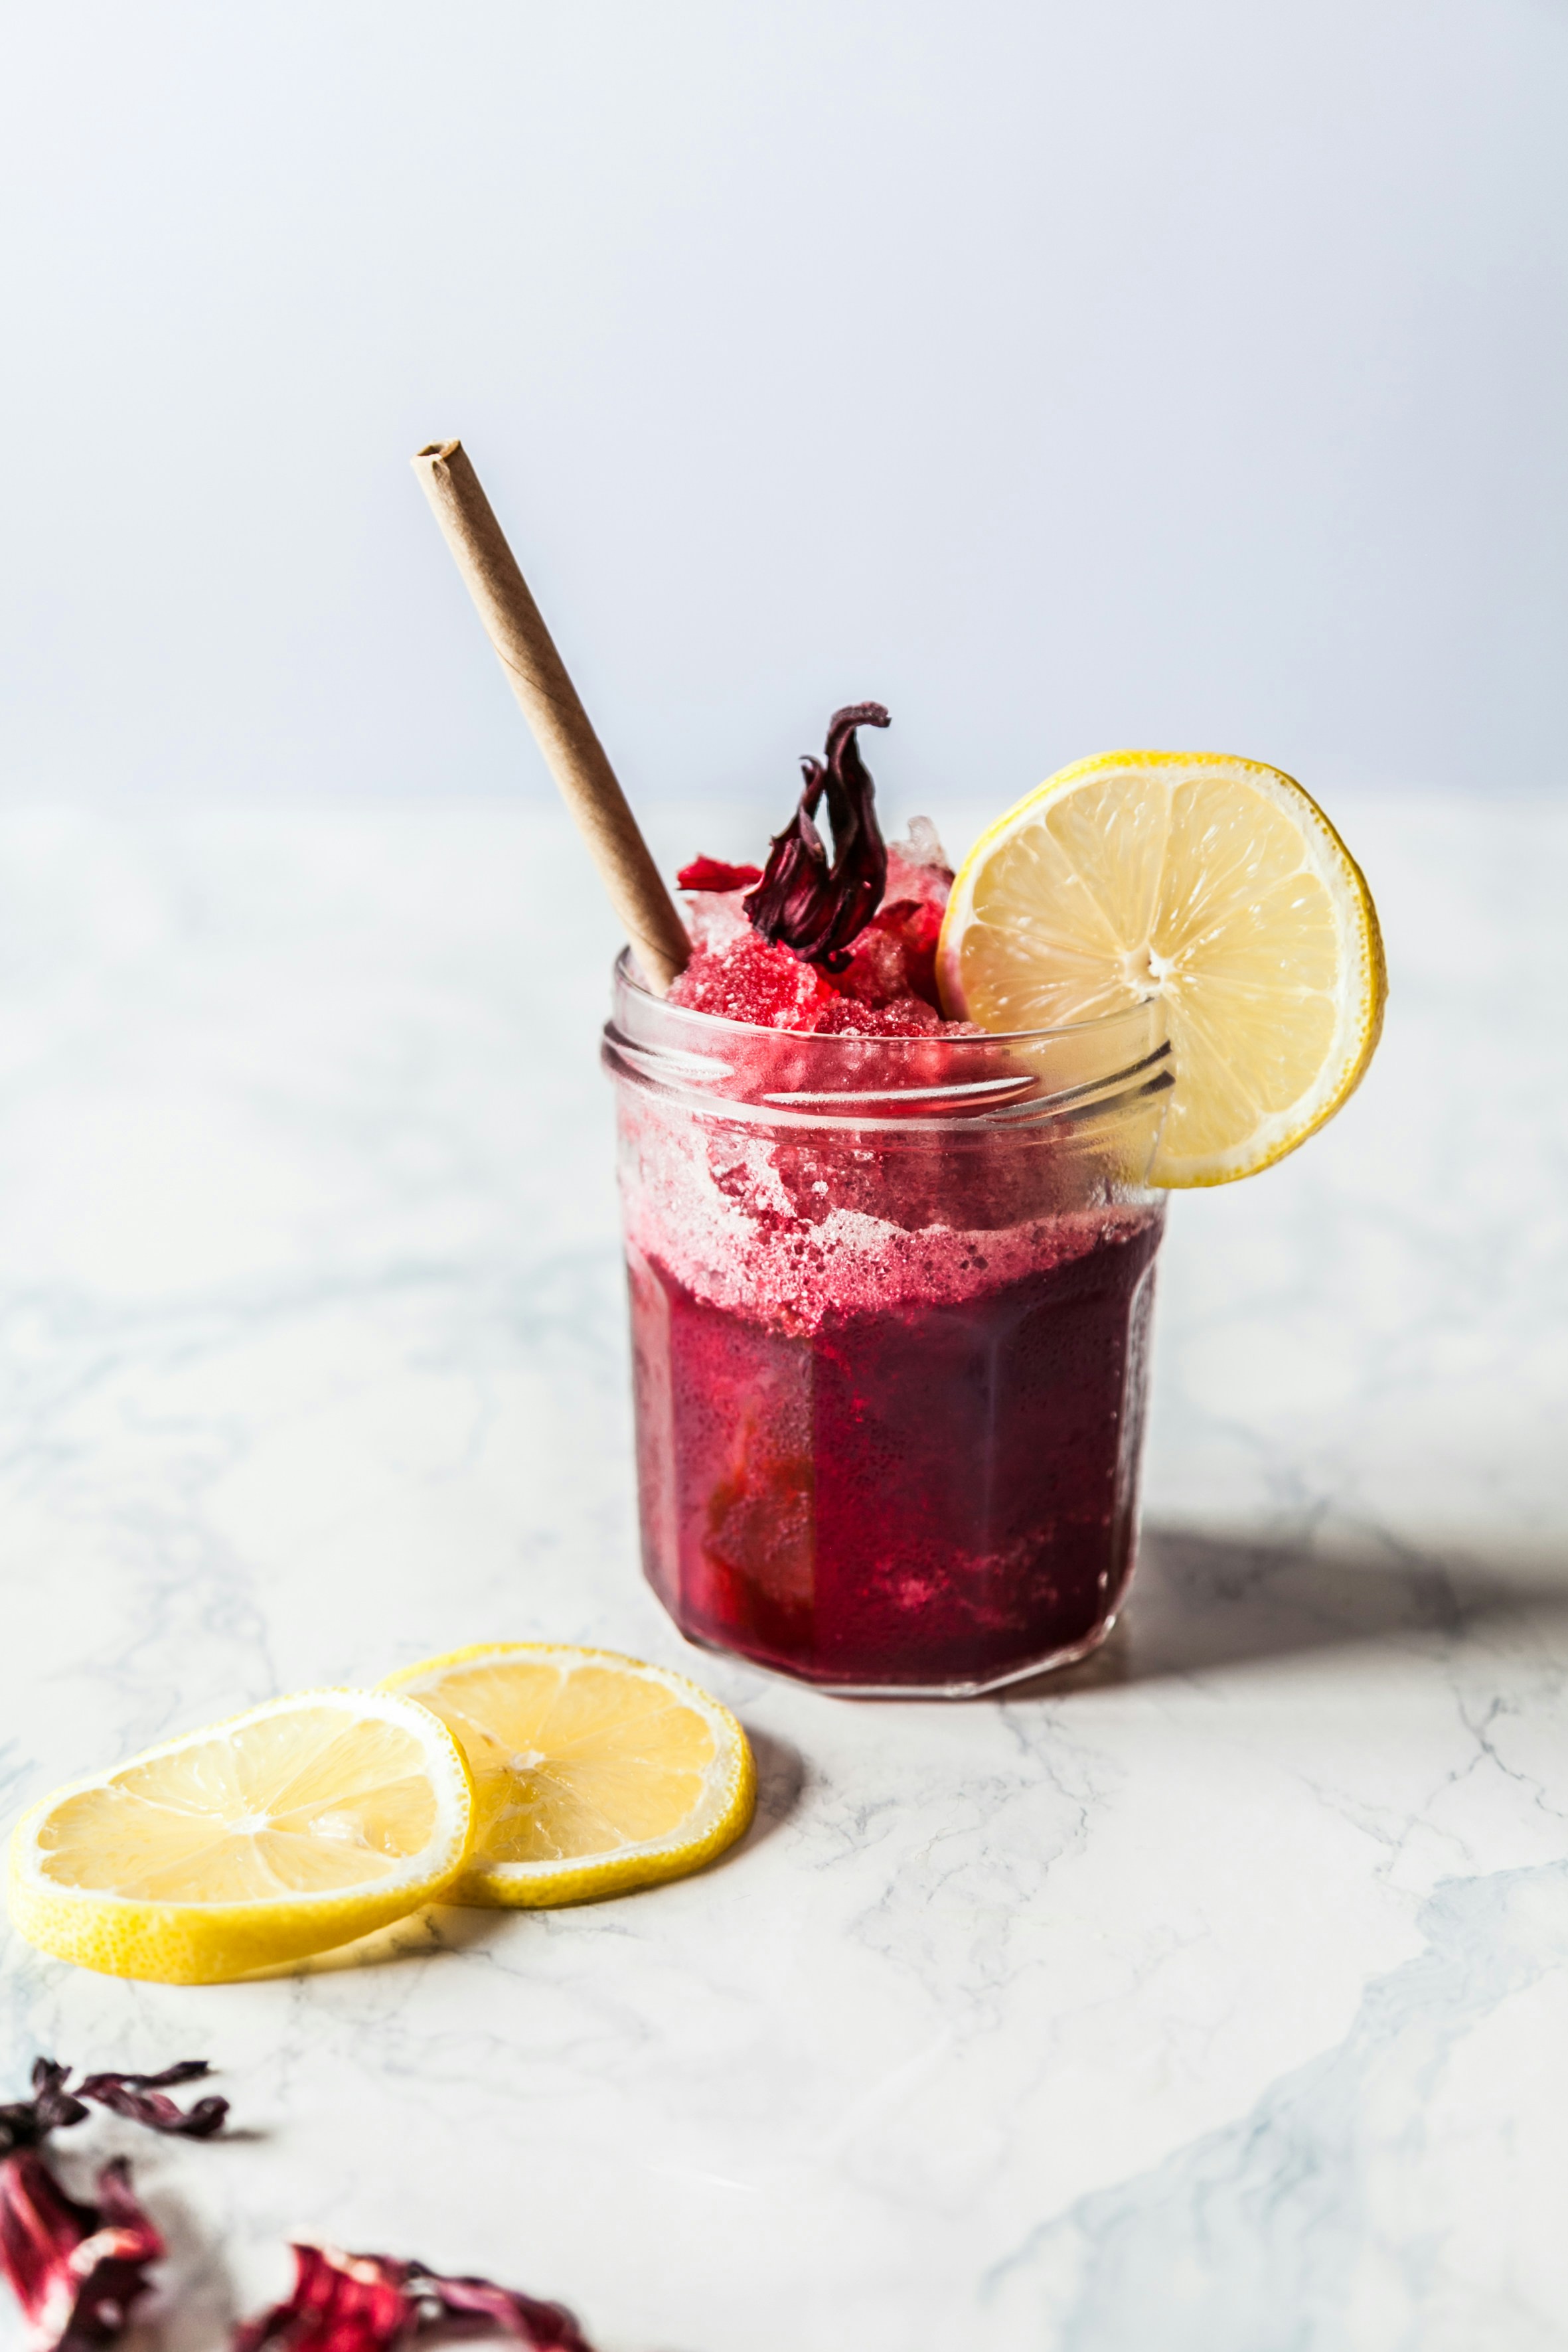
With inpainting, you can use a base image, an image mask, and a text prompt to add content to an existing image.
Inputs
| Base image * to edit | Mask area specified using tools in the Google Cloud console | Text prompt |
|---|---|---|
 |
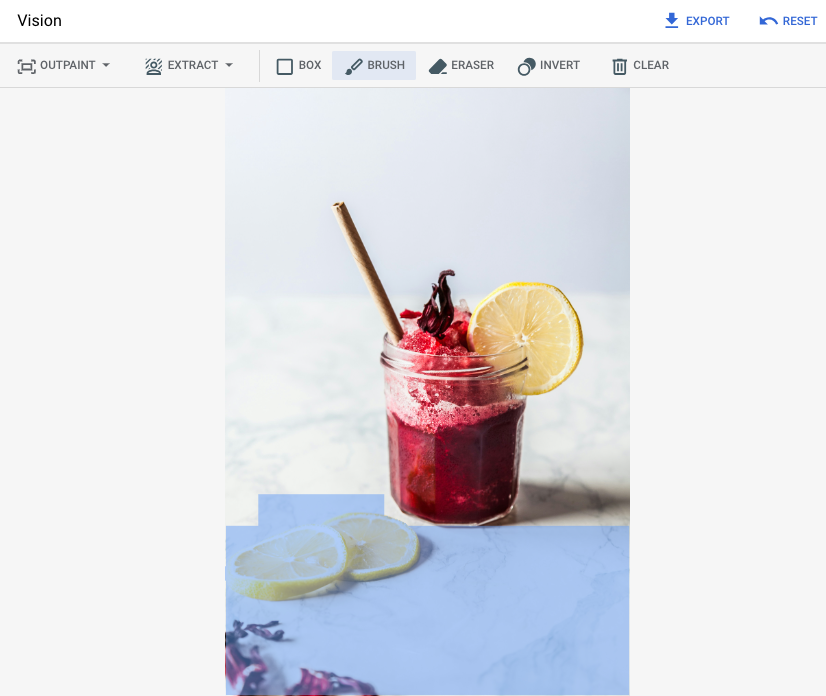 |
strawberries |
* Image credit: Alex Lvrs on Unsplash .
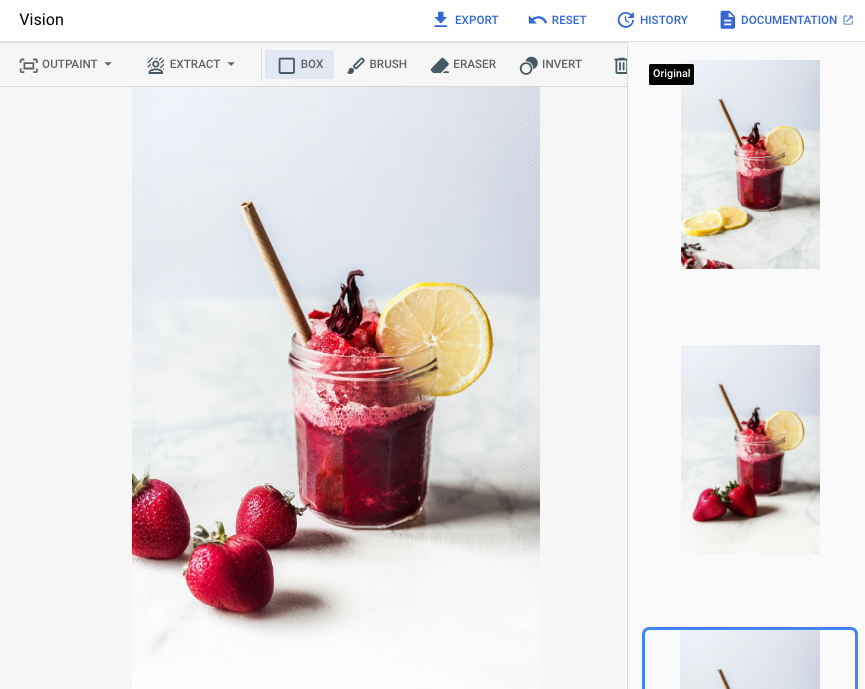
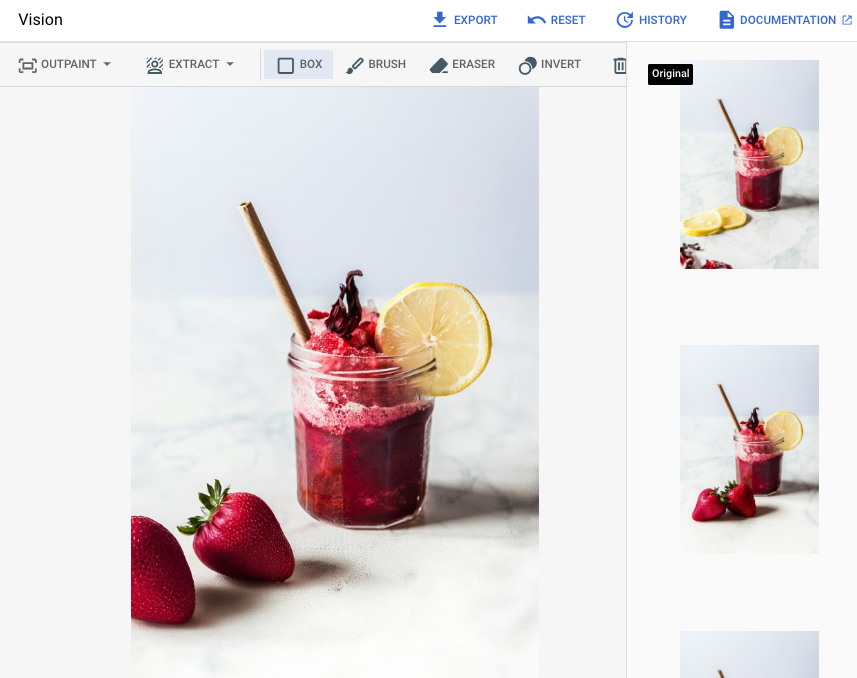
Output after specifying a mask area in the Google Cloud console
 |
 |
 |
View Imagen for Editing and Customization model card
Before you begin
- Sign in to your Google Cloud account. If you're new to Google Cloud, create an account to evaluate how our products perform in real-world scenarios. New customers also get $300 in free credits to run, test, and deploy workloads.
-
In the Google Cloud console, on the project selector page, select or create a Google Cloud project.
Roles required to select or create a project
- Select a project : Selecting a project doesn't require a specific IAM role—you can select any project that you've been granted a role on.
- Create a project
: To create a project, you need the Project Creator role
(
roles/resourcemanager.projectCreator), which contains theresourcemanager.projects.createpermission. Learn how to grant roles .
-
Verify that billing is enabled for your Google Cloud project .
-
Enable the Vertex AI API.
Roles required to enable APIs
To enable APIs, you need the Service Usage Admin IAM role (
roles/serviceusage.serviceUsageAdmin), which contains theserviceusage.services.enablepermission. Learn how to grant roles . -
Set up authentication for your environment.
Select the tab for how you plan to use the samples on this page:
Console
When you use the Google Cloud console to access Google Cloud services and APIs, you don't need to set up authentication.
Python
To use the Python samples on this page in a local development environment, install and initialize the gcloud CLI, and then set up Application Default Credentials with your user credentials.
Install the Google Cloud CLI.
If you're using an external identity provider (IdP), you must first sign in to the gcloud CLI with your federated identity .
If you're using a local shell, then create local authentication credentials for your user account:
gcloud
auth
application-default
login
You don't need to do this if you're using Cloud Shell.
If an authentication error is returned, and you are using an external identity provider (IdP), confirm that you have signed in to the gcloud CLI with your federated identity .
For more information, see Set up ADC for a local development environment in the Google Cloud authentication documentation.
REST
To use the REST API samples on this page in a local development environment, you use the credentials you provide to the gcloud CLI.
Install the Google Cloud CLI.
If you're using an external identity provider (IdP), you must first sign in to the gcloud CLI with your federated identity .
For more information, see Authenticate for using REST in the Google Cloud authentication documentation.
Insert with a defined mask area
Use the following samples to send an inpainting request using the Imagen 3 model.
Console
-
In the Google Cloud console, go to the Vertex AI > Vertex AI Studio page.
-
Click Generate media .
-
Click Image .
-
From the Tasklist, select Inpaint-add.
-
From the Modellist, select the Imagen model to use.
-
In Input imageclick Addand select the image that you are editing to upload.
-
In the Promptbox, enter a prompt that describes how to edit the image.
-
Do one of the following to specify a mask:
- Upload your own mask:
- Create a mask on your computer.
- Click upload Import maskand select a mask to upload.
- Define your mask: in the editing toolbar, use the mask tools ( box, brush, or masked_transitions inverttool) to specify the area or areas to add content to.
- Upload your own mask:
-
Click Run.
Python
Install
pip install --upgrade google-genai
To learn more, see the SDK reference documentation .
Set environment variables to use the Gen AI SDK with Vertex AI:
 # Replace the `GOOGLE_CLOUD_PROJECT` and `GOOGLE_CLOUD_LOCATION` values
 # with appropriate values for your project.
 export

 GOOGLE_CLOUD_PROJECT
 =
 GOOGLE_CLOUD_PROJECT
 export

 GOOGLE_CLOUD_LOCATION
 =
 us-central1
 export

 GOOGLE_GENAI_USE_VERTEXAI
 =
True
REST
Before using any of the request data, make the following replacements:
-
REGION: The region that your project is located in. For more information about supported regions, see Generative AI on Vertex AI locations . -
PROJECT_ID: Your Google Cloud project ID. -
TEXT_PROMPT: Optional. A text prompt to guide the images that the model generates. For best results, use a description of the masked area and avoid single-word prompts. For example, use "a cute corgi" instead of "corgi". -
B64_BASE_IMAGE: A base64-encoded image of the image being edited that is 10MB or less in size. For more information about base64-encoding, see Base64 encode and decode files . -
B64_MASK_IMAGE: A base64-encoded black and white mask image that is 10MB or less in size. -
MASK_DILATION: Optional. A float value between 0 and 1, inclusive, that represents the percentage of the image width to grow the mask by. Usingdilationhelps compensate for imprecise masks. We recommend a value of0.01. -
EDIT_STEPS: Optional. An integer that represents the number of sampling steps. A higher value offers better image quality, a lower value offers better latency.We recommend that you try
35steps to start. If the quality doesn't meet your requirements, then we recomment increasing the value towards an upper limit of75. -
SAMPLE_COUNT: Optional. An integer that describes the number of images to generate. The accepted range of values is1-4. The default value is4.
HTTP method and URL:
POST https:// REGION
-aiplatform.googleapis.com/v1/projects/ PROJECT_ID
/locations/ REGION
/publishers/google/models/imagen-3.0-capability-001:predict
Request JSON body:
{
  "instances": [
    {
      "prompt": " TEXT_PROMPT
",
      "referenceImages": [
        {
          "referenceType": "REFERENCE_TYPE_RAW",
          "referenceId": 1,
          "referenceImage": {
            "bytesBase64Encoded": " B64_BASE_IMAGE
"
          }
        },
        {
          "referenceType": "REFERENCE_TYPE_MASK",
          "referenceImage": {
            "bytesBase64Encoded": " B64_MASK_IMAGE
"
          },
          "maskImageConfig": {
            "maskMode": "MASK_MODE_USER_PROVIDED",
            "dilation": MASK_DILATION
}
        }
      ]
    }
  ],
  "parameters": {
    "editConfig": {
      "baseSteps": EDIT_STEPS
}, "editMode": "EDIT_MODE_INPAINT_INSERTION","sampleCount": SAMPLE_COUNT
}
}
To send your request, choose one of these options:
curl
Save the request body in a file named request.json
,
and execute the following command:
curl -X POST \
-H "Authorization: Bearer $(gcloud auth print-access-token)" \
-H "Content-Type: application/json; charset=utf-8" \
-d @request.json \
"https:// REGION
-aiplatform.googleapis.com/v1/projects/ PROJECT_ID
/locations/ REGION
/publishers/google/models/imagen-3.0-capability-001:predict"
PowerShell
Save the request body in a file named request.json
,
and execute the following command:
$cred = gcloud auth print-access-token
$headers = @{ "Authorization" = "Bearer $cred" }

Invoke-WebRequest `
-Method POST `
-Headers $headers `
-ContentType: "application/json; charset=utf-8" `
-InFile request.json `
-Uri "https:// REGION
-aiplatform.googleapis.com/v1/projects/ PROJECT_ID
/locations/ REGION
/publishers/google/models/imagen-3.0-capability-001:predict" | Select-Object -Expand Content
"sampleCount": 2
. The response returns two prediction objects, with
the generated image bytes base64-encoded. { "predictions": [ { "bytesBase64Encoded": " BASE64_IMG_BYTES ", "mimeType": "image/png" }, { "mimeType": "image/png", "bytesBase64Encoded": " BASE64_IMG_BYTES " } ] }
Insert with automatic mask detection
Use the following samples to specify inpainting to insert content. In these samples you specify a base image and a text prompt. Imagen automatically detects and creates a mask area to modify the base image.
Console
-
In the Google Cloud console, go to the Vertex AI > Vertex AI Studio page.
-
Click Generate media .
-
Click Image .
-
From the Tasklist, select Inpaint-add.
-
From the Modellist, select the Imagen model to use.
-
In Input imageclick Addand select the image that you are editing to upload.
-
In the Promptbox, enter a prompt that describes how to edit the image.
-
In the editing toolbar, click background_replace Extract mask.
-
Select one of the mask extraction options:
-
Background elements: detects the background elements and creates a mask around them.
-
Foreground elements: detects the foreground objects and creates a mask around them.
-
background_replace People: detects people and creates a mask around them.
-
-
Click Run.
Python
Install
pip install --upgrade google-genai
To learn more, see the SDK reference documentation .
Set environment variables to use the Gen AI SDK with Vertex AI:
 # Replace the `GOOGLE_CLOUD_PROJECT` and `GOOGLE_CLOUD_LOCATION` values
 # with appropriate values for your project.
 export

 GOOGLE_CLOUD_PROJECT
 =
 GOOGLE_CLOUD_PROJECT
 export

 GOOGLE_CLOUD_LOCATION
 =
 us-central1
 export

 GOOGLE_GENAI_USE_VERTEXAI
 =
True
REST
Before using any of the request data, make the following replacements:
- PROJECT_ID : Your Google Cloud project ID .
- LOCATION
: Your project's region. For example,
us-central1,europe-west2, orasia-northeast3. For a list of available regions, see Generative AI on Vertex AI locations . - TEXT_PROMPT : The text prompt guides what images the model generates. When you use a prompt for inpainting insertion, use a description of the masked area for best results. Avoid single-word prompts. For example, use " a cute corgi " instead of " corgi ".
- B64_BASE_IMAGE : The base image to edit or upscale. The image must be specified as a base64-encoded byte string. Size limit: 10 MB.
- MASK_MODE
- A string that sets the type of automatic mask creation the model uses.
Available values:
-
MASK_MODE_BACKGROUND: Automatically generates a mask using background segmentation. -
MASK_MODE_FOREGROUND: Automatically generates a mask using foreground segmentation. -
MASK_MODE_SEMANTIC: Automatically generates a mask using semantic segmentation based on the segmentation classes you specify in themaskImageConfig.maskClassesarray. For example:"maskImageConfig": { "maskMode": "MASK_MODE_SEMANTIC", "maskClasses": [175, 176], // bicycle, car"dilation": 0.01 }
-
- MASK_DILATION
- float. The percentage of image width to dilate this mask by. A
value of
0.01is recommended to compensate for imperfect input masks. - EDIT_STEPS
- integer. The number of sampling steps for the base model. For
inpainting insertion, start at
35steps. Increase steps to upper limit of75if the quality doesn't meet your requirements. Increasing steps also increases request latency. - EDIT_IMAGE_COUNT - The number of edited images. Accepted integer values: 1-4. Default value: 4.
HTTP method and URL:
POST https:// LOCATION
-aiplatform.googleapis.com/v1/projects/ PROJECT_ID
/locations/ LOCATION
/publishers/google/models/imagen-3.0-capability-001:predict
Request JSON body:
{
  "instances": [
    {
      "prompt": " TEXT_PROMPT
",
      "referenceImages": [
        {
          "referenceType": "REFERENCE_TYPE_RAW",
          "referenceId": 1,
          "referenceImage": {
            "bytesBase64Encoded": " B64_BASE_IMAGE
"
          }
        },
        {
          "referenceType": "REFERENCE_TYPE_MASK",
          "referenceId": 2,
          "maskImageConfig": { "maskMode": " MASK_MODE
","dilation": MASK_DILATION
}
        }
      ]
    }
  ],
  "parameters": {
    "editConfig": {
      "baseSteps": EDIT_STEPS
}, "editMode": "EDIT_MODE_INPAINT_INSERTION","sampleCount": EDIT_IMAGE_COUNT
}
}
To send your request, choose one of these options:
curl
Save the request body in a file named request.json
,
and execute the following command:
curl -X POST \
-H "Authorization: Bearer $(gcloud auth print-access-token)" \
-H "Content-Type: application/json; charset=utf-8" \
-d @request.json \
"https:// LOCATION
-aiplatform.googleapis.com/v1/projects/ PROJECT_ID
/locations/ LOCATION
/publishers/google/models/imagen-3.0-capability-001:predict"
PowerShell
Save the request body in a file named request.json
,
and execute the following command:
$cred = gcloud auth print-access-token
$headers = @{ "Authorization" = "Bearer $cred" }

Invoke-WebRequest `
-Method POST `
-Headers $headers `
-ContentType: "application/json; charset=utf-8" `
-InFile request.json `
-Uri "https:// LOCATION
-aiplatform.googleapis.com/v1/projects/ PROJECT_ID
/locations/ LOCATION
/publishers/google/models/imagen-3.0-capability-001:predict" | Select-Object -Expand Content
"sampleCount": 2
. The response returns two prediction objects, with
the generated image bytes base64-encoded. { "predictions": [ { "bytesBase64Encoded": " BASE64_IMG_BYTES ", "mimeType": "image/png" }, { "mimeType": "image/png", "bytesBase64Encoded": " BASE64_IMG_BYTES " } ] }
Limitations
The following sections explain limitations of Imagen's remove objects feature.
Modified pixels
The model generates pixels at its own resolution (for example, 1024x1024), which might differ from the input image's resolution. This means the generated image might have small changes that weren't in the original image.
To perfectly preserve the image, we recommend blending the generated image with the input image using the mask. Typically, if the input image resolution is 2K or higher, blending the generated image and input image is required.
Insert limitation
While the inserted object usually matches the style of the base image, some keywords might produce cartoon-like results instead of a photorealistic output.
For example, prompting for a "yellow giraffe" might result in a cartoonish image because giraffes are naturally brown and tan. Generating photorealistic images with unnatural colors can be difficult.
What's next
Read articles about Imagen and other Generative AI on Vertex AI products: