

This page describes how to use outpainting to expand the content of an image to a larger area or an area with different dimensions.
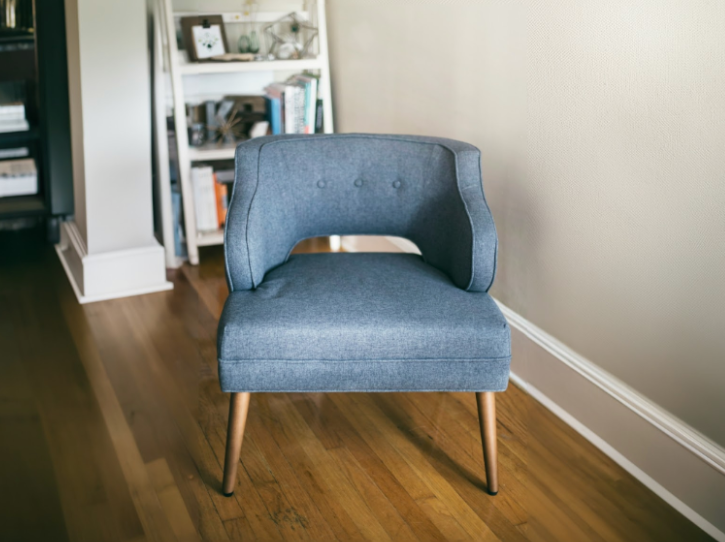
Outpainting example
Outpainting is a mask-based editing method that expands the content of a base image to fit a larger or differently sized mask canvas.
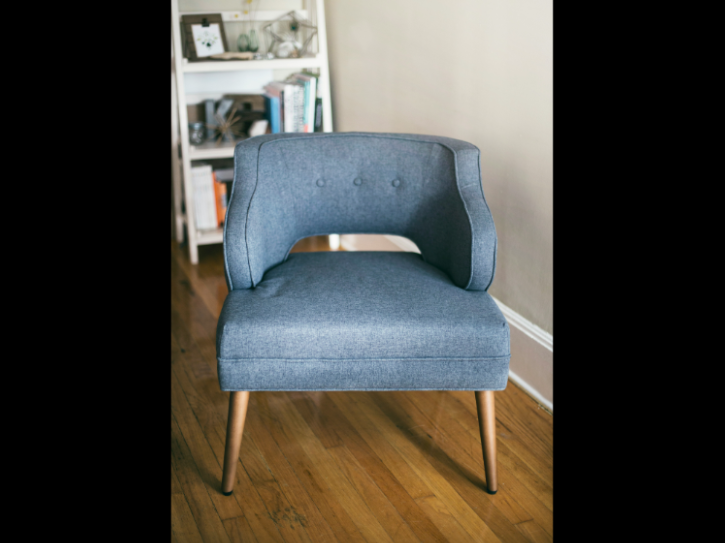 Image source: Kari Shea on Unsplash . |
 |
 |
View Imagen for Editing and Customization model card
Before you begin
- Sign in to your Google Cloud account. If you're new to Google Cloud, create an account to evaluate how our products perform in real-world scenarios. New customers also get $300 in free credits to run, test, and deploy workloads.
-
In the Google Cloud console, on the project selector page, select or create a Google Cloud project.
Roles required to select or create a project
- Select a project : Selecting a project doesn't require a specific IAM role—you can select any project that you've been granted a role on.
- Create a project
: To create a project, you need the Project Creator role
(
roles/resourcemanager.projectCreator), which contains theresourcemanager.projects.createpermission. Learn how to grant roles .
-
Verify that billing is enabled for your Google Cloud project .
-
Enable the Vertex AI API.
Roles required to enable APIs
To enable APIs, you need the Service Usage Admin IAM role (
roles/serviceusage.serviceUsageAdmin), which contains theserviceusage.services.enablepermission. Learn how to grant roles . -
Set up authentication for your environment.
Select the tab for how you plan to use the samples on this page:
Console
When you use the Google Cloud console to access Google Cloud services and APIs, you don't need to set up authentication.
Python
To use the Python samples on this page in a local development environment, install and initialize the gcloud CLI, and then set up Application Default Credentials with your user credentials.
Install the Google Cloud CLI.
If you're using an external identity provider (IdP), you must first sign in to the gcloud CLI with your federated identity .
If you're using a local shell, then create local authentication credentials for your user account:
gcloud
auth
application-default
login
You don't need to do this if you're using Cloud Shell.
If an authentication error is returned, and you are using an external identity provider (IdP), confirm that you have signed in to the gcloud CLI with your federated identity .
For more information, see Set up ADC for a local development environment in the Google Cloud authentication documentation.
REST
To use the REST API samples on this page in a local development environment, you use the credentials you provide to the gcloud CLI.
Install the Google Cloud CLI.
If you're using an external identity provider (IdP), you must first sign in to the gcloud CLI with your federated identity .
For more information, see Authenticate for using REST in the Google Cloud authentication documentation.
Expand the content of an image
Use the following code samples to expand the content of an existing image.
Console
1. In the Google Cloud console, go to the Vertex AI > Media Studiopage. < a href="https://console.cloud.google.com/vertex-ai/studio/media/generate;tab=image" class="button button-primary"
target="console" track-name="consoleLink" track-type="task">Go to Media
Studio</a>
-
Click Upload. In the displayed file dialog, select a file to upload.
-
Click Outpaint.
-
In the Outpaintmenu, select one of the predefined aspect ratios for your final image, or click Customto define custom dimensions for your final image.
-
In the editing toolbar, select the placement of your image:
-
Left align:
-
Horizontal center align:
-
Right align:
-
Top align:
-
Vertical center align:
-
Bottom align: 1 Optional: In the Parameters panel, adjust the following options:
-
Model: the Imagen model to use
-
Number of results: the number of result to generate
-
Negative prompt: items to avoid generating
-
-
In the prompt field, enter a prompt to modify the image.
-
Click Generate.
Python
Install
pip install --upgrade google-genai
To learn more, see the SDK reference documentation .
Set environment variables to use the Gen AI SDK with Vertex AI:
 # Replace the `GOOGLE_CLOUD_PROJECT` and `GOOGLE_CLOUD_LOCATION` values
 # with appropriate values for your project.
 export

 GOOGLE_CLOUD_PROJECT
 =
 GOOGLE_CLOUD_PROJECT
 export

 GOOGLE_CLOUD_LOCATION
 =
 us-central1
 export

 GOOGLE_GENAI_USE_VERTEXAI
 =
True
REST
Before using any of the request data, make the following replacements:
- PROJECT_ID : Your Google Cloud project ID .
- LOCATION
: Your project's region. For example,
us-central1,europe-west2, orasia-northeast3. For a list of available regions, see Generative AI on Vertex AI locations . -
prompt: For image outpainting you can provide an empty string to create the edited images. If you choose to provide a prompt, use a description of the masked area for best results. For example, " a blue sky " instead of " insert a blue sky ". -
referenceType: AReferenceImageis an image that provides additional context for image editing. A normal RGB raw reference image (REFERENCE_TYPE_RAW) is required for editing use cases. At most one raw reference image may exist in one request. The output image has the same height and width as raw reference image. A mask reference image (REFERENCE_TYPE_MASK) is required for masked editing use cases. If a raw reference image is present, the mask image has to be the same height and width as the raw reference image. If the mask reference image is empty andmaskModeis not set toMASK_MODE_USER_PROVIDED, the mask is computed based on the raw reference image. - B64_BASE_IMAGE : The base image to edit or upscale. The image must be specified as a base64-encoded byte string. Size limit: 10 MB.
- B64_OUTPAINTING_MASK : The black and white image you want to use as a mask layer to edit the original image. The mask should be same resolution as input image. The output image will be the same resolution as the input image. This mask image must be specified as a base64-encoded byte string. Size limit: 10 MB.
- MASK_DILATION
- float. The percentage of image width to dilate this mask by. A
value of
0.03is recommended for outpainting. Setting"dilation": 0.0might result in obvious borders at the extension point, or might cause a white border effect. - EDIT_STEPS
- integer. The number of sampling steps for the base model. For
outpainting, start at
35steps. Increase steps if the quality doesn't meet your requirements. - EDIT_IMAGE_COUNT - The number of edited images. Accepted integer values: 1-4. Default value: 4.
HTTP method and URL:
POST https:// LOCATION
-aiplatform.googleapis.com/v1/projects/ PROJECT_ID
/locations/ LOCATION
/publishers/google/models/imagen-3.0-capability-001:predict
Request JSON body:
{
  "instances": [
    {
      "prompt": "",
      "referenceImages": [
        {
          "referenceType": "REFERENCE_TYPE_RAW",
          "referenceId": 1,
          "referenceImage": {
            "bytesBase64Encoded": " B64_BASE_IMAGE
"
          }
        },
        {
          "referenceType": "REFERENCE_TYPE_MASK",
          "referenceId": 2,
          "referenceImage": {
            "bytesBase64Encoded": " B64_OUTPAINTING_MASK
"
          },
          "maskImageConfig": {
            "maskMode": "MASK_MODE_USER_PROVIDED",
            "dilation": MASK_DILATION
}
        }
      ]
    }
  ],
  "parameters": {
    "editConfig": {
      "baseSteps": EDIT_STEPS
}, "editMode": "EDIT_MODE_OUTPAINT","sampleCount": EDIT_IMAGE_COUNT
}
}
To send your request, choose one of these options:
curl
Save the request body in a file named request.json
,
and execute the following command:
curl -X POST \
-H "Authorization: Bearer $(gcloud auth print-access-token)" \
-H "Content-Type: application/json; charset=utf-8" \
-d @request.json \
"https:// LOCATION
-aiplatform.googleapis.com/v1/projects/ PROJECT_ID
/locations/ LOCATION
/publishers/google/models/imagen-3.0-capability-001:predict"
PowerShell
Save the request body in a file named request.json
,
and execute the following command:
$cred = gcloud auth print-access-token
$headers = @{ "Authorization" = "Bearer $cred" }

Invoke-WebRequest `
-Method POST `
-Headers $headers `
-ContentType: "application/json; charset=utf-8" `
-InFile request.json `
-Uri "https:// LOCATION
-aiplatform.googleapis.com/v1/projects/ PROJECT_ID
/locations/ LOCATION
/publishers/google/models/imagen-3.0-capability-001:predict" | Select-Object -Expand Content
"sampleCount": 2
. The response returns two prediction objects, with
the generated image bytes base64-encoded. { "predictions": [ { "bytesBase64Encoded": " BASE64_IMG_BYTES ", "mimeType": "image/png" }, { "mimeType": "image/png", "bytesBase64Encoded": " BASE64_IMG_BYTES " } ] }
Limitations
If the outpainted image is expanded to 200% or more of the original image size, the model might produce distorted details. As a best practice, we recommend adding a post-processing step to run alpha blending on outpainted images.
The following code is an example of post-processing:
  parameters
 =
 {
 "editConfig"
 :
 {
 "outpaintingConfig"
 :
 {
 "blendingMode"
 :
 "alpha-blending"
 ,
 "blendingFactor"
 :
 0.01
 ,
 },
 },
 }
What's next
Read articles about Imagen and other Generative AI on Vertex AI products: