[発動機] カテゴリの記事
全14件 (14件中 1-14件目)
1
-
ギアプーラーを買ったものの
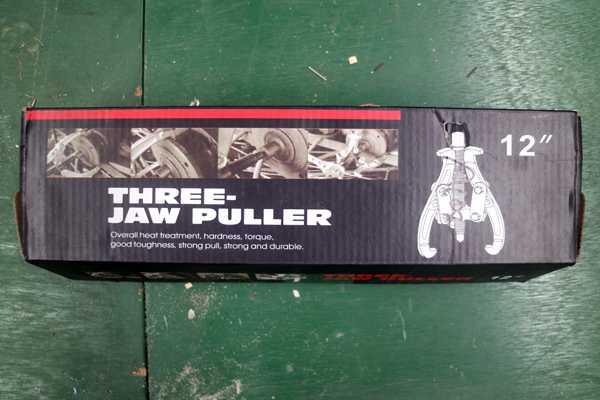
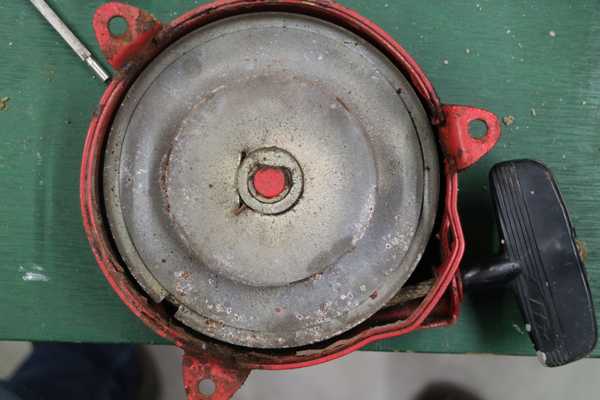
発電機HONDA/G40 のフライホイールがどうあがいても外す事が出来ないので、そのままになっていたが、どうしても外してみたくなって、amazonでギアプーラーを探してみた。G40 のフライホイールは直径が18㎝もあるので、大型プーラーが必要になる。15㎝迄なら安い物が幾らでもあるのだが、15㎝を越えると選択の余地が殆どないので、2本爪、3本爪兼用30㎝(3,330円)を思い切って購入した。届いたプーラーは流石30㎝用、ズシリと重く頑丈である。3本爪の方が安定してセンターも出しやすいのだが、発電機のアングルが邪魔になり、掛けられない事が分かったので、2本爪にしてセットし直したが、フライホイールの縁の凸が2㎜ほどしか出が無く、爪の先がピンポイントで接触する程度なので、掛けるだけでも大変だ。ウッドラフキーの溝にCRCを吹き込んで、押しネジの頭にメガネレンチを挿し込み締めて行くが、フライホイールは外れてくれない。力任せに締め付け過ぎると、プーラーの爪がフライホイールの縁から外れて仕舞うのだ。適度に締め付けたまま、押しネジの頭をハンマーでどつくも、その瞬間にプーラーが外れてしまう。瀧の汗をかきながら何度やっても外れない。農機具屋は、プーラーなど使わず、クランクシャフトのネジにナットを取り付けてハンマーで叩いていとも簡単に外してしまうようだ。クランクシャフトにはあまり衝撃を加えたくはないのだが真似をしてみたが外れない。フライホイールにプーラーの爪が掛かるように縁をもう少し付けるか、プーラーを掛ける位置を凹ませて置けば良いのに…。HONDAのサービスはどうやって外しているのだろうか。特殊工具でもあるのだろうか。フライホイールが外れないまま、数日放置していたがどうしても気になり、酒を飲みながら色々と考えた。プーラーの爪の先が尖っていないので、大きな力を掛けると滑ってしまうのだろう。それなら爪を研いでみたらどうだ。と言う事で、グラインダーに砥石ディスクを付けて先を鋭く研いでやってみたが、結果は同じで撃沈である。次は太いナマシ線をフライホイールに巻いて締め上げ、そこに爪を掛ければ何とかなるかもと思いやってみたが、ナマシ線と一緒に爪も外れてしまう始末である。最後の手段は、ヒートガンでクランクシャフトを炙って、プーラーの押しネジをあてがい頭をどつくのだが、フライホイールの中にはコイルやポイントなどがあろうから、あまり熱を掛けすぎては元も子もないので慎重に炙って、押しネジの頭をハンマーでどついたら3撃目で見事外れた。やれやれである。フライホイールを外すだけで8ヶ月も掛かってしまったが、炙りが一番効いたようである。しかも結局プーラーで外せなかったのは悔しいが、押しネジが使えたので良しとするしかない。ポイントを確認してみると、真っ白になって何かが付着しているようだ。恐らくプラグに火が飛ばない原因はここだろうと確信して、400番の耐水ペーパーで接点を磨いて最後に紙を通す。ウエスにパーツクリーナーを染み込ませ、ピンセットで摘まんで接点の回りをクリーングする。クランクシャフトにナットを付けてスパナで挟んで、クランクを回してポイントが一番開いた所で止め、0.3㎜のシクネスゲージで接点の間隔を測ったら丁度良かったので、クランクシャフトのポイントカムが接する部分にグリスを薄く塗って組み立てた。発電機の電源をONにして、自信満々にリコイルスタータの紐を引っ張ると、プラグの先から火花が…。出ない。何度やっても出ない。ポイントではなかったのか。撃沈である。それならコイル?恐らく新品は無いだろうなぁ。要らないプーラーを買っただけに終わってしまったのが情けない。最大掛け幅300ミリのギアプーラー2本爪にしてセットしてフライホイールに掛けるプーラーフライホイールを締め上げたナマシ線ヒートガンで炙ってプーラーの押しネジをあてがいハンマーでどついたら外れたフライホイール外したフライホイールと電装部分保護カバーを外して剥き出しになったポイント
2021.07.10
コメント(2)
-
ヘッドを開けて見たら…..
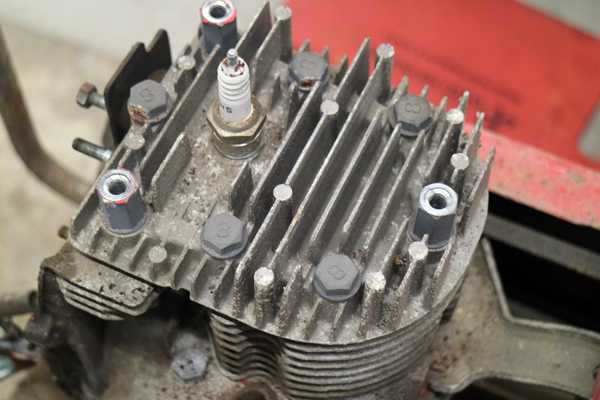
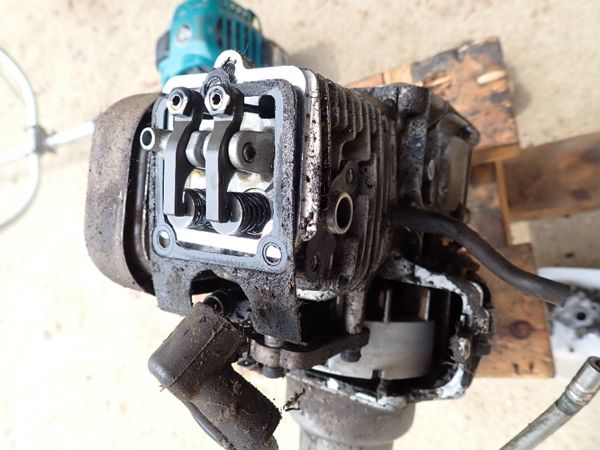
G40はガソリンエンジンなのにヘッドが小さい。ひょっとしてと思って外してみたら、何と!聞いたことはあったが、初めて見るサイドバルブエンジンだった。あの独特な瓢箪のように横に長い燃焼室とピストンの隣には吸気バルブと排気バルブが並んでいる。このバルブはクランクシャフトからギアで動くようになっているのだろう。タイミングチェーンなどは使われていない。実にシンプルだ。現在の4サイクルや2サイクルエンジンが活躍する前は、このサイドバルブエンジンがクルマやバイクに搭載されていたのだそうだ。部品点数が少なく頑丈で壊れにくい長所があるものの、燃焼室の形状から高圧縮にする事が出来ないので、出力が高められず現在のエンジンに取って変わられた過去の遺物であるが、発動機などでは長く採用されていたようだ。サイドバルブエンジンは2サイクルだけかと思っていたのだが、4サイクルもあったのね。知らなかった。ヘッドの中は黒いカーボンが付着して、年式相応の汚れ具合だ。それにしてもピストンのボアが大きい。クランクを回してピストンを下げてみたが、シリンダーの内壁にはまだオイルが残っており、傷1つ無い。流石低回転サイドバルブエンジン。ヘッドカバーの内側とピストン、吸排気バルブの頭のカーボンを削ぎ落とし、ボンスターで磨いてみた。排気バルブのヘッドは熱のためか、磨いても凸凹である。マフラーを外してみると排気ポートに錆状の物が大量に堆積していた。ガスケットは銅と紙で出来ており、ぶ厚いので慎重に剥がして、再利用する。本組みをする時に液体ガスケットを塗っておけば、何とかなるだろう。G40のヘッドとヘッドボルト/3本はエンジンカバー取り付け用のボルト穴開きカーボンが体積したサイドバルブエンジンヘッド内部クリーニングを終えたヘッドカバーとピストンとバルブヘッド排気ポートに堆積したサビ
2020.11.17
コメント(0)
-
どうにかならぬかフライホイール
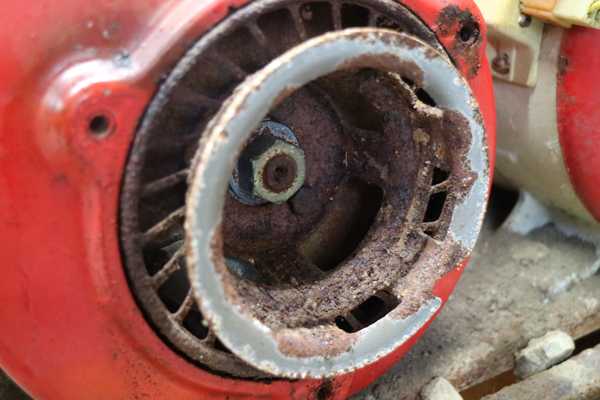
G40のプラグから火花が飛ばない。プラグコードの通電を確認するにも、発電機側のスイッチの通電を確認するにもフライホイールを外さなけらばならないので、先ずフライホイールに3本のボルトで固定されているリコイルスタータを引っ掛けるプーリーを外すのだが、真っ赤に錆びていたので、CRCを吹いて電動インパクトで一気に緩めた。次はフライホイールのセンターナットだ。共回りを防ぐストッパーを仕掛けるのが面倒くさいので、これも電動インパクトでガツンと一発で緩める。これでやっとフライホイールを外す準備が出来たのだが、このフライホイールは直径18センチもあるので大型プーラーが必要であるが、そんな物は持っていない。何か他の方法は無いかと観察したら、先程外したプーリーのネジ穴が3箇所見えた。この穴にプーラー替わりのボルトを締め込んで行けば何とかなるのでは?と思い、治具を作る事にした。ボルトを通す何か適当な鉄板はないものかと探していたら、直径6センチ、厚さ3ミリの円形鉄板が出て来た。適当な長さのボルト3本を揃え、外したプーリーに鉄板をあてがい、ボルト穴の印を付けてボール盤でボルトが通る穴開けを行う。3本のボルトを鉄板の穴に通し、フライホイールのネジ穴にセットする。鉄板の中央はクランクシャフトの頭に当たっているので、メガネレンチで3本のボルトを均等に締めて行くとフライホイールが外れるという塩梅だったが、いくら締めてもフライホイールは外れて来ない。クランクシャフトの真上の鉄板の中央をハンマーでどついてもビクともしない。更にボルトを締め付けると鉄板が曲がって来た。頑固なフライホイールだ。ウッドラフキーが固着しているのだろうか。更に締め込むとボルトの首が折れた。撃沈である。これを外すには大型プーラーを手に入れるしかないようだ。リコイルスターターを引っ掛けるプーリー/ボルトは錆で真っ赤であるプーリーを外したフライホイール穴開け加工中の円形鉄板ボルトをセット中のフライホイール首が折れたボルト
2020.11.10
コメント(4)
-
リコイルスタータのイケズ
G40のキャブと燃料コックの掃除が終わったので、プラグのスパークを確認しようと、リコイルスタータの紐を引っ張ったら手応えが変である。しかも引っ張って伸び切った紐がだら~んとだらしなく出たままで、巻き取ってくれない。何度やっても同じ事だ。リコイルスタータがイケズをしているのだ。リコイルスタータの仕組みは、中に長い板バネがグルグル巻かれた状態でセットされており、その外側に引っ張り紐が付いている。紐を引っ張る事によってバネが縮み、バネが戻る事によって紐が巻かれる。発動機や草刈り機、チェーンソーなどはこの方式が主流である。バイクなら足でキックする事ができるが、小さなエンジンではキックする事も出来ない。初期の頃のスタータはバネ仕掛けが無く、クランクシャフトに繋がるプーリーに切り込みがあり、引っ張り紐の先端をコブ結びにして、その切り込みにコブを引っ掛けて紐をプーリーに巻いて引っ張っていたので、一発で掛けられないと、また同じ事をやらなければならなかったが、この方法だとリコイルスタータのバネの調子が狂ったりする事も無く、確実にプーリーを回せる。昔はエンジンを掛けるのに色々と手順があったが、時代と共に楽に掛けられるように、初期型スタータからリコイルスタータになり更にバッテリーを搭載してセルスタータに変わって行ったのである。確かに便利にはなったが、機械式から電気式へと変わる事によって機構が複雑になり、部品点数も多くなって故障する箇所も増えて来るのである。従ってパワーと快適性は程ほどにしないと、現在のバイクのように素人が弄る事ができないようになってしまうのである。果たしてそれで愛着というものが涌くのか、はなはだ疑問である。リコイルスタータのイケズであるが、不調の原因はケース内でバネが規定より伸びてしまった。長く使わないと引っ張り紐が巻いた形に癖がついて固まってしまった。経年劣化で引っ張り紐が毛羽立って抵抗となってしまう。バネの両端のフック状の形状が伸びてしまった。などが上げられるが、取り敢えず外してみる事にした。E型クリップを精密ドライバーの先で外すと分解できるが、バネまで外してしまうと、組み立てが難しくなるので、ケースの中央に仕込んであるスプリングまで外してケースを少し開けて調子をみたら強い勢いで巻き取る事が出来た。どうやらスプリング位置が悪かったらしい。再び組み立てて、スタータを引いてみると今度は大丈夫だ。引っ張り紐もバネの力でスタータの中に格納される。プラグキャップの接点部分を細いワイヤブラシで磨いて接点活性スプレーを吹いてプラグを取り付け、発電機側のスイッチをONにしてプラグのスパークを確認するもスパークしない。プラグの不良かと思い他のプラグに交換してみたがスパークしない。電気系統の何処かがが壊れている。プラグコードか?マグネトーか?発電機側のスイッチか?面倒な事になって来た。エンジンから取り外したリコイルスタータプラグコードとB6HSのプラグマグネトーに繋がるプラグコード(左)と電源線(右)マグネトーと発電機の接続配線発電機側の操作スイッチ
2020.11.08
コメント(0)
-
G40キャブ分解
HONDA GENERATOR E1000のエンジンはG40型である。エンジンサイズの割りには大きなキャブレターが付いている。キャブを外すには先ず保護フレームを分解して、キャブに付いているエアークリーナーを外す必要がある。エアークリーナーは想像していた通り、中のスポンジは少し触っただけで砕けてしまうほどボロボロになっているが、原形をとどめているだけ立派なものだ。当然再使用はできない。キャブを外して分解する。外側の汚れはそれなりだが、中は以外にも想像以上に綺麗で、ガソリンの不純物がタール状になって、更に固まったような形跡もない。長期保管のため、中のガソリンを抜いていたのかも知れない。キャブが大きく見えた理由は、このキャブはダイヤフラムを持つ負圧式キャブだったせいである。バイクでは負圧式キャブは比較的年式の新しい車体に搭載されているので、強制開閉式の後で開発されたのだと思っていたが、50年以上前既に負圧式は存在していた事に驚いた。ジェットニードルが固着して動かないので、張りついたダイヤフラムを破らないように慎重に剥がして行く。これを破ったら、スペアを探すのが大変な上にダイヤフラムは非常に高価なパーツである。長期間放置のためチョークバタフライが錆びていたので、小さなビスを外して磨いて置く。後は洗浄であるが、ジェット類を全て外し、パーツクリーナーとキャブクリーナーで全ての穴とジェット類を洗浄し、高圧エアーを吹く。バイクに比べてガスの通路が全て大きいように思える。発動機なのでバイクのようにシビアな設定は必要無いので、少々の不純物があっても作動するためであろうか。次は燃料コックの分解を行い、洗浄液に浸けて置く。パッキンのゴム類が硬化して再使用に不安を残すが、パッキンの入手が不可なら、燃料コックそのものを代替え品と交換する手もあるだろう。保護フレームを外したHONDA GENERATOR E1000ボロボロのエアークリーナー負圧式キャブと燃料コック錆びたチョークバタフライ比較的綺麗だったキャブの内部負圧式の特徴であるダイヤフラム
2020.11.06
コメント(2)
-
HONDA GENERATOR E1000
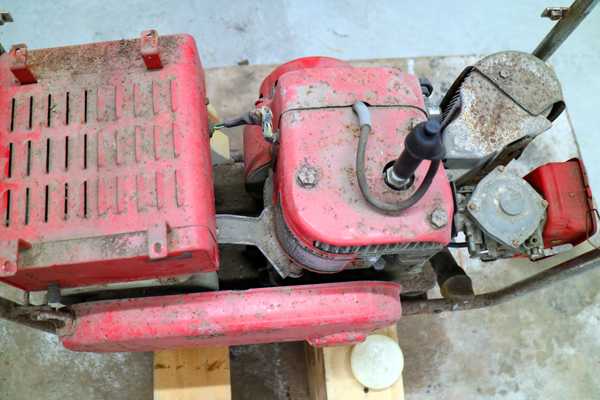
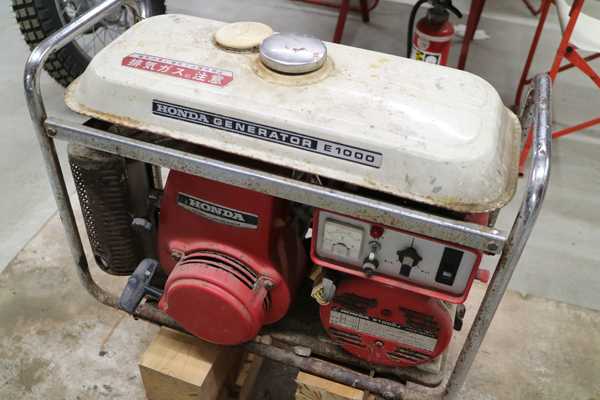
今年の夏のある日、父と兄が廃墟となった県北の父の実家の納屋の戸を叩き壊して40程年前に使っていたHONDAの発電機E1000を回収し、ジムニーに乗せてやって来た。何でも父が公務員だった頃、役所の船に積んで使用していた物を譲り受けて、当時としては最先端の杉や檜の枝打ちマシーンを動かすのに使用していたものらしい。納屋の中に保管されていたために、半世紀以上経過した物にしては、案外綺麗だ。一体いつ頃の物かネットで調べてみると、1965~1967年頃に作られた発電機らしい。実に53年から55年前の物だ。発電能力は交流出力100V/1.25KVA、直流出力6V、12V/8.3Aの能力を持つので、現在でも十分使用できる。手始めにガソリンタンクの中を覗いてみたら、何と!錆も無く綺麗なものだ。ガソリンを抜いていたとしても、錆が無いのは保管場所と当時の材質だろうか。何れにせよ有り難い事である。燃料コックとキャブは全バラ必須だが、ゴム部品等のHONDA純正部品は到底手に入らないだろうから、慎重に分解しなければならないが、果たして修理は可能だろうか。心許ない。HONDA GENERATOR E1000前部HONDA GENERATOR E1000後部諸元表、油脂類の表示キャブレター発電機のOutput発電機の定格出力表示
2020.11.04
コメント(7)
-
刈払機の修理
今回はマキタの刈払機(4サイクルエンジン)の修理である。持ち主が草刈り中に突然エンジンが止まったという。運転中に止まったというのはエンジン焼き付きの可能性が高い。スタータの紐は引っ張っても全く動かない。ちょっとばらしてみるかと預かったが、まあこのエンジン、メンテナンスしたことがあるのか、というくらい油まみれ。(写真01,02)スタータ部分を外してクランクを回してみると360度は回らないが、あっちに回してコン、こっちに回してコン、ピストンは焼き付いてないことが分かる。とすればこれはバルブ関係かな、とさらにばらす。案の定バルブにピストンが当たって止まったことが分かった。(写真03)エキゾーストバルブの先が何らかの原因で折れ、バルブが落ちる。そこにピストンが上がってきて当たったのだろう、バルブが曲がっていた。それにしても小さい。(写真04)このエンジン、シリンダとヘッドが一体である。シリンダからヘッド方向を覗くとなんか人の顔に見える。(写真05)知り合いにマキタのパーツを注文、連休を挟んだので10日ほどかかったが部品が届く。パッキン類や換えた方が良さそうなゴム部品も届いた。(写真06)さていよいよ組み立てにかかるが、まずは灯油で洗浄、灯油が真っ黒になった。(写真07、08、09)組み立て始めて気がついた。カムのタイミングを控えていない・・・。このエンジンは1つのカムで吸気、排気を行っている。ピストン圧縮上死点で両方のカムが閉じていなければならないのでおそらくこの位置、と何回も確かめる。(写真10)ここでピストンを挿入、クランクを回してさらに確かめる、間違いない。クランクケースにシールを塗って組み立てた。シールはいつも行くバイク屋で少しだけ分けてもらった。(写真11)バルブのスキマはBMWほど厳格ではないだろうと手分量で、この位かな、で締める。(写真12)エンジンオイルは80ccを計って入れる。キャブもばらして硬化しはじめていたゴム部品を全て交換、組み立てる。(写真13)全て組み付けいよいよ始動。プライマリーポンプをパカパカやってみるのだが、ガソリンが来ない。なんで、とよく見るとガソリンタンクから来るホースと、帰るホースを付け間違えていた。元に戻してパカパカ、チョークをかけ、紐を引っ張ると3回ほどでブルンときた。やったー、始動したぞ、スローを調整してしばらくほっておく。オイルも回っているようなので一安心。写真でファンが止まっていないので回っているのが分かるはず。(写真14)太さんの「直すところが見たい」につられてやっちまった!(藤)写真01写真02写真03写真04写真05写真06写真7写真8写真9写真10写真11写真12写真13写真14
2020.05.16
コメント(2)
-
ティラーの断念そして復活
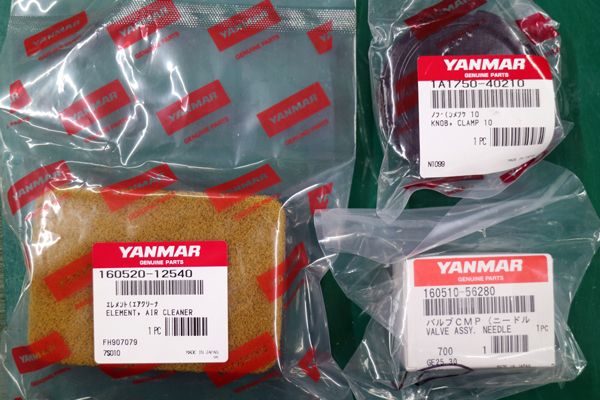
ヤンマーのティラーMT310 DXのキャブからの燃料漏れを修理すべく、フロートチャンバーのゴムパッキンとガスケットを購入したので、早速交換。今度はフロートチャンバーから燃料のシミも出ない。完璧だ。やはり新品は違うぜよ。キャブを取り付けてエンジン始動。1発で掛かり、チョークやスロットルも問題無い。暫くアイドリングしてエンジンを止めて、TYを弄っていたら、コンクリートの床に何か見えた。近寄ってみると、何とガソリンがポタポタと滴って大きなシミを作っているではないか。直ぐに燃料コックをOFFにして、「フロートチャンバーは大丈夫だった筈なのに」と思いながらキャブを確認するも異常はない。何処から漏れているのか探すと、エアークリーナーからだった。バイクだと、普通はキャブにオーバーフローパイプが付いているので、そこから溢れた燃料が排出されるのだが、このキャブにはそんな物は付いていないので、吸気ポートを通ってエアークリナーから漏れ出したという訳だ。以前キャブで苦労したシャリィもオーバーフローパイプが無かったのか、紙製の新品エアークリナーがガソリン漬けになった悪夢を思い出す。エンジン側に流れたら大変だが、そちらには流れないようになっているのだろうか?オーバーフローの原因はフロートかフロートバルブの異常という事だろうが、組み立てる時に念入りにクリーニングを行い、バルブが動く事も確認した筈なのに何で?と言う思いが募る。折角組んだキャブをバラしてフロートを確認するも、このフロートはプラ製なのでハンダの隙間からガソリンが入り込むような事にはならない。フロートバルブを取り出し、天眼鏡でティーパー状になった先を凝視するも段差になっている箇所は確認出来ない。バルブシートもゴミや不純物が付着している形跡もない。念のために再度洗浄を行い、小さく切ったウエスでバルブシートを拭いておく。フロートバルブの動きを確かめて、再度組み立て、始動。問題無くエンジンは掛かる。エンジンを切ってエアークリーナケースを外したままの吸気ポートを祈る気持ちで睨む。ガソリンは出て来ない。やっと直ったと安堵した瞬間にガソリンが流れ出て来た。ダメじゃ~ん。直っていない!また、最初からやり直しである。それにしても訳が分からない。幾らやってもオーバーフローは止まらない。撃沈である。これではシャリィの二の舞ではないか、シャリィの場合はブチ切れて新品のPC20キャブを奢ってしまったが、30年ほど前の小型耕耘機にそんな金はビタ一文出せない。フロートが上がった時にバルブを押し上げ切れていないのだろうか?鉄製フロートなら爪の角度調整する事も出来るのだが、プラなのでそれも出来ない。浅学の知識ではもうこれが限界なので、素直にヤンマーに電話してフロートバルブの発注を行った。ついでに、エアークリーナーと割れてしまっていたハンドルを昇降さすグリップが割れていたので一緒に頼んだ。3日後に部品が届いた。フロートバルブとフロートは部品番号ではセットになっていたとの事で両方届いた。早速キャブをバラして組み込む。これで直らなかったら、バルブシートだろうが、シートは変えられないので、キャブのアッセン交換しかない。そうなると耕耘機の中古を買った方が安いかも知れない。エンジンを掛ける。問題無く1発で掛かる。チョークも、アイドルも、スロットルも問題無い。ここまでは前回と同じだ、問題はここからだ。エンジンを止めて吸気ポートに穴が開くほど、微動だせず、眉間に皺を寄せて、じっと見つめる。睨む。歯を食いしばる。息を止める。出ない。幾ら待っても燃料は出て来ない。直った。やっぱりフロートバルブの不良だったのかなぁ。まぁ良い。これでティラーは復活だ。早いとこ実家に届けて、TYに専念せねば。ヤンマーから届いたバルブコンプリート、グリップ、エアークリーナー憎っくきフロートバルブ新品になったグリップケースに取り付けた新品のエアークリーナー
2020.04.23
コメント(0)
-
ティラー
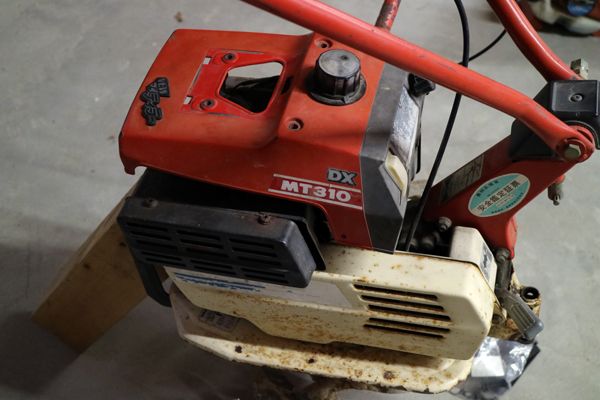
子供の頃、近所のオジサンは皆テーラーに乗っていた。テーラーとは耕耘機に移動用のタイヤを履かせ、ハンドルの下に運転席を付けその後ろに積載用の荷台を付けた乗り物で、果樹、野菜、米、肥料、農機具と何でも乗せて道路を走っていた。元は耕耘機なのでノロノロなのだが、登坂力は結構あったように思う。ところが我が家だけはテーラーでは無く、父が仕事先で見てきた三輪の特注仕様であった。エンジンは格好良い黒いロビンの大型空冷で、ミッションはミゼット用、シャーシーは特注の鉄パイプ溶接、バイクのハンドルに大型タイヤの三輪仕様なので、小回りが効くし、ローギアが素晴らしくどんな荒れ地の坂道でも荷物を満載で登って行った。その走破性はテーラーの比では無かった。しかし、時代と共に軽トラなる物が出現し、テーラーは姿を消し、実家の三輪も運搬車に変わってしまった。残念な事である。先月、実家の発動機を直したが、今度は耕耘機が動かないと言うので引き取って来た。何でも農協に見て貰った時にはエンジンが掛かるが、農協が居なくなると直ぐに掛からなくなるらしい。ドンキーベースに運び込んだ小型耕耘機はヤンマーのMT310 DXだ。ガソリンタンクカバーにNEW マイティラーのプラのエンブレムを見つけて戦慄が走った。これだ。子供の頃どこの家庭にも一台はあったあのテーラーは地元の訛りで正式にはティラーという名称だったのだ。これは是非とも直したい。農協のプロでも手こずるティラーのタンクを先ず外し、キャブに付いているスロットルのガバナーやチョークレバーなどを取り外し、キャブを引き抜くとガスケットの端が少し破れた。どうやら農協は、キャブの分解まではしていないらしい。取り外したキャブを分解すると、意外に汚れは少ない。パーツを取り外し全て洗浄、穴の貫通確認をして組み立てたが、フロートチャンバーから燃料漏れを起こす。やはり、ゴムのパッキンが劣化しているのだろう。破れたガスケットの事もあるし、近くのヤンマーに発注する事にした。MT310 DXだけでは情報不足かも知れないと思い、工作車にティラーを乗せて運び込むと、修理係りのオジサンがティラーの方をチラッと見てパッキンとガスケットね。事務所で連絡先を書いて下さいと言って終わった。事務所で「310 の型番を見ただけで大丈夫なの?」と尋ねたら「大丈夫です。」の回答。どうやら農業機械はバイクの様に車体番号による品番分けなど無いらしい。MT310 DXさえ分かれば部品は直ぐに揃うという塩梅だ。3日程で届いたとの連絡を受け、引き取りに行くと、最近はキャッシュレスでクレジットかコンビニ支払いとなっているそうなのでコンビニにすると、支払いは1ヶ月後になるらしい。ヤンマーアグリジャパンから届いたガスケットが170円、パッキンが330円で合計550円ナリ。支払い用紙を郵送して、コンビニにシステム手数料を払って儲けになるのかねぇ。ヤンマーMT310 DXの勇姿ヤンマーブランドの入ったタンク燦然と輝くNEW マイティラーのエンブレムガスケットとパッキンの品番ヤンマー純正のガスケットとパッキン
2020.04.15
コメント(2)
-
三菱メイキG500L
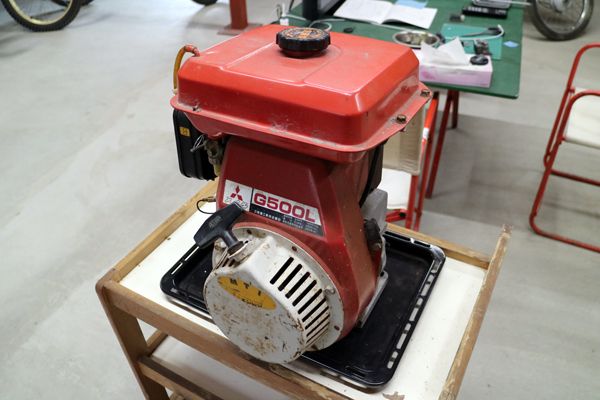
ドンキーベース完成に伴い実家から発動機と耕耘機の修理のオーダーが入った。発動機は三菱メイキG500Lで、定格3.5馬力、最大5.0馬力だ。工作車に積んで持って帰ったが、耕耘機はスパークはするので、キャブだけ外して持ち帰った。話しによると、発動機は5年程前に掛からなくなり、そのまま軒下にビニールを掛けて放置していたとの事。野晒しでなかった事で、酷いサビなどが無かったのが救いである。一応欠品や、破損箇所などないか見渡して修理に取り掛かる。タンクを外してみるとガソリンが僅かだが残っていたので全て捨てた。プラグを外してみると焼け具合は良好だ。プラグコードに繋いでリコイルスタータを引くと発火が確認出来た。電気系統は大丈夫のようだ。ならばキャブレターだろうと思いバラシに掛かるが、キャブを留めている片方のボルトがマフラーが邪魔になって外せないので、マフラーから外す。エアークリーナーを外し、スロットルやチョークを繋いでいる針金のように細いロッドとスプリングも外すとキャブが外れる。このキャブはフロートチャンバーが異様にデカくて円筒形となっており、底のボルトで留める仕様なので、フロートチャンバーはどの位置でも取り付け出来るようになっている。キャブの外側はアイドル調整とパイロットジェットがあるのみ。中はガソリンが残っておらず、不純物も無く綺麗なものだ。フロートを外しニードルバルブを取り出すとこれも綺麗だが、バイクのようにスプリングが仕込まれた突起が無い。発動機なのでこんなものであろうか。次はメインジェットだが、キャブの上下を貫通している筒の中の奥まった所に付いており、マイナス溝も無くボルトの頭状にもなっていないので、外す事ができない構造となっている。仕方がないので細い針金とパーツクリーナーと圧縮エアーで貫通を確かめつつ掃除を行う。全ての穴の掃除を行い、貫通を確かめたので、組み立てに掛かる。スロットルを繋ぐ細いロッドは天秤金具を取り付けた後では取り付けが出来ない事がわかり、何回も天秤金具を取ったり着けたりでやっと組み立て完了。燃料コックの状態を見て、ついでにオイル交換をしようとドレンボルトを探したら2箇所もあった。注油口も2箇所だ。恐らくポンプなどをベルトで繋いだ時に前後どちらからでもオイル交換できるようにするための親切設計だと思われる。オイルは真っ黒では無かったし、20Wのオイルが無かったので止めにした。直ぐには壊れないだろう。新しいガソリンを少し入れてリコイルスタータを5回程引いたら掛かった。暫くしてチョークを戻すとアイドリングも安定している。スロットルを開けると大きな音で回転も付いて来る。台座が無いので、エンジンが一人で暴れ出す。放っておいたら他所の家に飛び込んでも困るので、アイドルに戻し様子をみたが大丈夫のようだ。一旦止めてを繰り返したが問題無いようだ。後は耕耘機のキャブの掃除したら終わりだ。お蔭で貴重な時間が割かれてTYの作業が中断してしまったので、納品時には牡蠣鍋と清酒嘉美心を存分に飲ませて貰う事としよう。三菱メイキG500Lエアークリーナー、マフラー、キャブ側取り外し中のデカいフロートチャンバーが付いたキャブキャブの真上。アイドルスクリューと中央にあるのがパイロットジェットどうにも外せないメインジェット
2020.03.12
コメント(0)
-
あかつき4
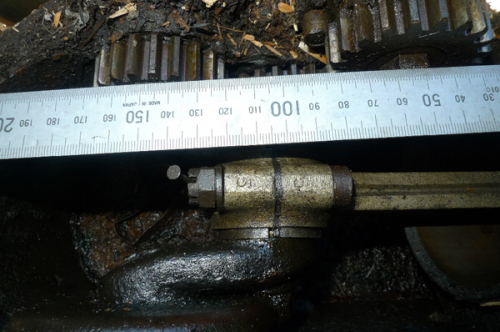
クランク室の蓋を開けてみる。クランクがむき出しだ。ボア・ストロークを計ってみる。(写真1・2・3)これによるとボアは87粍、行程93粍と出た。半径×半径×円周率×行程で排気量は550立方糎ほどだ。(ここまでくるとセンチ=糎、ミリ=粍、ストローク=行程とすべきか)馬力はおそらく3馬力程度。リッター出力5.5馬力ほどのおおらかさ。バルブスプリングむき出しでもいいわけだ。見ての通りクランクは回る。放置期間40年?だけれど、雨ざらしでなかったのが幸いしている。また、コンロッドビッグエンド、キャップボルトのスリットに「釘」が刺さっているのがわかるだろうか。ここは普通「割ピン」を使う。釘で代用できるところがすばらしい。次はギヤだ。(写真4)ギヤが3枚見える。一番左はクランクに刻まれている。その下に大きなギヤがある。1/2に減速されて吸排気カムを駆動しているはずだ。その右にあるのがマグネトー駆動ギヤだ。ここはばらす前にしるしでも付けておかないと、組んだときバルブタイミングや、点火タイミングがぐちゃぐちゃになる。それにしても埃とオイルが分厚く堆積している。何とも楽しみな発動機である(トホホ)(藤)写真1写真2写真3写真4
2012.08.25
コメント(2)
-
あかつき3
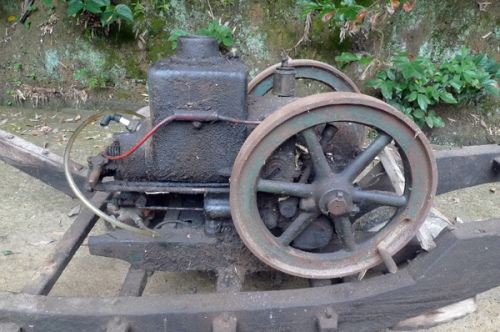
右に回るとまたまたフライホイールがある。(写真1)この中心の太いところに平ベルトをかけて動力を取り出す。ホッパーに「あかつき」の銘が誇らしげに掛かる。その下は水抜きコックか。右の丸っこい物はマフラーだ。意外と小さい。最近の高出力バイクのマフラーのでかさは尋常ではない。それに比べたら大丈夫かと思うくらい小さすぎる。後方に回る。(写真2)銘板はここに止めてあった。銘板の下がシリンダヘッドだ。プラグの下にバルブスプリングが2つむき出しで出ている。今のエンジンでスプリングむき出しは考えられない。これも回転数、パワーの少なさゆえか。現代のエンジンだと動いているのを見ることができないスプリングが、パコパコ動いている姿が見えて何ともいえず楽しい。発動機によっては吸入側ロッカーアームとプッシュロッドが無い(バルブとスプリングはある)ものが存在する。スプリングは弱く、吸入はピストンが下がるときの負圧でバルブが開き行うのだろう。一番下にダイヤルが2つ、まんなかに酒のちょこに蓋がついたようなものがある。これがキャブレター?ダイヤルはエンジンの回転数調整だと思うが、どのように使うのだろう。発動機は始動後、一定回転で長時間運転するという使い方をするはずだ。ちょこは始動時ガソリンを入れるのだろう。始動だけはガソリンで、その後灯油に切り替えるはずだ。その操作はどうやる?わからん、先生が必要だ。(藤)写真1写真2
2012.08.24
コメント(2)
-
あかつき2
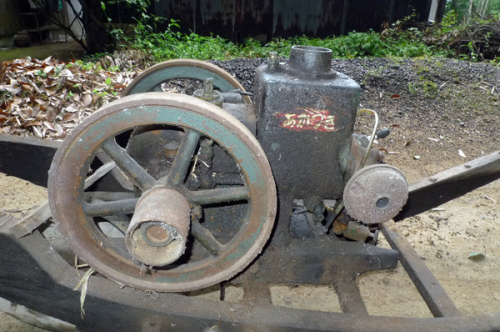
さて、ぐるっと眺め回してみよう。右側面だ。(写真1)右といっても、発動機の前後はわからないので、ねこぐるまの前方が前としよう。大きなフライホイール、日本語で言えば「はずみ車」だ。これがあることで低回転でも回ることができるが、ボディーと共に重い部品の一つだ。右下にある取っ手を持ち時計方向に回転させて発動機をかける。フライホイール中心線上から左にロッドが2本と下に1本。上はOHVのプッシュロッドだろう。下は何かわからない。ボディー横の赤い線はイグニッションコード。プラグキャップの所でちぎれている。プラグキャップの下に太短い鉄棒が手前に出ているのはデコンプレバーだろう。半透明のチューブは燃料パイプ。ちなみに燃料タンクはついていない。適当な缶に灯油を入れてチューブの先っちょを突っ込んでおけば吸うのだろう。前から見る。(写真2)煙突状の穴があるホッパーと呼ばれる物には水が入りシリンダを冷却する。車のエンジンにはラジエターがあり冷却水を冷やしているが、発動機にはラジエターなど無い。回転数も低いし、発熱量も少ない、ということか。手前の丸っこいカバーの下にクランクがあり、その軸にオイルを落とす円筒状のオイラーが左のフライホイール(写真では右)と本体の間にある。これと同じ物がホッパーの穴の手前にあったはずだが、根元から折れて無くなっている。これがないとシリンダにオイルが行かないのでなんとかせねばなるまい。右のフライホイール(写真では左)と本体の間にあるのはマグネトー点火装置だ。これが生きているか死んでいるか。死んでいたら巻き直すのは専門家でないとだめだろう。写真1写真2
2012.08.17
コメント(6)
-
AKATUKI見参
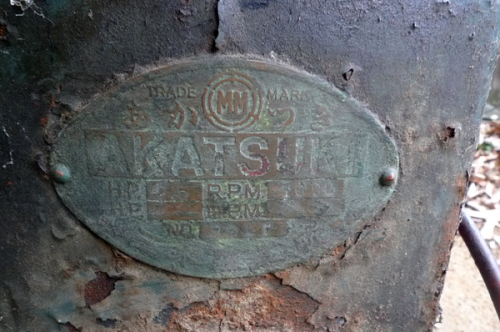
昨日発動機が手に入った。低い回転でシュポシュポ回る発動機は、なぜか郷愁を誘う。 我が家は農家ではないが、小さい頃畑の片隅で発動機を回しながら脱穀をしていた風景が頭の中にある。ブログにあるように、バイクが好きで直したりしながら走らせてきた。発動機は回してみたいエンジンの一つである。ただもうこの世の中に発動機を作っているメーカーはない。知り合いの小さな造船所で、船を海から引っ張り上げるのに発動機が動いていた。奥さんがフライホイールの取っ手を持って、クイッ、クイッと回すとポン、ポンと回りだし(他に何か操作をしているのだろうけどよく分からない)なつかしい音を響かせる。どこかにころがっていないかと知り合いの元農家に尋ねたら「あるよ」と言うことでめでたく頂いてきた。発動機など動かしたことのない素人に直せるだろうか。ネットには様々なブログやHPが り、見ていると私にも直せるかもしれない、と密かな甘い考えでやってみるか。吉と出るか凶と出るかわからないが・・・。さて、やってきた発動機を眺め回してみる。まず、銘板だ。(写真1)メーカーは「あかつき」とある。HPとRPM、NOが見えるが打刻が読めない。かろうじてRPMは1000だろうか。HPとNOはわからない。ネットで「あかつき・AKATUKI」を探してみるが、金星探査機しかでてこない。メーカーがわかったところでどうせ今はないだろう。発動機の専門家にでも聞いてみよう。(その専門家がどこにいるかわからない)こんな状態でやってきた。(写真2)所謂「ねこぐるま」に載っている。そういえばかつて我が家にもねこぐるまがあった。フレームが木、車輪も木。この反ったフレームがたまえらない、輪切りにした太い木を車輪に、自転車の太いタイヤのゴム部分を車輪の外側に打ち付けていたよなぁ、などと懐かしむ。発動機はねこぐるまにボルト留めされていたので、このまま軽トラックに載せてきた。重い発動機はこの方が動かしやすい?!。ねこぐるまの”ねこ”は”猫”なのだろうか。なんで”猫”なのだろう。いや、今回の本題は発動機である。写真1写真2
2012.08.16
コメント(2)
全14件 (14件中 1-14件目)
1