[AF BORG] カテゴリの記事
全12件 (12件中 1-12件目)
1
-
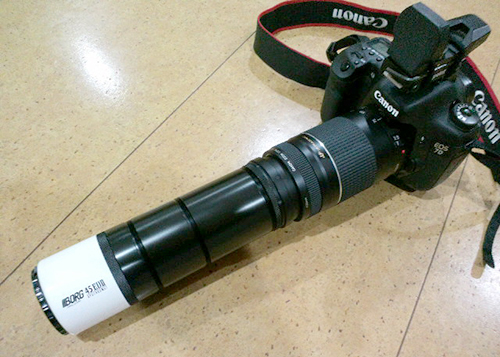
8月20日の日記 2本目のBORG
相変わらずの目が回る多忙・・・・倒れるかも。そんな中、こつこつと2本目を。実は、既に6月にテストしており、やっと本格運用。 全玉抜いた75-300mmに、手元に余っていたB品の45ED2を。詳細は暇があったら書きますが、絞りユニットは外してあります。
2013/08/20
コメント(2)
-
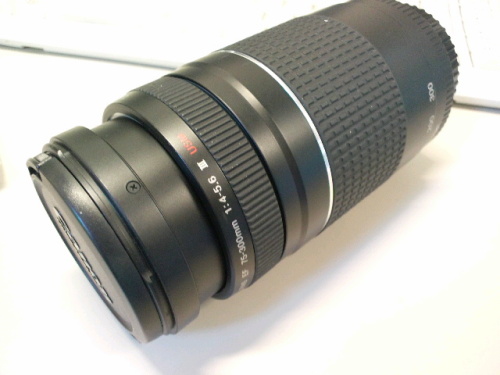
5月25日の日記 またつまらぬものを・・・・・
なんの変哲も無い、ただの75-300mm 玉ヌキしてシマツタ・・・・・・・・武士の情け・・・・・
2013/05/25
コメント(2)
-
8月25日の日記 迷い道くねくね~~
久しぶりに機材いじりAFBORGに諦めが付かず ZUIKO 70-300mm全玉撤去アクロマートAFのページを見ながら、30分でオペ終了。AFレンズにはD50-800mmとKENKOクローズアップレンズNo.2を試しているが、光路長を短くしないと無限遠が出ない。未だ、試行錯誤の状態。 外装変更迷彩テープが暑さでべたべたになったので、思い切ってマイナーチェンジ!ホームセンターで購入したガラス用のシート¥480-最初からこれでよかったかも。 アクロマートAFに関しては、これからつめて見る予定。
2010/08/25
コメント(4)
-
BORG AF化9 ZUIKO 14-42mm?末記 その3
さてさて、休みのはずが休みなしになってしまいました。BORGのAF化、その後です。試写後、周囲の減光があったので、絞りの穴を拡大。 びふぉ~~~ あふた~~~ 手持ちのリーマーの最大値13mmまで拡大。それでもまだ周囲に減光。 *BORG77ED2 + 【9868】 「LMF-1」 +「1.4× テレコンバーターGR」 【7215】 + E620 *完全持ち データ省略 リサイズ、レベル補正 カワちゃん試写。やはり、AF効かず。フォーカスエイドは来るもののこれでは使えない。コントラストAF(プレビュー)でのセットも試したが、こちらはAFが効くものの、シャッターが下りず。根本的に、カメラをパナに変えないと駄目みたい。
2010/06/05
コメント(4)
-
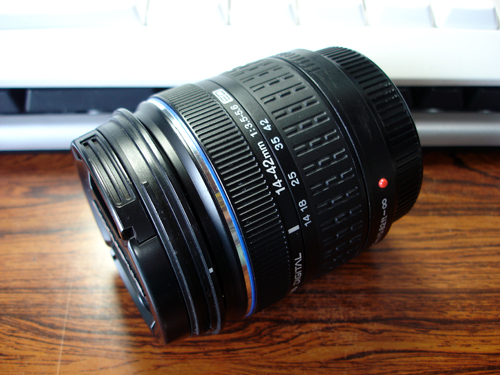
BORG AF化8 ZUIKO 14-42mm?末記 その2
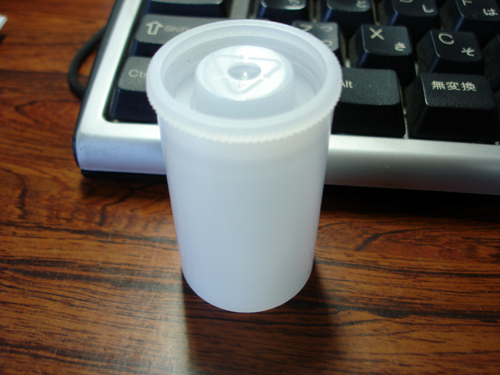
さてさて、昨日の日記の続き。1日あたりの写真UP容量が決まっていたとは。 どこまで行ったか・・・・・そうそう、前玉外して中球取った。 次はインナー鏡筒作り いろいろ物色したが、目に付いたのがどこにでもあるフィルムケース。仮に合わせてみると、これがピッタリ!(>_<)早速加工する。氏のHPより、鏡筒の長さを19.7mmと推測し、カッターで切る。 切ったフィルムケースの切り口を、耐水ペーパーで仕上げ、エポキシ接着剤でステップアップリング28-37mmを接着。ノギスで測定すると、長さの誤差0.1mm、左右の位置の誤差0.05mm許容範囲か?(--; そのままでは余計な光が入るので、ステップアップリング以外にプラスチック用のプライマーを吹き、タミヤのフラットブラックで表裏を塗装。玉を抜いたZUIKO 14-42mmに仮接着フォーカスリングにピッタリと収まる。 次に、接眼レンズ(テレコン)の加工 BORG テレコンバーター 7214の鏡筒を切断。切断中にレンズが外れたので、外して加工。 切断した鏡筒にステップアップリング37-43mmを接着。 先に加工したステップアップリング28-43mmの前に取り付け、完成です。ここまで長かった・・・・・・なおBORGとの接続用に、BORG 7407ADを取り付け。あとはテストなのだが・・・・・・・ 天気悪い(--;
2010/05/27
コメント(8)
-
BORG AF化7 ZUIKO 14-42mm?末記
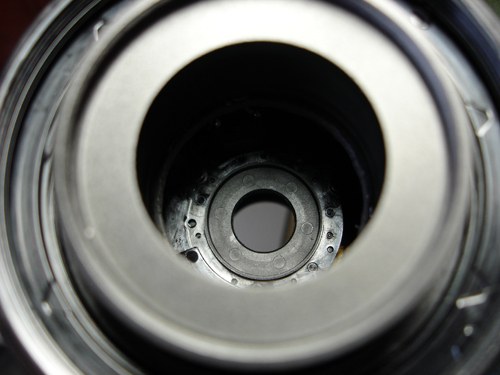
さてさて、またしても雨の日が続きます。こうなると、フィールドへも行けなくなる(ってか、平日は無理だろ!)ので、室内作業&ブログの更新(苦笑) Charborgさんに教えていただいた、ZUIKO 14-42mmベースのセミAFの?末記なお、改造は各自の責任において行ってください(苦笑)なんなく、中古のZUIKO 14-42mmを入手。 早速、作業に取り掛かる・・・・・・ まず、後ろ球撤去。ビス3本(1本外してあります)をはずし、カバーを取り、更にビス3本を外して後ろ球撤去 ビスが硬かったですが、後ろ球(右側においてある)を撤去。次は前玉。 前玉は、ZUIKO 70-300mmと同じ要領で取り外し、 簡単に外れた・・・・・・ 中球のカバー(金属)をマイナスドライバーでこじり、取り去る。 中球ははめ殺しになっているので、1mmのドリルで玉の周囲に穴を開けていく。私はピンバイスを使って、手作業で行ったが、力を入れすぎてフォーカスリングとインナーリングとの勘合がずれてしまっていた。 中球(右においてある)撤去。中に入っているバネ(右隅に写っている)も撤去切り口は綺麗にヤスリをかけた。この時点で、フォーカスリングとインナーリングの勘合のずれ(ダボが外れている)に気が付き・・・・・・・ バラバラ事件(^-^;ばらすのは慣れているので(笑)ただ、この時に不注意でAFモーターのデータライン(フィルム線)を切ってしまい、この玉はお釈迦(-人-)ち~~んあくまで改造は自己責任。 更に中古を探して入手。今度は成功。中球を抜くときに、後ろからスペーサー(台)を噛まして直接中球を支持し、穴あけ加工したので、フォーカスリングはずれずに済んだ。 1日の写真UPの容量を使い切ったので 続く・・・・・・
2010/05/26
コメント(2)
-
5月14日の日記 BORG AF化 その6 ボス!事件です。
ジーパン「ボス!大変です! バラバラ事件です!!」 「殿下、山さん、至急現場に直行してくれ!」続く・・・・かな
2010/05/14
コメント(10)
-

BORG AF化5 やっと形に・・・・
サブタイトル ZUIKO70-300 ?末記 と言う事で、前回の日記で触れたBORG AF化の?末記を。前回、組み立てまでは順調でした。が!が!が! テストをしたところ、AFが合わない。というか、動きがおかしい・・・・・そこでやめておけば良かったものを、続けてテストしたもんだから・・・・・ AFモーター 焼ききってしまいましたorz ZUIKOの頭に接続ADを取り付けたときに、タッピングビスを使用した。そのビスが、ZUIKOのインナー鏡筒まで固定していたのだった・・・・・・これだから、素人は怖い(^^;☆=(--#バキッ! 泣く泣く、ZUIKOを修理に出しました。オリンパス カスタマーサポートさん、ありがとうございました。修理に出して1週間位で直って来たので、テストに出かけたのが3月21日の日記になります。 そして、その後に再び改造。前玉を交換し、 M3ヘキサボルトに交換。長さも削って2.5mmほどにし、接続ADアダプタにもM3のネジを切った。どうしてヘキサボルトにしたか・・・・・ そこにボルトが転がっていたから。同様に、ドローチューブ側のBORG(ボーグ)【7025】80φL25mm鏡筒(接続AD付)のビスもヘキサボルトにした。これで、いざとなれば六角レンチ1本で調整可能。テスト用のチャートは CADで作ったよ(笑) 手元のCADで30分ぐらいで完成。試写の様子はまた後日。 一応の完成形。BORG77ED + ドローチューブホルダー + BORG(ボーグ)【7025】80φL25mm鏡筒(接続AD付) + BORG(ボーグ)【7025】80φL50mm鏡筒(接続AD付) + ZUIKO 70-300mm ZUIKOの前玉はアクロマート50-800mmに交換 まだ設定等煮詰めないといけないが、この装備で頑張るつもり。 フィールドにて 接続部にも、カモフラージュテープを巻いた。ダッドサイトも装備。しかし、ドローチューブから後ろが、やはり自重で下がる。ヒップサポートが必要か?あぁ・・・・・BORG沼よ
2010/04/08
コメント(8)
-
3月7日 BORG AF化4 光軸調整&取付け変更
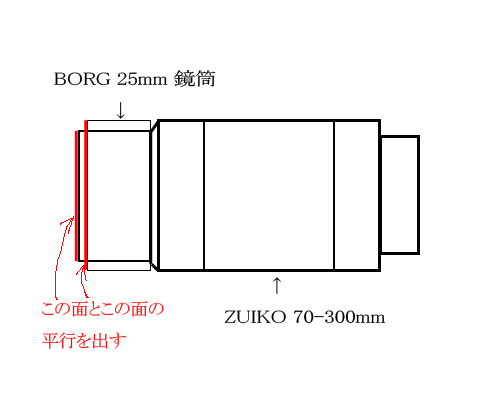
今日2本目の日記(笑)雨止まないので、改造~~~(^皿^;BORGのドローチューブとAFユニットの調整をしました。まず、AFユニット。ADリングを叩き込んだだけだったので、光軸まで確認してませんでした。AFユニットから一時、アクロマートレンズを取り外し。BORG(ボーグ)【7025】80φL25mm鏡筒(接続AD付)をAFユニットの先端に取り付け、ズームでインナー鏡筒をBORGの鏡筒と同じ位置まで出します。この時点で、インナー鏡筒とBORGの鏡筒との位置が合わず傾いている。ので、BORG鏡筒を少しづつ叩いていれ、それぞれの鏡筒が平行になるように調整。写真撮り忘れた(^^; 横着してPhotoshopで図解。本来なら、それぞれの鏡筒の光軸中心点を出して調整するのがベストであるが、手抜きの私は上記方法で(^^; そして、接続ADとZUIKOに2.5mmの穴を4箇所開けタッピング(3×4mm)をねじ込み固定。これでずれない。 更にはドローチューブ側。こちらの方を、BORG(ボーグ)【7025】80φL25mm鏡筒(接続AD付)にすべく、前回巻いたアルミテープの幅を縮小。要らない部分を切り取った。BORG(ボーグ)【7025】80φL25mm鏡筒(接続AD付)に6箇所穴を開ける。そのために、イラストレーターで作図、定規を作る。BORG(ボーグ)【7025】80φL25mm鏡筒(接続AD付)を定規にあて、そのまま垂直に罫書き。一応、鉛筆(シャーペン)で罫書きしたあと。ここに2.5mmの下穴を開ける。下穴を開けたあと、M3のタップを立てる。肉厚が薄いので慎重に。タップを立てたあと、M3×6mmのステンレスボルトを取り付け、ドローチューブ側に接続。ドローチューブとの傾きを確認し、対角線にボルトを締めていく。あくまでBORG(ボーグ)【7025】80φL25mm鏡筒の肉厚が薄いので慎重に閉める。これで、ドローチューブの引き出し量も増え、最短距離も縮まる・・・・はず。 AFユニットを取り付けてみた。これなら、多少の力では動かない。これで光軸ずれていたら泣きだな(;_;)さぁ、テスト~~~~~1週間は雨予報・・・・・・・・・ (__ξ
2010/03/07
コメント(10)
-

3月5日の日記 BORG AF化3 鏡筒との接続
なんだか全然進んでませんでした、BORGのAF化フロントヘリコリドセットを購入しましたが、接続できず。ずっと悩んでおりました。アルミからアダプタをワンオフしてもらおうかとも考えましたが、そんな事したら・・・・・ 悩んでもしょうがないので、対応策を考える アルミ箔テープ ¥590- 安く確実な方策を考えた。接続鏡筒と、ドローチューブの径が合わない。ドローチューブ側が細すぎるので、太くすればいいと・・・・ アルミ箔テープは幅5cmだが、4cmにカットしひたすらドローチューブに巻く。コツとしては、一気に巻かず50cm位の長さで切ったものを、延長鏡筒のクリアランスと合わせながら何枚も張っていく。 いい感じになったら、延長鏡筒(7050)を無理やり入れる(^^;以外にしっかり止まる。これで固定完了。これでも動くようなら、ねじ切ってタッピングぶち込む(笑)あとはここに、先日作ったAFユニットを接続するだけ。試写したが、ドローチューブを縮めた状態で一応無限遠でピント合致しているようである。ただ、絵が甘い。手持ちで撮ったので、手ブレなのかレンズなのか検証の余地あり。なお、最短はドローチューブ引き伸ばし、200mmポジションで8mほど。これも、なお検証の余地有り。全ては天気がよくならないと・・・・・
2010/03/05
コメント(3)
-
2月27日 BORG AF化2 三歩進んで2歩下がる
って、ね~~~~~フロントヘリコロイドセット購入したけど、接続できませんでした(;_;) しょうがないので、手で押さえて接続、光路長の調整を・・・・・・・おかしい・・・・・・・焦点が合わない・・・・・・・もしや(-_-; アクロマートレンズが裏返しだった(__;接着やり直し・・・・・・
2010/02/27
コメント(3)
-
2月25日の日記 BORGのAF化
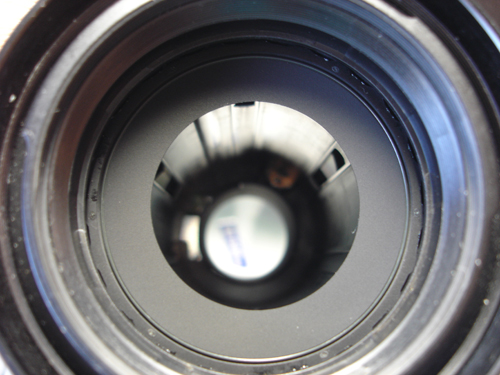
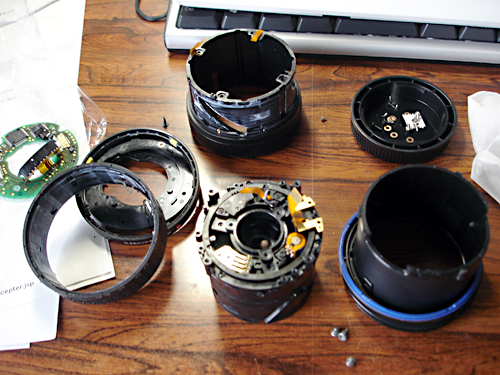
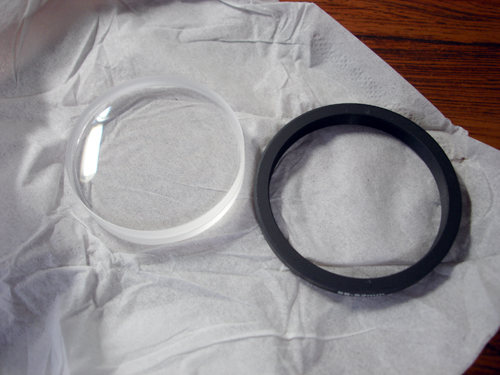
ぼちぼち花粉が飛んできました~~~(-Π-)鼻がつまり気味です。 今週は天気がよくなったので、仕事で忙しい。忙しい中をぬってBORGのAF化に着手しました。AFと言っても、光路長の問題で完全なAFではないらしい。大まかにドローチューブで合わせてAF。 用意するものは~・ZUIKO ズーム 30-700mm・アクロマートレンズ D50-800mm・ステップダウンリング 52-58mm・椅子の足キャップ・吸盤・BORG(ボーグ)【7050】80φL50mm鏡筒(接続AD付)・BORG(ボーグ)【7025】80φL25mm鏡筒(接続AD付) まずはレンズを作成。 アクロマートレンズ D50-800mm(左)と、ステップダウンリング 52-58mm(右) ステップダウンリングの内側をゴリゴリとヤスリで削ります。 丁度いい大きさに削ったら、アクロマートレンズを挿入し、ホットメルで仮固定。下の500円玉は高さを揃えるためのスペーサー代わり。裏側もホットメルで仮固定。この時点でアクロマートレンズ1個欠いてしまった・・・(;_;)仮固定したら、周りを接着剤で固定します。 次に~~~ZUIKO 70-300mmの前玉を抜きます。 椅子の足カバー(¥163)と100円ショップの吸盤(笑)これだけで前玉が抜けるとは!moutonさんのページを参考にしました。 椅子の足キャップをレンズ面に押し当てて半時計周りにまわします。レンズにキャップが接触するので、私はティッシュの切れ端を入れました。 黒い枠が外れます。ティッシュが見えますね。 次に吸盤を2個レンズに取り付けます。私が購入した吸盤はちょっと大きかったので、レンズ面に吸着するように吸盤1個は切りました。その上から、先ほどの椅子の足カバーを裏下して押し当て、再び反時計回りにまわします。 あっという間に前玉(右)が外れます。 外れた位置に、先ほど作っておいたアクロマートレンズを装着。 更に、BORG(ボーグ)【7025】80φL25mm鏡筒に付属の接続ADをZUIKO70-300mmの筒に木槌で叩き込み、接続鏡筒を取り付け。 これで準備万端!さて、BORGに接続・・・・・・・・・って、付かない(--;) どうやら、M68.8→M75が必要である・・・・・あぁ、BORG沼よ!
2010/02/25
コメント(4)
全12件 (12件中 1-12件目)
1