
Schedule Google SecOps dashboard reports
This page explains how you can schedule the delivery of Google SecOps dashboard reports over email.
You can schedule the delivery of Google SecOps reports for both the default dashboards and custom dashboards. When you schedule delivery of a Google SecOps dashboard report, you perform the following tasks:
- Schedule the delivery of the dashboard report immediately or on a recurring schedule.
- Specify the email addresses to deliver the report.
- Specify the format of the report such as CSV, PDF, or PNG file.
- Filter the report based on a specified time period.
- Set the pagination details and test the delivery of the scheduled report.
Control access to scheduling dashboard reports
You must have the Administrator role or Editor role to schedule dashboard reports. For more information about managing Users and Groups, or assigning roles, see Role-based Access Control .
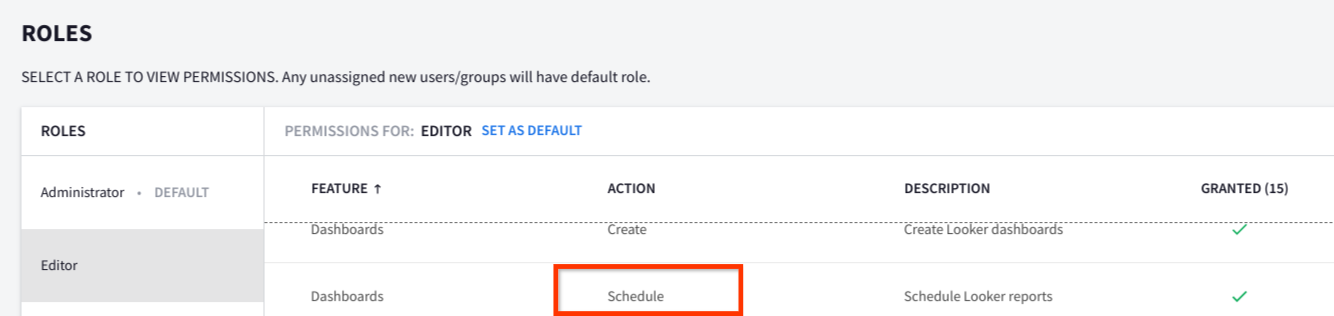
Figure: Administrator role and Editor role provide access to schedule reports
Create a new schedule for report delivery
If you do not have any pre-existing schedules for the dashboard report, create a schedule for dashboard reports and customize the recurrence, destination email, format, filters, and pagination.
- Select the default or custom dashboard for which you want to schedule the report delivery.
- In the navigation bar, click Dashboards & Reports > SIEM Dashboards. For Google Security Operations SIEM customers, just click Dashboards.
- From the list of default and personal dashboards, select the dashboard for which you want to schedule the report delivery.
- To schedule the delivery of a dashboard report, on the dashboard page, click the more_vert Moreicon and select Schedule delivery. If report schedules exist for the dashboard, the Schedulesdialog appears with options to edit or create new schedules. If report schedules don't exist for the dashboard, the Scheduledialog appears with the dashboard name appended in the following format: Schedule <Dashboard Name> .
-
In the Scheduledialog, specify the following details on the Settingstab:
- Select the interval of delivery from the Recurrencelist and select the time of delivery. You can also specify the delivery timezone on the Advanced optionstab.
-
In the Email addressesfield, enter a comma-separated list of email addresses to which you want to deliver the report. The email domain must be the same as the user domain that you use to login to Google SecOps. For example, if you login to Google SecOps using
sara@altostrat.com, you can specify only emails that uses thealtostrat.comdomain, such asalex@altostrat.com. By default, you cannot send emails to other external email domains.To send emails to an additional domain or to allow emails to be sent to any domain by disabling email domain validation, contact Google SecOps Support.
-
In the Formatlist, select the CSV, PDF, or PNG file format for the report.
-
On the Filterstab, specify the time period based on which you want to filter the report. If the dashboard does not contain filters, a message that the dashboard has no filters appears.
- To specify a filter, click the Timefield and specify the filter condition, month, and year.
- To add more time filters, click add Addicon.
-
On the Advanced optionstab, specify the pagination options for the email.
- To include a custom message in the email, in the Custom Messagefield, add a custom message.
- If necessary, select the following options:
- Include links: includes links in emails to the dashboards for which you have scheduled report delivery.
- Expand tables to show all rows.
- Arrange dashboard tiles in a single column.
- In the Paper sizelist, select the paper size.
- In the Delivery time zonelist, select the timezone to deliver the message.
-
To test the delivery of the report over email, click Test now.
-
Click Save. The Schedulesdialog appears.
-
To edit, duplicate, or delete the scheduled delivery, in the Schedulesdialog, click the more_vert Moreicon.
-
To send the report immediately, click Send now.
-
To create another new schedule, click New.
-
To close the dialog, click Done.
Use an existing schedule for report delivery
If a schedule for the dashboard report delivery exists, you can immediately send the report or modify the report delivery options.
- Select the default or custom dashboard for which you want to update the report schedule.
- In the navigation bar, click Dashboards & Reports > SIEM Dashboards.
- From the list of default and personal dashboards, select the dashboard for which you want to schedule the report delivery.
- On the dashboard page, click the more_vert Moreicon and select Schedule delivery. If report schedules exist for the dashboard, the Schedulesdialog appears with options to edit or create new schedules.
- To edit, duplicate, or delete the scheduled delivery, in the Schedulesdialog, click the more_vert Moreicon.
- To send the report immediately, click Send now.
- To create another new schedule, click New.
- To close the dialog, click Done.
Need more help? Get answers from Community members and Google SecOps professionals.