
[ラジオ] カテゴリの記事
全192件 (192件中 1-50件目)
-
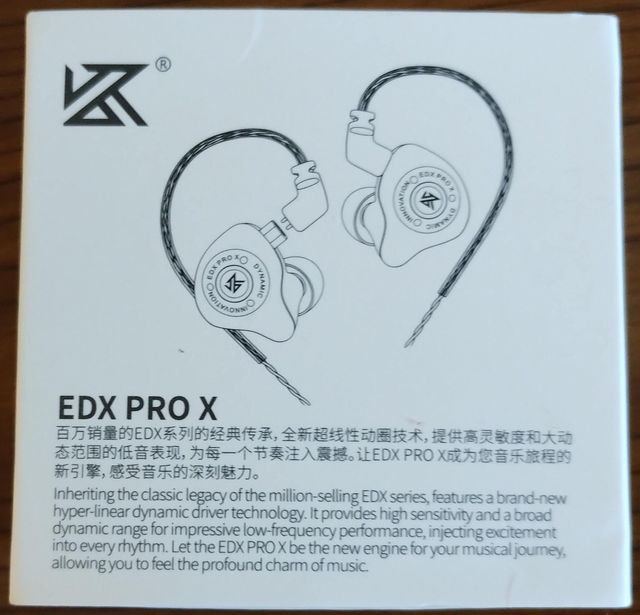
KZ EDX Pro X を使ってみた
今日は雨時々曇り。そんなに激しく降らないので買い物とかは何とかなりそうです。---AliExpress で買える KZ 製のイヤホンで KZ EDX Pro Xが割と安く(1.5千円を切るぐらい)で売られえていたので確保しました。パッケージの表側パッケージの裏側パッケージはシンプルで裏側にはスペック表がついています。f特は20~40,000Hzとなってますが、高域側はそんなに出るのかどうか分かりません。(^^;リケーブル可能なイヤホン本体パッケージに入った状態を撮り忘れたのですが、イヤホン本体はリケーブル可能となっており、ケーブルと独立してパッケージに入ってました。クリアタイプの色を選んだのですが、ナカナカきれいです。ケーブルに接続したイヤホン今回はマイク付を買ったので、音楽プレーヤの停止、再生、曲送りの操作ができます。無しでもよかったのですが、値段が変わらんかったので... (^^;;さて、KZ EDX Pro X は 1DD (Dynamic Driver)なのですが、思ったより高域が出てて驚きました。音全体はクリアでキレのある感じです。低音が少し弱めに感じますが、今まで使ってきた中国製イヤホンが低域ブースト気味やったので、KZ EDX Pro X ぐらいが普通のバランスのような気がします。JungleやDrum'n'bassはキレがあって心地よく、80年代洋楽はボーカルが割とのびていい感じです。高域がちゃんと出てるっちゅうところが効いてるのかもしれません。ただ、低音は控えめなので、低音をきかせたいときはQKZ AK6 Pro とかの方がよいように思いました。KZのイヤホンは以前にKZ ZSN Proを確保して使っていました。KZ ZSN Pro は 1DD+1BAなので、高域と中低域が出るのは当たり前な気がしますが、KZ EDX Pro X は 1DDなのに KZ ZSN Pro と同じぐらいに聴こえます。KZ EDX Pro Xの方がキレはよくて私が常日頃聴くような音楽については、こちらの方が合ってる気がしました。っちゅうことで、KZ ZSN Proは家用、KZ EDX Pro Xが持ち歩き用になりました。KZ の安いイヤホンにも興味がありますが、QKZのイヤホンと同じような気もしてどうするか悩み中です。中国製イヤホン沼にハマるとそれはそれで大変そうなので、どうしようかな... (^^;;--- 10:30 ---
June 23, 2024
コメント(0)
-

KZ ZSN Pro のイヤーピースを替えてみたが...
今日は早めで帰宅は18時過ぎ。中国製イヤホン KZ ZSN Pro のイヤーピースの耳へのフィット具合がイマイチな気がして、某ワンクリックなところで交換用イヤーピースを買ってみました。安いやつ安いのを買ったので、イマイチかな?? と思いながらも交換してみました。耳へのフィット感はあまり改善せず、音質も中低音が出なくなり、やっぱりイマイチなイヤーピースでした。それなりに高いのを買わんといかんのかもしれません。(^^;っちゅうことで、KZ ZSN Pro の元々のイヤーピースを付け直してみたら、前よりも中低音の感じがよくなったように思いました。付け方でも音質は変わるもんなのか??まぁ、高い交換用イヤーピースもどれがいいのか分からんので、現状のまま使うことにします。--- 18:20 ---
June 5, 2024
コメント(0)
-
KZ ZSN Pro も使ってみた
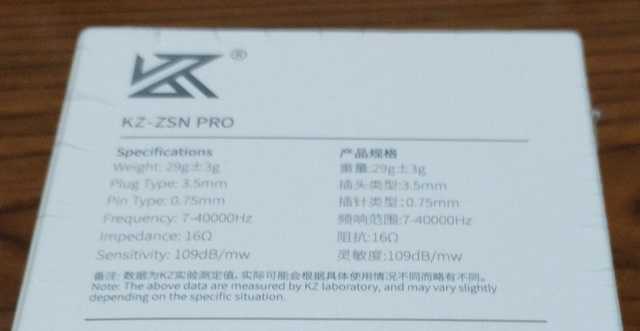
今日は早めで帰宅は18時過ぎ。こないだから AliExpress で中国 QKZ 製のイヤホン AK6 と AK6 Pro を確保して使ってみて、中低音に強い私好みのイヤホン、という印象を持ちました。中国のイヤホンメーカは他にもたくさんあるようなのですが、AliExpressでそこそこの価格で確保できるのは KZ 社のイヤホンのようなので、KZ ZSN Pro というのを確保してみました。約1.8千円で AK6 の6倍します。(^^;パッケージの仕様表仕様によると 7~40,000Hzとなっていますが、年寄りには高域が聴こえにくいので、高い方は検証が難しそうです。パッケージ1DD (Dynamic Driver) + 1BA (Balanced Armature) の構成らしく (AK6/Proは1DD)、BAで高域を補っているのかもしれません。パッケージの中身パッケージにはイヤホン本体、ケーブル、予備のイヤーピースが入っていました。AK6 Proと同じくケーブルが外せるタイプです。L/Rはケーブルに記載があるので、注意してイヤホンをケーブルに接続します。ケーブルに接続したイヤホンケーブルを接続したので試聴してみます。中低音の具合を確認するのに Jungle や Drum'n'Bass を聴いてみました。中低音はしっかり出ています。AK6/Pro よりもまろやかな出具合、高域とのバランスが取れてる良い感じでした。ボーカルとかの聴こえ具合を確認するために、80年代洋楽を聴いてみました。AK6/Proよりも高域の伸びがよく、また、音場もより広がりがあるように感じました。音のキレもよく、なかなか良い感じです。高域がより出てるっちゅうことで、オーケストラものを聴いてみました。だいぶ楽器の音がくっきりしますが、まだ何となく足りないものがあるように思いました。AK6/Proよりはよい感じです。っちゅうことで、AK6 Proがナカナカ私に合うイヤホンやと思ったのと同様、KZ ZSN Proも私の好みに合うイヤホンで、AK6 Pro よりも良い感じに思えました。より中低音をきかせたいときには AK6 Pro、バランスよく聴きたいときには ZSN Pro かな、っちゅうところでしょうか。--- 19:15 ---
May 24, 2024
コメント(0)
-
QKZ AK6 Pro も使ってみた
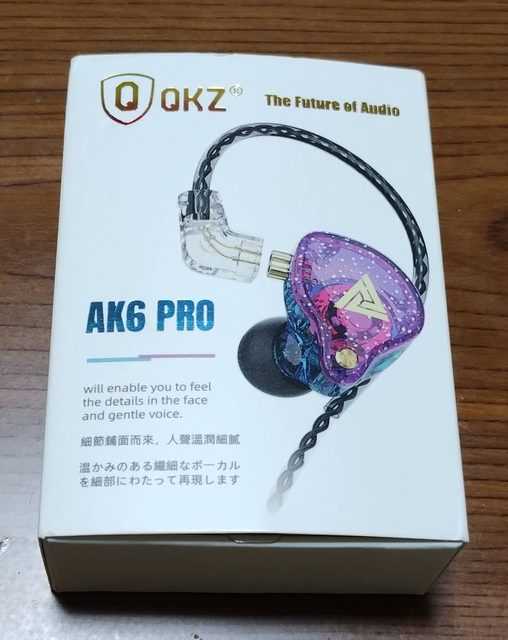
今日は早めで帰宅は18時過ぎ。AliExpressで確保したQKZ AK6が気に入ったので、その上位と思われる QKZ AK6 Pro を確保してみました。こちらはAK6の0.3千円に比べて少し高くて0.45千円でした。安いのは安い。(^^;パッケージパッケージは AK6 とは違い、紙パッケージに梱包されていました。ケーブルが外せるイヤホンはケーブルが外せるタイプでパッケージにはケーブルを外した状態で入っていました。ケーブルを替えたからどうなるかは分かりませんが... (^^;;リモコンは1ボタンAK6と違ってリモコンに音量調整はついていませんでした。ボタンの操作はAK6と同じようです。さて、Proというからには何か違うんやろうと期待して聴いてみたのですが、ものすごく音が変わるかというとそうでもなかったです。(^^;;高域は AK6 Pro の方が若干出るようです。あと、音のキレが AK6 Pro の方が良いように思いました。トータルとしてボーカルに少し強くなった感があります。中低域が出るのは AK6 と変わらないので、JungleやDrum'n'Bassなどに強いのは変わりありませんが、80年代洋楽にも強くなったように思います。高域の伸びが今ひとつなところがあるので、オーケストラっぽいのにはあまり向いてないように思いました。っちゅうことで、AK6 Pro は AK6 よりはイイ感じで聴ける音楽ジャンルが増えたように思います。値段の差を考えても AK6 Pro にしといてもよいのでは??っちゅう感じです。--- 18:40 ---
May 20, 2024
コメント(0)
-
QKZ の有線イヤホン AK6 が気に入った
今日は曇り。曇ってるけど気温は上がる予報です。雨は降らんといてほしいなぁ。---AliExpress で格安で売られてるQKZのイヤホンを確保してみました。確保したのは、300円の AK6 です。公式ページには AK6 Pro しか載っていませんが、その廉価版なのかな? といっても、AliExpressでは AK6 Pro も450円ぐらいで売ってますが... (^^;ちゃんとパッケージに入ってるAliExpressなので、バルクで袋入りでやってくるのかと思いきや、ちゃんとパッケージに入った状態でやってきました。残念ながらパッケージには発送用のシールがべったり貼られてて裏面ぐらいしかまともに書いてあることが読めませんでしたが... (^^;;メーカロゴ入りのケースに入ってるメーカロゴ入りの黒いプラスチックのケースに入ってていい感じです。300円とは思えません。パッケージの中身ケースを開けると白い袋に入ったイヤホン本体(上の図では袋から出してます)、交換用イヤーピース、イヤーフック、が入っていました。イヤホンのプラグにはカバーも付いていました。イヤホンの構造イヤホンにはマイク付のコントローラが付いています。このコントローラにはスライド式のボリュームとマルチコントロールボタンがついています。ボタンを一回押すと曲のポーズ、二回押すと次の曲、三回押すと前の曲、といったコントロールができるようです。さて、この状態でスマホにつないで80年代洋楽を聴いてみたのですが、何だかスカスカした音でした。うーむ、このイヤホンはハズレか... と思いつつ、販売ページのイヤホン付けてる女の人の写真をよく見ると、イヤホンを耳にはめる向きが上下逆でした。(^^;;イヤホンを定位置にはめて耳にしっかりフィットするようにするとちゃんと中低音も出るようになりました。さらに、このイヤホンにはイヤーフックが付属してるので、これをイヤホンに付けてみました。イヤーフックを付けるイヤーフックを付けるとイヤホンがより耳に密着するようになるので、中低音からある程度の高域までちゃんと聴こえるようになりました。このイヤホンはどうもイヤーフックを付けて使うのが前提のようですね。イヤーフックを付けて耳に装着イヤーフックを付けて耳に装着するので、耳に差し込むだけのイヤホンと比べると少し大がかりになりますが、本来の持ち味を出すためには仕方ありません。さて、AK6 を使用して音楽を聴いてみました。80年代洋楽、New wave から Funk、Metal など取り交ぜて聞いてみました。高域はそれなりですが、中低音がしっかりしています。あきばお~で売ってるPanasonicの800円ぐらいのイヤホンよりいい感じです。The Pointer Sisters の Automatic なんかがぐっときましたね。次に昭和歌謡。元の音がそんなに派手ではないので、それなりに聴こえました。このイヤホン、特にボーカルに強い、というわけではなさそうなので、まぁ、普通、っちゅう感じ。聴いてみて、このジャンルにピッタリ、っちゅうのが、Jungle とか Drum'n'Bass です。ベースとドラムがグンと前に出てきて前述の Panasonic イヤホンには出せない音ですね。まぁ、逆に言うと、この辺に癖がある、っちゅうことですが... (^^;; これはナカナカいいイヤホンを引き当てました。っちゅうことで、QKZ AK6 は AliExpress の100円ショップで 300円で買えるのにもかかわらず、国内で売ってる1千円ぐらいのイヤホン並みの音を持ってるっちゅう感じです。特に、ドラム、ベースが重厚な Jungle、Drum'n'Bass といったジャンルの音楽にはピッタリと思います。中低音に強いイヤホンです。AK6 は私好みのイヤホンでした。--- 10:15 ---
May 12, 2024
コメント(0)
-
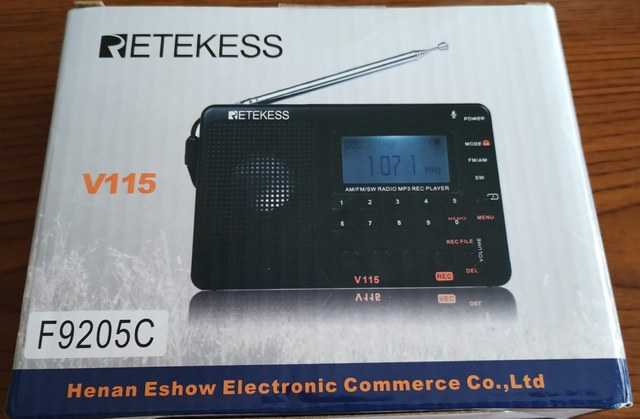
AliExpress で Retekess V115 を確保した
今日も晴れて良い天気。昼間は暑くなりそうです。---AliExpress を眺めているとセール品の中に AM/FM/SW ラジオ+MP3プレーヤ の Retekess V115 が2千円しない価格で売られているのを発見。最近の短波が入るラジオはどんなんかな、っちゅうことで確保してしまいました。(^^; Rektess っちゅうのは深センの会社らしく、日本語のページもある割としっかりした会社のようです。外装の箱AliExpressにしては珍しく(^^)箱潰れ無しで届きました。開けてみます。内容物内容物としては、ラジオ本体、充電ケーブル、マニュアル、が入っていました。ラジオのバッテリは放電防止のため袋に入っているので、一度裏ブタを開けて袋から出してセットする必要がありました。また、マニュアルは複数言語で書かれており、日本語もちゃんとありました。これはありがたい。ラジオを聴いてみるラジオは電源を入れてAM/FMあるいはSWのボタンを押すと聴くことができます。社宅は電波状態が非常に悪いので、AMのローカル局しか受信できませんでした。(^^;; また、FMの周波数帯は最初から 64MHz~108MHzに設定されており、日本の放送局も問題なく聴ける状態でした。ロシア局も受信できるね。一方、AMの方は最初10kHzステップに設定されていたので、9kHzステップに変更する必要がありました。メニューの言語設定で日本語も選べる設定メニューを開くと言語設定があるので、そこで日本語を選べばメニュー等が日本語表示になります。わかりやすい。V115 には MP3 プレーヤ機能とラジオ録音機能が付いてるので SD カード(TFカード)を本体に挿せば、これらの機能を使うことができます。マニュアルによると SDカードを挿した状態でPCに接続すると、外部ストレージとして認識されるようです。私はPCで音楽ファイルをSDカードに入れてから本体に挿しましたが、後からでも音楽ファイルの追加はできるようです。音楽ファイルはフォルダ構成も可MODEボタンを押すとMP3プレーヤモードになります。音楽ファイルを再生するときにプレイボタンを単純に押して再生するとファイルがフラットに展開された状態で再生されますが、プレイボタン長押しすると、フォルダ構成になった音楽ファイルのフォルダを選ぶことができて、アルバム単位での再生が可能となります。最初知らなくて、マニュアルをよく読んだら書いてありました。やっぱりマニュアルは読まんといかん場合があるね。(^^;;音楽再生中再生してる曲名は置いといて(^^)、日本語ファイル名もメニューで言語設定を日本語にしておけばちゃんと表示されます。途中で端折られることもありますが... スピーカはモノラルですが、イヤホンを挿すとステレオで聴けます。音は軽めかな。デフォルトでは低音がちょっと薄いけど、内蔵イコライザをかけるとブーストすることもできそうです。試してないけど... (^^;;っちゅうことで、2千円しないラジオで AM/FM/SW が受信と録音でき、MP3プレーヤにもなる、とは時代も進んだものです。まぁ、AliExpressのセールのおかげでもありますが... セールでなくても AliExpressでは2.2千円~2.6千円ぐらいで売られてるようです。これから短波の入るラジオを探してる人には向いているかもしれません。--- 10:10 ---
April 14, 2024
コメント(0)
-
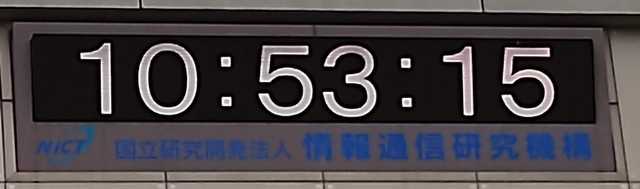
NICTオープンハウス2023に行った
今日は曇り時々晴れ。NICTのオープンハウス2023が開催される、っちゅうことで、遠征してきました。情報通信研究機構の文字と日本標準時建物の上部に日本標準時が出てました。日本標準時は情報通信研究機構(NICT)で生成されて、電波時計の基準となる40kHzと60kHzの日本標準時の報知とかNTPサーバの設置とかで日本国中で利用されています。まずは日本標準時の元となるセシウム原子時計を見てきました。セシウム原子時計説明員の方はJJYが短波での放送を止めた年にはまだ小学生やった、とのことで、お互い時代を感じました。(^^;その他、電磁波関係のことをNICTでは色々やってて、beyond 5Gとか6Gで必要とされるテラヘルツ波についても研究開発をやっているようでした。謎の多い白い部品NICTが開発したのではない(岐阜大とソフトバンク)のですが、テラヘルツ受信アンテナの先っぽに取り付けると受信感度がかなり上がる、っちゅう謎の白い部品を使ってデモをやっていました。寸法はきっちり書かれてるのですが、どうも製造が難しいらしい。謎の誘電体部品だそうです。その他にもNICTは色々やってて、生物(バクテリア)を使った液体識別用センサを作ってるそうです。バクテリアの好きな物質か嫌いな物質か、をバクテリアの動きから機械学習で判断し、その液体が何なのかを検知しよう、っちゅう、あまり考えもしない研究開発でした。(^^;;生体センサ全体に基礎研究開発が多い印象ですが、応用に向かって実験が進んでいるものもあり、なかなか楽しめたオープンハウスでした。来年も時期が合えば行ってみようかな。--- 15:40 ---
June 24, 2023
コメント(0)
-

「モールス電鍵ミニチュアコレクション」のガチャを子ども(壱)が発見した
今日は早めで帰宅は18時過ぎ。会社のもう若くはない若い衆が探していたモールス電鍵ミニチュアコレクションは秋葉原では発見できませんでした。子ども達は通学などであちこち出かけるので、捜索を依頼していたのですが、遂に子ども(壱)が都内某所で発見しました。某所で発見されたモールス電鍵のミニチュアガチャ子ども(壱)に頼んで1回まわしてもらいました。出てきたミニチュア電鍵元々が色違いだけのようで、出てきたのは茶色みたいです。1回500円なので、4種類コンプするにはそれなりの投資が必要になりそう... (^^;若い衆には今度渡すつもりです。若い衆によると、これを無線機のキー入力のところにつないで、実際に電信で交信した猛者がいるらしい。(^^;; 軽そうやから重しがないとツラいでしょうね。まぁ、見つかってよかったです。--- 18:40 ---
November 28, 2022
コメント(0)
-
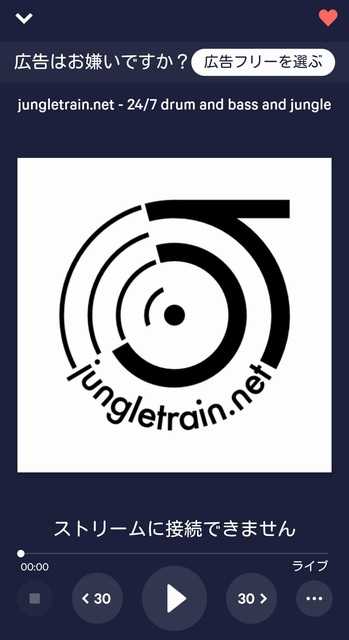
TuneIn Radio で jungletrain.net に接続できない
今日は在宅勤務。ちょっと前からスマホに入れたTuneIn Radioで jungletrain.net のストリームにつながらなくなりました。ストリームに接続できませんDrum and bass系の音楽、特に Jungle系を聴きたいときに jungletrain.net は重宝してたのですが、どうしたことか...と途方に暮れてても仕方ないので、jungletrain.net の Webページに行ってみると、プレイアイコンがありました。これをクリックするとちゃんとストリームが再生されます。WebページのストリームはOKなのに、TuneIn Radio のストリームがNGなのは何か納得いきませんが、とりあえずは聴く手段は確保できました。これで高速バス移動中でも Jungle系の音楽を聴くことができます。--- 18:50 ---
September 2, 2021
コメント(0)
-
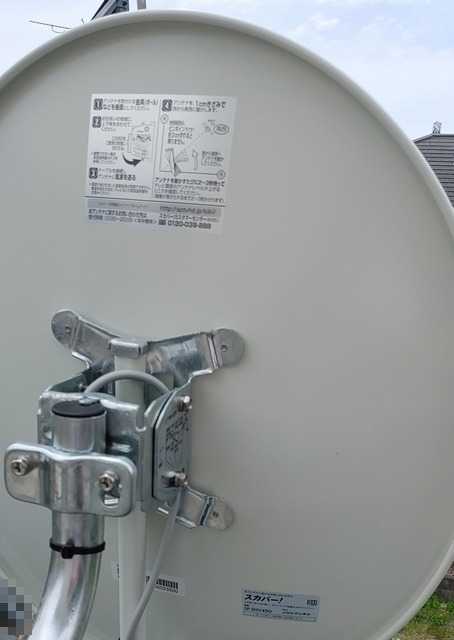
スカパー!のアンテナを付けてもらった
今日は晴れ。嫁はんがスカパー!の番組が観たい、っちゅうので、スカパー!のアンテナを付けることにしました。光TVとかとセットで申し込むという手もあったのですが、物理的にアンテナを付けた方が安くあがる、っちゅうことで、アンテナ設置を依頼しました。スカパー!には新規加入になるので、スカパー! アンテナサポートを申し込みました。Webから工事日を指定して申し込むと、工事日前日に工事時間のお知らせ電話があり、当日工事となります。工事の人がやってきて、まずは設置場所の検分。2階のベランダがよかろうっちゅうことで、テスト用のアンテナにマスプロの測定器を接続して衛星がちゃんと見えるか確認してました。設置場所が決まったら、早速設置工事。アンテナマストをベランダに取り付け、パラボラアンテナをそれに設置します。設置したら、測定器で電界強度を見ながら方向の微調整をしてました。方向が決まったらネジを全部締めて固定完了です。設置したアンテナアンテナはDXアンテナ製でスカパー!の他にBSも見られるようです。嫁はんはBS放送も見たいと言ってたのでちょうどいい感じ。1階のレコーダに接続するので、アンテナからのケーブルは2階から1階に降ろし、窓の隙間から家の中に引き込ました。引き込み部分だけ薄型のケーブルに付け替えて配線を行ってました。薄型のケーブルで引き込む配線が終わったら、工事の人がカスタマーセンターに電話をかけて2週間のお試し契約をしてくれました。これで、スカパー!が見えるようになりました。今まで地上波しか見えませんでしたが、これで、BSとスカパー!が見えるようになりました。今回のプランを有効にするにはスカパー!に1年間契約しないといけませんが、5チャンネルだけ選択するプランが安いので、それで契約しようかと思います。我が家の文明度が少し向上しました。(^^;--- 14:25 ---
August 21, 2021
コメント(0)
-
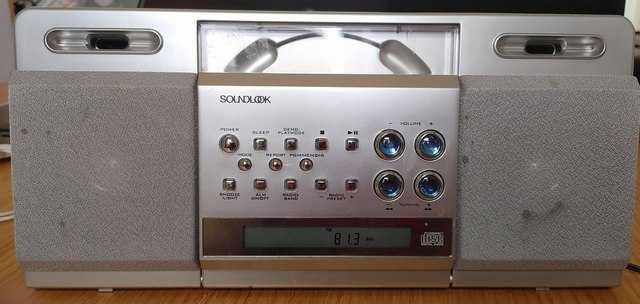
SOUNDLOOK SAD-4302 のジャンク品を買った
今日は晴れ時々曇り。まだそんなに暑くはないです。昼からは暑くなるのかな?---昨日、某リサイクルショップに偵察に行ったところ、KOIZUMIのラジオ付CDプレーヤ、SOUNDLOOK SAD-4302 がジャンクコーナーで助けを求めていました。(^^; ジャンク品なので動くのかどうかわからない(値札しかついていない)のですが、値段が330円やったので確保してしまいました。ACアダプタはセンタープラスの9Vが必要やったのですが、ごそごそ探すと、プラグ径が合いそうなモノを発見。これも330円でした。本体と同じ。(^^;;SOUNDLOOK SAD-4302正面SAD-4302 裏側正面にはCDコントロール用のボタンが上部にあり、ラジオ関連が下部にあります。電源を入れるとラジオが起動するようです。RADIO/BANDボタンを押してもラジオは起動しました。ラジオはシンセサイザ方式でAMは9kHzステップ、FMは50kHz単位で選局することができます。選局用のTuningボタンがだいぶ渋くなってて強めに押さないと反応してくれませんでした。(^^;; FM受信用のロッドアンテナは付属していないので、FMの感度はそれなりです。関東エリアの強い局なら受信できます。背面にアンテナ用端子があるので、ここにビニール線などをつなげば感度は上がると思われます。AMの方はPCのノイズの影響が大きくてまだちゃんと評価できていません。昼間なので、関東エリアの主要局しか入りませんが、夜に評価すると実力がわかると思います。CDプレーヤは特に使わないので(^^)、検証してません。この感じやと動きそうですが...スピーカとしてツイータが付いてるようなので、高音の伸びは割と良いです。低音はスピーカ径が小さいので、まぁ、こんなもんか、っちゅうところ。割と安くそれなりのラジオが手に入ったので満足です。--- 10:55 ---
August 11, 2021
コメント(0)
-

ソーラー充電ラジオCB-G406を使ってみた
今日は早めで帰宅は18時過ぎ。先週末、アキバ特区でジャンクとして0.28千円で売っていたCB-G406というソーラー&USB充電ラジオを買ってみました。CB-G406のパッケージこのラジオ、何年か前に秋葉原で売ってたような気がするのですが、気のせいでしょうか... (^^; まぁ、0.28千円という激安なので動かなくても部品取りにできそうなのでよいでしょう。パッケージを開けると、ぷちぷちに包まれたラジオ本体と箱に入った説明書とケーブル、プラグ類が出てきました。このラジオ、USB TypeA端子から外部に給電できる、という機能もあるので、そのためのケーブル、プラグ類です。内蔵電池の容量からしてもナカナカ無謀な機能な気はするのですが、気休め程度には充電できるのかもしれません。この点に関しては今回未検証です。(^^;;ソーラー充電ではいつになったら充電できるかわからないので(^^)、USBから充電することにしました。充電用の端子はminiB... miniBの充電器なんて持ってたかな(持ってたのですが...(^^)??と思ったら、先ほどのケーブルの中にTypeAからminiBのケーブルもあったので何とかなりそうです。充電するのにケーブルを挿したら、時計表示がいきなり出てきました。時刻合わせは説明書見なくてもできるオーソドックスな方法でした。デフォルトモードは時計モードデフォルト、っちゅうかラジオの電源オフ時には時計表示になっています。一番左のON/OFFと書かれたスイッチを長押しすると電源が入ります。電源が入った後はこのスイッチがAM/FMの切替スイッチになります。USBで充電中にラジオを聴こうと思ったのですが、ノイズがひどくて使い物になりませんでした。(^^;; っちゅうことで、ある程度充電が済んでからスイッチオン。ラジオ受信中何か操作すると青色LEDの照明が点灯音量は+/-で可変、周波数は三角矢印で上下します。何かスイッチ操作すると青色LEDの照明が点灯します。イマイチ見にくいけど... (^^;; AMの受信範囲はパッケージには520~1710kHzと書いてますが、実際は522~1620kHzでした。FMはパッケージに書かれた通り、76~108MHzでワイドFMに対応しています。そして、何とこの激安ラジオ、DSPラジオのようなのです。周波数はAMが9kHzステップ、FMが0.1MHzステップで変化します。三角矢印を長押しするとup/downスキャンが始まり、ある程度の強度の信号が受信されたらストップします。また、操作がヤヤコシイですが周波数メモリ機能もあります。あと、フェーディングのときなどのAGCの効き方がステップ動作で音量が離散的に変わります。っちゅうことから、どうも中身はDSPラジオのようなのです。LEDライトも付いているラジオの他にLEDライトも付いています。しっかり点灯しました。っちゅうことで、中身はどうなってるのか見たくなりますよね? (^^;; 底面の4本のネジを外すとソーラーパネル側がパコっと外れます。電池が邪魔やな中にはリチウムポリマー電池(?)とLEDライト、基板、スピーカなどが入っていました。スピーカは一応2つあるのでステレオ対応??と思われます。電池をどけると...電池をどけてみたのですが、ラジオICチップやCPUは裏面にあるようで見えませんでした。これ以上分解するのがめんどくさくなったので(^^)、ラジオICの型番までは分かりませんでした。ラジオとしての性能を調べたいところですが、単身赴任先の社宅は鉄筋アパートなので、電界強度が極めて低いのです。なので、AMはローカル局が2, 3局、FMにいたっては何も受信できませんでした。(^^;; っちゅうことで、性能評価は自宅に持ってかえって行うしかないようです。っちゅうことで、このCB-G406、動く個体に当たれば(^^)、それなりに使えそうなラジオです。激安0.28千円やし。--- 19:05 ---
October 23, 2020
コメント(0)
-
SRW-710Sの中波感度はいまひとつだが及第点か...
家にいるので、SDカードに再録可能なマルチバンドラジオ、SRW-710Sの中波帯の使い勝手を調べてみた。夜になって東京から関西のラジオ局がどれぐらい受信できるかを判断基準にしてるんやけど、受信自体は大体できました。558kHz ラジオ関西1008kHz 朝日放送1179kHz 毎日放送1314kHz ラジオ大阪あと、1170kHz KBSワールドラジオ1044kHz 中国国際放送も受信はできました。ただし、信号強度がイマイチでフェージングの谷に入るとさっぱり受信できなくなります。分解したときに見ましたが、まぁ、あの短いバーアンテナではそんなに感度は期待できそうにないです。何にしても受信はできてるので、私としては及第点かな、というところです。1143kHz KBS京都 も1134kHz 文化放送のサイドをかぶりながらかろうじて受信できているので。SRW-710Sの中波帯は感度はイマイチなものの、それなりに受信はできる、っちゅう印象です。--- 20:45 ---
January 11, 2020
コメント(0)
-

SRW-710SをMP3プレーヤーとして使ってみた
今日は早めで帰宅は18時半過ぎ。単身赴任先の社宅は鉄筋なので、ラジオがほとんど入りません。(^^; っちゅうことで、Shigezoneで買ったSDカードに再録可能なマルチバンドラジオ SRW-710S のラジオの性能を調べることができません。これは年末年始に家で確認してみます。っちゅうことで、SDカードに入れたMP3ファイルを再生する MP3プレーヤーとして SRW-710S を使ってみました。(^^;; MODEキーを押すとプレーヤーモードになります。とりあえず最初の曲を再生し始めます。操作は簡単SRW-710Sと白く書かれた上にある3つの丸いボタンで操作できます。真ん中がプレイ/ポーズボタン、左が1曲戻る(長押しで巻き戻し)、右が1曲進む(長押しで早送り)です。画面表示も充実してて、曲時間、再生時間、MP3のビットレート、曲名、スペクトラム表示、などなど、グラフィック液晶を活かして色んな情報が表示されています。SDカードもあきばお~で398円で買った32GBのモノをちゃんと認識してくれています。最初、SDカードに入ってる曲をフラットにしか再生できないのかと思ってましたが、説明書を読むとフォルダ構成にも対応してることがわかりました。フォルダは何階層でも行けそうな感じ。フォルダを移動するためにはプレイボタンを長押ししてメニューを表示させます。フォルダ操作メニュー出てきたメニューの「root」というのがフォルダ選択するためのメニューです。他にもPlay modeとかイコライザ(Eq)とかありますが、そちらは試してみてください。(^^;; rootを選んだ状態でプレイボタンを押すと、今いるフォルダの曲一覧画面に遷移します。フォルダ内の曲一覧画面この画面中で早送りボタンを押すとカーソルが上に、巻き戻しボタンを押すとカーソルが下に動きます。選択はプレイボタンです。このようにしてフォルダ内の曲を選ぶことができるのですが、さらに上層のフォルダに移動するには、最上部の「UP LEVEL」を選択します。すると、フォルダ一覧が現れます。フォルダ一覧ここで、フォルダを選択してプレイボタンを押すと、そのフォルダ内の曲名一覧が表示されます。っちゅうことで、アーティスト名、アルバム名、のフォルダを階層的に作成し、その中に曲を入れておくとちゃんと整理した状態で再生が可能となります。また、フォルダ名、曲名に漢字、カタカナ、ひらがなもOKです。フォルダ名、曲名に漢字などOKっちゅうことで、MP3プレーヤーとしてみたときも、かなり使い勝手の良いプレーヤーに仕上がっていることが分かりました。ただ、曲をストップすることはできず、ポーズをかけることしかできません。(^^;; 電源を切ってプレーヤーモードで立ち上がると、曲の再生が必ず始まります。まぁ、それぐらいはしゃーないか... (^^;;--- 19:40 ---
December 25, 2019
コメント(0)
-

Shigezoneで買ったSRW-710SのFM日本国内バンド化改造を行った
今日は早めで帰宅は18時半過ぎ。昨日、ShigezoneでSDカード再録可能なマルチバンドラジオ SRW-710S を3千円で買いました。Shigezoneが普通の店と違うのは、1kΩのチップ抵抗が付属してるところ。この1kΩチップ抵抗を基板上のランドR10に付けると、国際仕様のFMバンド(87~108MHz)が日本国内仕様+α(70~108MHz)に変更できる、というではあ~りませんか。これはやってみるしかありません。(^^;まずは箱からSRW-710Sと付属品を出す付属品はバッテリ、マイクロUSB-Bのケーブル、取扱説明書です。バッテリはBL-5Cという汎用のモノが使われているのでヘタってきたときも安心です。取扱説明書は中国語と英語です。英語の方を読めば大体の使い方は分かりそう。バッテリの充電ケーブルもマイクロUSB-Bなので、スマホ用のアダプタがそのまま使えて便利です。さてさて、早速SRW-710Sを開腹。裏側のネジを6本外す裏側のネジを外すと裏蓋が取れるのですが、勢いよく外してしまうとバーアンテナから伸びてる細いケーブルを切ってしまうかもしれないので注意しましょう。バーアンテナからのケーブルが細いので注意さて、改造個所のR10のランドはどこかというと...R10のランドはココこのR10のランドに付属していた1kΩのチップ抵抗を半田付けします。ランドは1608っぽいけど、チップ抵抗の幅が少し広いような気が... (^^;; 買うときに店長が「あれっと思うかもしれません」と言ってたのはこのことか... 老眼と闘いながら、何とか半田付けすることができました。若いときならもっと早くできたかもしれんなぁ。(^^;;R10に1kΩを半田付け裏蓋を元通りにネジ止めして動作確認です。FMバンドの下限の周波数は70.0MHzFMバンドの上限周波数は108.0MHzっちゅうことで、無事に70.0MHz~108.0MHz受信できるようになりました。108MHzまで入るのでFM補完放送も入るし、70MHzからっちゅうことでロシアの一部局も入る可能性があります(要Eスポ)。改造情報付きで販売してる Shigezone に感謝です。:-)--- 19:40 ---
December 16, 2019
コメント(0)
-
民放連がAM放送廃止を要請?!
ニュースを見てると気になるタイトルのものがあった。ラジオのAM放送廃止を要請へという記事で、民放連がAM放送を廃止し、FM放送に転換できるよう制度改正を総務省に求める方針をまとめた、っちゅうことが書かれていました。収入難を理由にワイドFM放送へ一本化したい、ということらしいのですが...AM放送は検波が容易でごく簡単なラジオでも聞けるし、ある程度電波が飛ぶので広域性があるといった特徴があります。このAM放送を手放すのは防災上も不利な気がするのですが... 収益の面から考えるとAM放送廃止、という結論が出るのでしょうか。今いる社宅は鉄筋でローカル放送局のワイドFMは受信できません。AM放送の方は何とか聞くことができます。この辺考えても民放連の言ってることは逆な気もするんですよね。さてさて、これからどうなることやら。ラジオをAMラジオで聴く文化は無くなっていくのでしょうか... AMラジオに親しんで育った世代にはツラい未来が待ってるのかも。--- 21:55 ---
March 22, 2019
コメント(0)
-
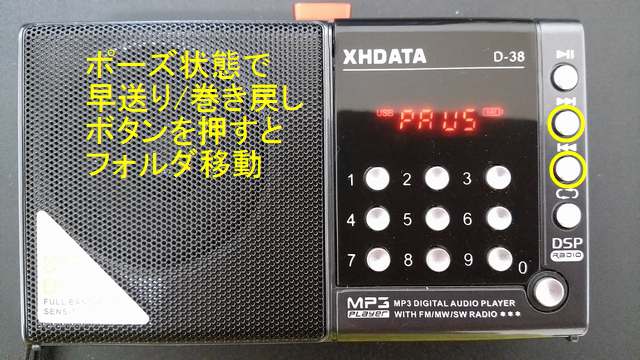
MP3プレーヤとしてのXHDATA D-38
今日はそれなりで帰宅は19時半前。単身赴任先の社宅は鉄筋なので、XHDATA D-38はラジオとしてほとんど役に立ちません。中波のローカル局が受信できる程度。(^^; っちゅうことで、使い道としてはMP3プレーヤになります。MP3プレーヤとしての操作は単純で、・プレイ/ポーズ(プレイ/ポーズボタンによる操作)・曲単位の送り/戻り(早送り/巻き戻しボタンによる操作)・曲中の早送り/巻き戻し(早送り/巻き戻しボタンの長押しによる操作)ぐらいしかありません。(^^;; フォルダを作成してアルバム単位とかで曲を管理してる場合に、フォルダ間を移動するのに、ちょっとした操作が要るぐらいです。フォルダ間の移動のためのボタン操作フォルダ間を移動するには、上の写真のように、一旦ポーズをかけて、早送り/巻き戻しボタンを操作します。フォルダに移動したときは先頭の曲から再生が始まります。フォルダの並ぶ順番は、USBメモリ/SDカードに書き込んだ順番になります。フォルダ名をアルファベット順に並べてくれるのか、と思ったら違ってました。(^^;; フォルダも1階層しか試してないので、2階層以上になるとどういう動作をするのかは不明です。あー、大事なことが一つ。D-38のMP3プレーヤにはストップボタンがありません。曲の演奏を止めるにはポーズしかないのです。(^^;; 電源をオフにしてもMP3プレーヤを立ち上げると、自動で前回聴いてたところからレジュームします。完全に演奏を止めさせるには、電源オフ時にメディアを取り外すぐらいしか方法はありません。(^^;;音質はMP3の音源を聴くには普通な感じ。イヤホン次第やとは思いますが、中低音にややシフトしてるかな、という気はします。ナカナカ聴きやすいです。バッテリもそれなりに持つようで、アルバム5~6枚聴いてもバッテリランプはびくともしてません。急にぱったり止まるのかもしれんから、油断はできませんが... (^^;;ちょっとゴツイけど、MP3プレーヤとしては満足いく仕上がりになっています。DSPラジオ付MP3プレーヤとしてはナカナカいいのではないでしょうか。--- 20:00 ---
June 27, 2018
コメント(0)
-
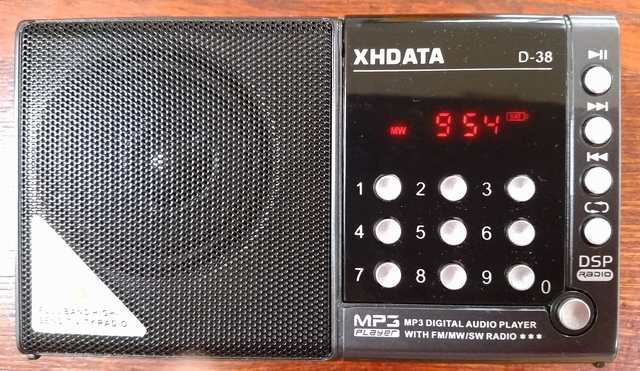
XHDATA D-38を買った
今日は曇り時々雨。午前中、医者に行きましたが、途中でポツポツと雨に降られました。涼しくていいけどね。---某ワンクリックなとこで買ったXHDATA D-38っちゅうMP3プレーヤ付ラジオが家に届いてました。高速バスで移動中に音楽を聴くのにMP3プレーヤが欲しいと思ってたのですが、MW/SW/FM DSPラジオが付いた XHDATA D-38を発見してついつい買ってしまったのです。(^^; 中国製のラジオですが、日本語マニュアルが付いててラジオとしての使い方は大体わかります。TBSラジオを受信中のD-38こんな感じで周波数はデジタルのLED表示です。ナカナカ味があります。このおかげで暗いところでも表示がよく見えます。逆に言えば、太陽光の下などまぶしいところでは表示が見にくくなります。(^^;;D-38の各部説明(ラジオ用)このラジオ、バンド切替スイッチが上部についていますが、これで切り替えるだけだと、FM: 87~108MHzMW: 522~1620kHzSW1:3000~10000kHzSW2:10000~22000kHzのブロードバンドモードになってます。FMは北米バンドになってるし、SW1、SW2とも同調させようにも同調ボリュームの回転で動く周波数が大雑把すぎて、まともなチューニングはできません。ちなみに、FM、MWは周波数をちゃんと表示(FMは0.1MHz単位、MWは1kHz単位)してくれますが、SWは 1/10 表示(10kHz単位で表示が変わり、1kHz単位は表示されない)です。これも相まって短波帯はこのままでは使い物になりません。そんなときに、MP3プレーヤ用の早送り/巻き戻しボタンを使います。これを日本語マニュアルではナローモード切替と称しています。上部のバンド切替でFM/MW/SWを選んでおいて、このボタンを押すとバンドが切り替わります。こんな表示が出てバンドが切り替わるナローモードにすると、バンドが以下のように切り替わります。FM1:87~108MHzFM2:64~87MHzMW1:522~1620kHz (9kHzステップ)MW2:520~1730kHz (10kHzステップ)SW1:5600~6400kHzSW2:6800~7600kHzSW3:9200~10000kHzSW4:11450~12250kHzSW5:13400~14200kHzSW6:15000~15900kHzSW7:17100~18000kHzSW8:21200~22000kHzFMで操作すると、低い周波数帯も受信できるようになります。MWで操作すると、日本仕様(9kHzセパレーション)、北米仕様(10kHzセパレーション)の切替ができます。SWで操作すると、放送バンドごとにバンドスプレッドした感じになります。このナローモードだと、短波(SW)帯でも1kHz単位が動いてる感じ(5kHzステップぐらいの感覚)のチューニングが可能になります。ただし、ラジオモードを抜けるとナローバンド設定はリセットされてしまいます。FMの受信ではこれが結構面倒な感じ。(^^;;ラジオ自体の性能はというと、MWとSWの感度は低め。aitendoで売ってるDSP6959ラジオモジュールを使って作ったラジオの方が感度はよかったです。(^^;; 関東から関西ローカル局(ABC、MBS等)が聴こえるか、っちゅうのを感度の指標にしてるのですが、かなり弱くしか受信できません。DSP6959ラジオの方はちゃんと聴こえるのですが... (^^;;あと、選択度が甘めなのか、強信号に弱いのか、中波(MW)でAFNやTBSなど強いローカル局を聴くと±18kHzぐらいに広がって聴こえてました。FMは割と普通で付属のロッドアンテナでもローカル局はちゃんとステレオで受信できてました。とりあえずラジオとして評価してみましたが、ローカル局を聴く分には申し分ないけど、中遠距離受信には向いてない、っちゅう感じでした。売値が2千円程度で、DSPラジオで、MP3プレーヤも付いてる、っちゅうことを考えると、まぁ、こんなもんかなぁ、っちゅうとこです。MP3プレーヤ付ラジオ、というよりは、ラジオ付MP3プレーヤと考えた方がよさそうです。(^^;;--- 15:25 ---感度低いと書きましたが、17:00~ 7275kHz KBSワールドラジオの日本語放送は、RF-2200と同程度に受信できることが分かりました。中波(MW)帯だけ感度低いのかな。--- 17:55 ---
June 23, 2018
コメント(0)
-
「決定版!BCLバイブル」を買った
今日は晴れて過ごしやすかった。洗濯物を外に干したらパリッと乾いて気持ちよかったです。---準最寄り駅の近くをプラプラしてると、大きい書店を発見。近所の書店は品揃えが悪いのですが、この書店はナカナカ品揃えがよかったです。雑誌のコーナーにちゃんと無線のコーナーがあり、トラ技なども売ってました。そのコーナーで三才ブックスの「決定版! BCLバイブル」を発見したので買ってしまいました。通信型受信機は減ってきて、SDRが主流となりつつある、今どきの受信機事情や懐かしの受信機など読んでて楽しくなる内容でした。色々なお役立ち知識も載ってるので、久しぶりにBCL復帰してみたくなりました。が、単身赴任先の社宅は鉄筋で電波状態が非常に悪いのが現状。アンテナを立てればいいのかもしれませんが、ナカナカ気力がなくて... (^^; 他に手段がないかと、RTL2832Uを使ったワンセグチューナ+TVアンテナを試してみましたが、一向に受信できず... orz FMラジオぐらいは受信できてもよさそうやけど、何でやろ??--- 17:45 ---
June 17, 2018
コメント(0)
-
TY-CR20はそれなりに快調
今日は早めで帰宅は19時半過ぎ。TY-CR20のAMモードでKBSワールドラジオを聴いてますが、SINPO=34434ぐらいかな。フェージングの谷になるとツライけどそれ以外はまぁまぁ聴ける範囲。感度は低いなりにちゃんと聞こえているようです。同じくお隣の毎日放送もSINPO=35434ぐらいで、まぁ聴ける範囲。フェージングが難儀です。年季モノのRF-2200より感度で劣る程度かな。--- 20:55 ---
July 10, 2017
コメント(0)
-
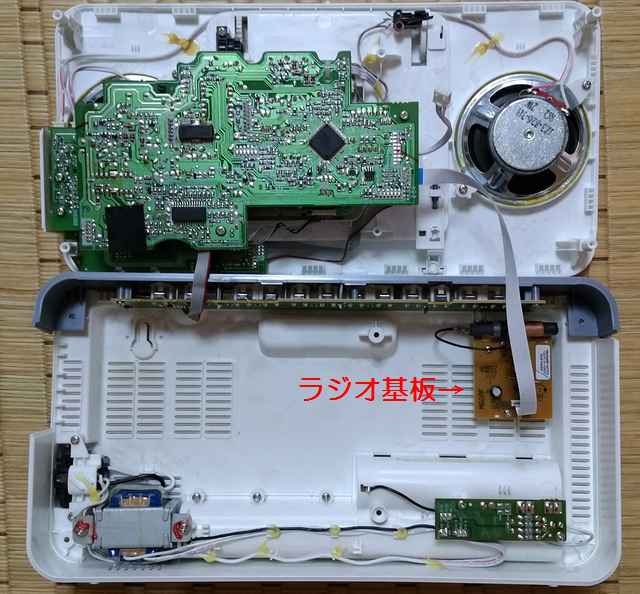
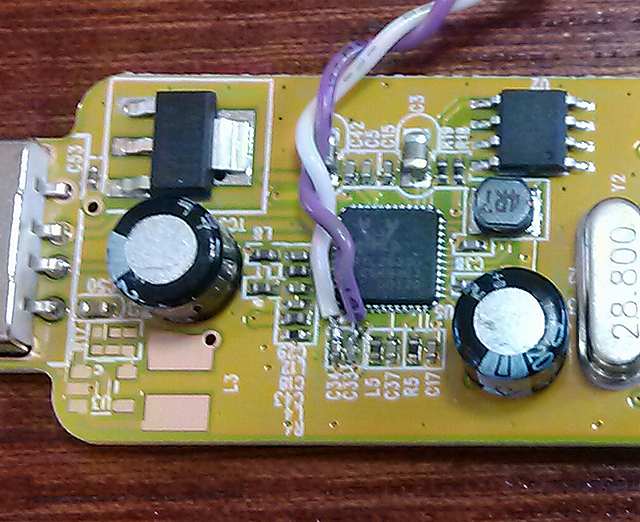
TY-CR20のラジオ基板を調べた
今日も晴れて暑い。部屋は30度越え... 風があるからまだマシですが。---昨日確保したTY-CR20のラジオがどういう構成になっているのか気になったので分解してみました。2枚におろす背面のネジを外せば2枚におろせます。電池ボックスの内部にも1本ネジがあります。上部のキーが並んでる部分が爪でかませてあるので、外しにくいのが難点... って、普通は分解せんからいいのか。(^^;内部はかなりスカスカな印象です。バーアンテナの載ってる基板がどうもラジオ基板のようです。ラジオ基板の表側Kwang Sungっちゅうとこがモジュールとして作ってるのかな? 32.768kHzの水晶が載ってるのと、ケーブルにSCLK, SDIOっちゅう端子があるところからして、シリアル制御されるラジオICが載ってるようです。ラジオ基板の裏側予想通り20ピンQFPのICが載ってます。これがラジオICのはずです。ただ、型番が読めない... (^^;; これが分かれば色々情報が取れるかもしれんのになぁ。残念。基板の仕上がり自体はきれいですね。ラジオICの詳細が分からないのでこれ以上は手が出せないことが分かりました。何か改造できるかと思ったんやけどなぁ。残念。AMの感度がイマイチと感じたのはバーアンテナがしょぼいせいのようです。筐体が大きいのでもっと大きいバーアンテナが入ってるかと思ったけど50mm程度の短いバーアンテナなんやもんなぁ。この手のラジオICにつなげるバーアンテナって、割と何でもいいはずなので、長いバーアンテナに交換したろかしらん。--- 13:55 ---
July 9, 2017
コメント(0)
-
TY-CR20を買った
今日は晴れて暑い。風があるのでまだマシではありますが、室温は30度越え... 文明の利器、扇風機を倉庫から出してきたので夜は快適に過ごせると思いますが、もうすっかり夏です。---昼から某リサイクルショップに偵察に行きました。特に何を買うという当ては無かったんやけど、ジャンクラジカセコーナーで比較的きれいなCD+ラジオを発見。振動でCD音飛びします、っちゅう注意書きがありましたが、要は振動を与えなければ正常なんやろう、と勝手に解釈して(^^)、864円で確保。東芝のTY-CR20っちゅう機種でした。帰宅して確認。付属してないと思ってたACコードは電池ボックスの中に入ってました。ラッキー。取説PDFも製品ページでダウンロードできるので使い方はすぐに分かりました。ラジオ部分はシンセサイザチューナでAMは9kHz、FMは0.1MHz単位でのチューニングでした。FMの受信感度はそれなりに良く、やや遠方のコミュニティFMもかろうじてステレオで受信できました。惜しむらくは90MHzまでしか受信できない点。これは使ってるICが分かればなんとかなる可能性はあるかも。AMの方はまだ時間が早いので遠距離局の受信確認ができてませんが、感じからすると期待できそうです。CDの再生も思った通り、据え置いて鳴らしてる分には問題なく再生できてます。寝るとき用のラジオとして、良い買い物やったように思います。--- 17:35 ---夜になったのでAMの遠距離受信確認をしてみました。関東圏から近畿圏のラジオ関西(558kHz)、朝日放送(1008kHz)、毎日放送(1179kHz)、ラジオ大阪(1413kHz)を聞いてみましたが、Sが弱い感じ。フェージングに弱い、っちゅうか、AGCのかかり具合が何となく気に入らん。デジタル的に少し音量が飛ぶ感じです。また、KBSワールドラジオ(1170kHz)もフェージングの谷では苦しいけど、まぁまぁ受信できました。しかし、全体に感度が悪い気がします。まぁ、こんなもんかもしれんけど... (^^;--- 21:00 ---
July 8, 2017
コメント(0)
-
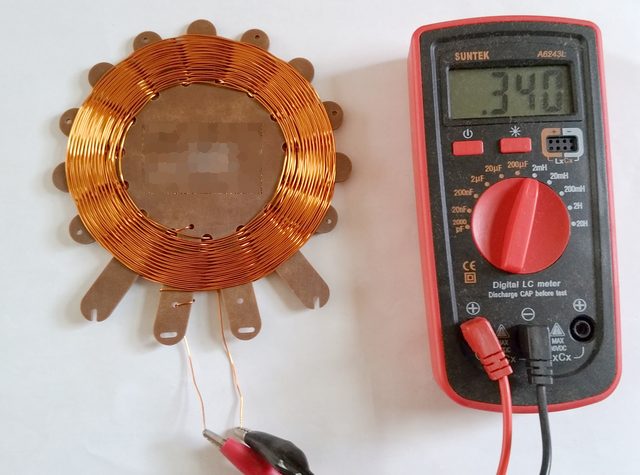
ダウンした...
今日はダウン...疲れが溜まってる気がしてたので、そろそろヤバいかな?と思ってたら今朝は起きられませんでした... 一日寝てたのでだいぶ復活しました。明日は行かないと...---夕方だいぶ復活したので、手伝うことになったラジオ組み立て講座で使うキットのスパイダーコイルを巻いてみました。子供達が一番難儀するところなので、自分でも体験しとこうと思ったので...大体うまくいったみたい誰が設計したのかは分からんけど、説明書き通りに巻くと340μHぐらいに巻き上がってます。売ってるフェライトバーアンテナが大体380μHぐらいなのでイイところでしょう。残りのキット部分も作ってラジオとして動かしてみましたが、ちょっと低い目に同調してるようです。上は1400kHzぐらいとちゃうかな? 測定器が無いので分かりませんが... この辺はご愛敬ですね。(^^;--- 18:15 ---
July 28, 2016
コメント(0)
-
在京FM補完中継局が本放送に入った
今日はそれなりで帰宅は20時半前。10月から試験放送をつづけていた在京3局(TBS 90.5MHz, 文化放送 91.6MHz, ニッポン放送 93.0MHz)のFM補完放送が本放送を始めました。当然のことながら(法令上)、中波放送のサイマル放送です。中波とは違ってステレオ放送になってるので、同じ番組でも新鮮な感じ。オールナイトニッポンがステレオになるんやもんね。とはいうものの、実はニッポン放送はまだAMステレオ放送を実施してるようなので、対応ラジオさえあれば中波でもステレオで聴けるんやけどね。(^^; AMステレオ対応ラジオ持ってたような気がするので聴き比べしてみるのもおもしろいかも...帰宅してからしか聴けてないので、昼間のベタなローカルCMがステレオ対応してるのか? とか確かめたいネタはあるけども。とりあえずは本放送開始おめでとうございます。試験放送も結構ヨカッタんやけどね。(^^;;--- 21:15 ---
December 7, 2015
コメント(0)
-

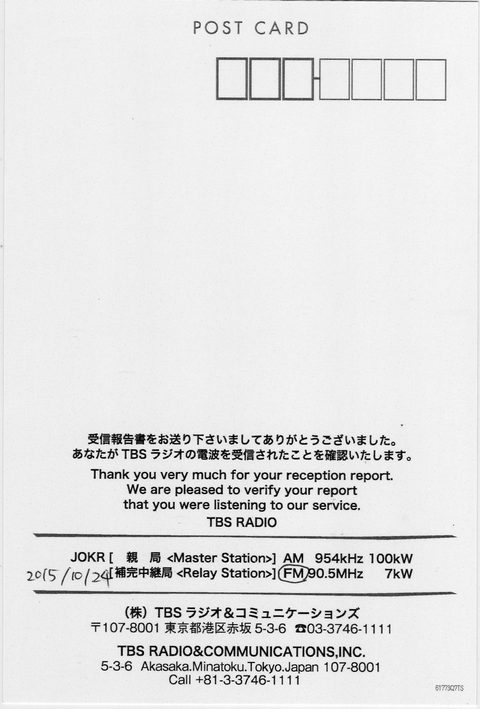
ニッポン放送FM補完中継局(93.0MHz)の受信報告に返信が来た
今日はダウン...朝起きたら体がだるく熱っぽいので会社を休みました。夕方までずっと寝てたのでだいぶ回復したと思われます。---ニッポン放送FM補完中継局93.0MHzに受信報告を10月下旬に出したのですが、その返事が来てました。各種データはきちんと記載されている試験放送第3段階、と書いてありますが、試験放送スケジュールによると、受信日の10月18日がその最終日だったようです。第3段階までは出力が小さかったのかな? 現在は7kWフルパワーのようですが...試験放送限定かな試験放送ですー、っちゅう絵柄なので、本放送開始後はデザイン変更されるんでしょうね。---ニッポン放送の試験放送がサウンドテスト等があり一番試験放送っぽいです。文化放送(91.6MHz)は音楽を連続で流してるので聴きやすい(このまま続けてほしい(^^)、TBS(90.5MHz)は中波番組のサイマル放送試験に注力してる、などなど放送局のカラーが出てるのも試験放送のおもしろいところです。--- 19:00 ---
November 30, 2015
コメント(0)
-
TBSのFM補完放送(90.5MHz)への報告に返信があった
今日は少し早めで帰宅は19時過ぎ。だいぶ前に受信報告を送って忘れてた(^^)、TBSのFM補完放送(90.5MHz)への返信がありました。データの記載はされてるAM/FM両方の送信所情報も載ってる封筒にカードを入れて送ってきてくれました。FM補完放送情報の入ったカードを作ってたので返信が遅かったのかな? どうもありがとうございました。---実は中波のサイマル放送が始まる前の試験放送の方が音楽番組(?)多くていいような気がします。(^^; そうはいっても法令上はサイマル放送が原則でしょうから、12月からは音質のいい中波放送番組、になるのかな。番組編成自体も補完放送開始にともなって若干変わることを期待してます。--- 20:45 ---
November 17, 2015
コメント(0)
-
RTC6215を使ったラジオをFM補完放送対応に修正した
だいぶ前にaitendoで扱ってるRTC6215を使ってワンチップFMラジオを作った。FM補完放送(90.1~94.9MHz)を聴こうと思ってスキャンかけてもTBS(90.5MHz)しか入りません。あれ? RTC6215って64~108MHzのグローバル対応やったはずなんやけど...??データシートによると15ピン(BAND)をオープンにすると64~108MHzになるようなんやけど、こう作ってなかったっけ?? と15ピンをチェックするとプルアップされてました... 作ったのが2013年なので日本バンド対応(76~91MHz)だけでよいと判断したようです。このラジオは自分で回路図起こさずにデータシートの回路で組んだようなので、この辺の細かいところが頭の中からぶっ飛んでるんですなぁ。(^^; やっぱり、作ったモノの図面はちゃんと描かんとイカンね。で、このプルアップを外してオープンにすると、無事に64~108MHz対応になったようで、文化放送(91.6MHz)、ニッポン放送(93MHz)も受信できるようになりました。このラジオ、かなり小さく作った方なので、重宝するかも。--- 18:50 ---
November 7, 2015
コメント(0)
-

文化放送(FM補完放送)の受信報告に返信があった
今日は父の命日のお参りをしてもらった。終わってから子ども(弐)が鉄道話を延々としてました。お寺さんにはお付き合いいただきまして(^^)ありがとうございました。(_o_)---10月24日文化放送FM補完放送(91.6MHz)の受信報告に対して返信がありました。受信データの記載有りFM補完放送用の絵柄になっている今日も音楽流しっぱなしの試験放送です、ときどき試験放送の旨アナウンスがあります。他の2社の状況はというと... ニッポン放送(93.0MHz)はときどきテスト用トーン信号を出す以外は音楽流しっぱなしの試験放送、TBS(90.5MHz)は中波放送のサイマル放送でときどき試験放送の旨のアナウンスが番組にかぶります。あー、今は別番組になってるね。--- 15:00 ---
November 7, 2015
コメント(0)
-

J-WAVE 港FM 88.3MHz受信報告への返信が来た
今日は出張。若い衆と実験でした。久々に実験して楽しかったです。:-)---J-WAVE 港FM 88.3MHz 試験放送に対して受信報告したところ、返信がありました。中継局 "J-WAVE 港FM" 100W 88.3MHz、と表記あり図柄は今までと同じ?絵柄面には81.3MHzと思いっきり描かれてますが、データ面には港中継局の情報が書かれてました。定型用返信用切手は入れたのですが、番組表とベリカードが定形外郵便で送られてきました。ありがとうございました。--- 20:20 ---
October 29, 2015
コメント(0)
-

ラムズホーン(?)が現れた
今日は晴れで割と温い。10時からFM補完放送の試験放送が開始されましたが、今日はTSBラジオ(90.5MHz)、文化放送(91.6MHz)、ニッポン放送(93.0MHz)のいずれも00分~40分で電波を出してます。音楽を流してても40分でブチッと終わることなく、でもフェードアウトするでもなく、時間合わせをしてるのは見事です。(^^;---メダカ水槽に小さな巻貝が発生したのには気付いてたのですが、入れた覚えの無いラムズホーン(?)が水草にくっついてました。ラムズホーンやと思うんやけど...これも水草に卵が付いてた類かなぁ。石巻貝は入れたけどラムズホーンは入れてないし... まぁ、水草を食べてたわけではなさそうなので、しばらく様子見でしょうか。--- 15:50 ---
October 24, 2015
コメント(0)
-

TOKYO FM 檜原中継局の受信報告に返信があった
今日はそれなりで帰宅は20時過ぎ。10月20日にTOKYO FM檜原中継局の試験放送を受信した報告に対して返信がありました。ちゃんと「試験放送」と書いてある絵柄は通常のベリカードと共通礼状、ベリカードと番組表が同封されてました。返信用封筒を同封してたけど、番組表を送るためか、大きい封筒で送ってくれはりました。ありがとうございます。今日もワンセグチューナ+SDR#で聴いてますが、選曲がいいですね。するっと聴くことができます。まぁ、これも本放送までのお楽しみかもしれません。(^^;--- 21:50 ---
October 23, 2015
コメント(0)
-
SDR#をWindows 10にインストールした
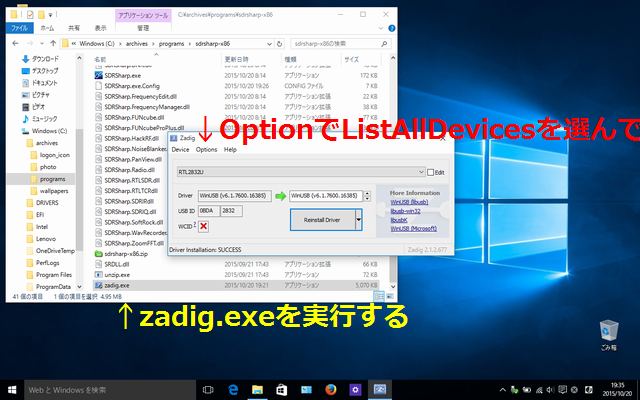
今日は少し早めで帰宅は19時前。最近また夕方になると疲れるなぁ...---FM補完放送の試験放送を聴いてから、RTL2832Uを搭載したワンセグチューナとSDR#の組み合わせでラジオを聴いてみよう、っちゅう意欲(?)がわいてきました。また、Windows 10な古物ノートPCも増えてきたことから、テストの意味も兼ねてThinkPad X200(Core2Duo 2.4GHz, メモリ2GB) + Windows 10 ProにSDR #をインストールしてみました。ダウンロードページからSDR# rev 1418 & ADSBSpyをダウンロード。revは適宜上がっていくんでしょうな。これを適当なところで解凍して、まずはinstall-rtlsdr.batを実行して本体?のインストールを行います。次に、ドライバをインストール。RTL2832U搭載のワンセグチューナをUSB端子に差し込んで、zadig.exeを実行。zadig.exeを実行してSDR用ドライバをインストールzadig.exeを管理者権限のあるユーザで実行しないと、ドライバのインストールができませんでした。あと、OptionsでList All Devicesを選ばないとRTL2832Uが出てきません。注意点はそれぐらいかな。その後、SDRSharp.exeを実行して、SourceをRTL-SDR(USB)に設定し、プレイボタン(右向きの黒三角アイコン)を押せば受信開始です。ニッポン放送のFM補完放送はやってないの??勇んで93.0MHzに合わせてみましたが... あれ?ニッポン放送のFM補完放送の試験電波が出てない??調べてみると、試験電波発射のスケジュールっちゅうのが、V-Low受信対策センター(東京地区)のページ内にありました。うーむ、今日は10:00~19:00やったのか... 残念。っちゅうことで、気を取り直してあちこち聴いていると...TOKYO FM 檜原中継局が86.6MHzで試験放送してたTOKYO FMの檜原中継局が86.6MHz(300W)で試験電波を発信してました。ちょっと得した気分。:-)--- 21:40 ---
October 20, 2015
コメント(1)
-
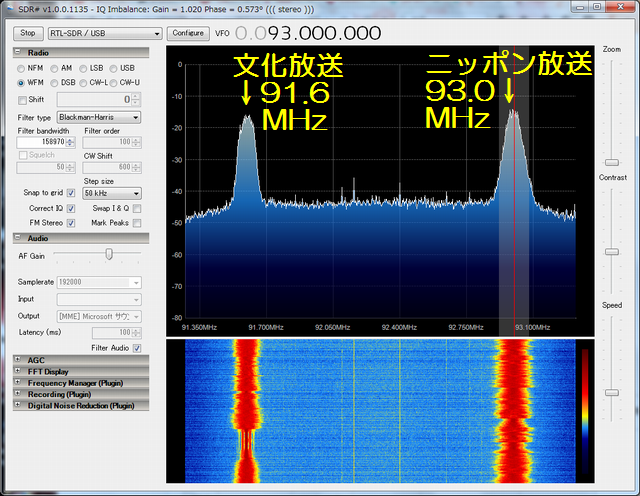
FM補完放送(ニッポン放送93MHz)を受信してみた
今朝、久しぶりにラジオでFM放送を聴いていた。そういうとFM補完放送をアナログTV1ch~3chの一部(90.1MHz~94.9MHz)が中波放送のサイマル放送を2015年12月から始める、っちゅう話を思い出したので、当該周波数範囲を聴いてみました。高い方から始めたのでまず受信できたのがHappyFM93(ニッポン放送)の試験放送。10~15分おきにスカイツリーからの試験電波発射中である旨のアナウンスがあり、アナウンス時にステレオテスト信号を出すことがあります。それ以外は音楽を流してることが多いですが、野球中継の再放送を流してみたり、と変化球があったりします。他の在京2局(文化放送 91.6MHz、TBS 90.5MHz)はまだちゃんと聴いてませんが、試験電波発射中のアナウンスと音楽の繰り返しだけのようです。1時間に1回ぐらい何かやってるのかもしれませんが...ニッポン放送(93MHz)と文化放送(91.6MHz)のスペクトルRTL2832Uの載ったワンセグチューナとSDR#を使って受信してみたスペクトルが上記です。アンテナはホイップアンテナの室内置きなので大したことはありませんが、他のスカイツリー発信のFM放送(J-Waveとか)と同等でステレオ受信には十分な電界です。っちゅうことで、広域FMラジオ、コミュニティFMラジオに加えて、FM補完放送もこれからラジオで受信できる放送局として期待できそうな感じ。ニッポン放送には久しぶりに受信報告を送ってみよう。--- 20:50 ---
October 18, 2015
コメント(0)
-
BBCの日本語ニュースサイトっちゅうてもラジオではないのか...
今日は少し早めで帰宅は19時半。宿題終わるまでご飯無し、縛りで、子ども(参)の宿題終わり待ち... お腹減った... (^^;---BBCのネット配信に全然注意を払ってなかったんやけど、BBCニュース日本語サイトが新たにできた、と一部で話題になってます。BBCワールドニュースは視聴が有料やったけど、ニュースサイトは無料で読める、っちゅうことなのかな?サイトを開くとビッグベンの音が鳴るとかの演出があるのかと思いましたが、そういうのはナシね。(^^;; そもそも、ニュースサイトであってラジオのストリーミングでは無いしねー。「ビデオ」と書かれたリンクで再生されるビデオは日本語に翻訳されてるので、そのうち「ラジオ」と書かれたリンクが出現してBBC日本語放送がストリーミングされるとか、妄想してみるも実現性は無いやろなぁ。(^^;;--- 20:20 ---
October 15, 2015
コメント(0)
-

手回しラジオはバッテリ不良?
今日は子ども(参)と秋葉原に行った。USB メモリを買う用事があったので行ったのですが、子ども(参)はポケモントレッタの新しい段(U4)をやりたかったようです。マスターリザードンをゲットしようと子ども(参)は頑張ってたのですが、別の子に捕られてしょぼーん。まぁ、しゃーないやろ。(^^;子ども(参)を連れて回ったのであまりちゃんと見られませんでした。PCNET駅前:Core i5具入りなThinkPad X201の12千円強はまだ数台残ってました。SS RX2具入りで5千円台半ば、3台。FMV-R8290?具入りで4千円台、1台。HDD無のVGN-G2が2千円弱で1台。HDDが1.8インチSATAやったはずなので割高になりそう。インバース:ジャンク棚がだいぶ寂しくなってました。シルバーウイーク前半でだいぶはけたのか...---何店舗かで見かけた手回しラジオが100円やったので買ってみました。ジャンク、と念押しされたので動かんのやろなー、と思いつつ、箱から出して手回し充電してもうんともすんとも... また、外部電源端子があるので、+5Vを供給してみた(定格は+4.5V)のですが、こちらもうんともすんとも... だってジャンクだもの。みつを。(^^;;というててもしゃーないので、分解。筐体は見えてるネジ4本を外せば2枚におろせます。基板を筐体から外すには、基板を留めてるネジを2本外し、選局ダイアルの周波数表示シールをはがしたところのネジを1本外してつまみ類を全部外す必要があります。また、バッテリがホットボンドで筐体に固定されてるので適当にはがします。基板のハンダ面基板の部品面黄色いのがラジオ用のバッテリでこれが死んでるようです。が、これって充電池なの?? ちゃんと調べてないのでイマイチわからん... (^^;; 部品面に局部発振用と思われる赤IFTがあり、ラジオとしてはハンダ面にあるIC(型名不明)を使ったスーパーヘテロダインなラジオっぽいです。手回しラジオとしてはジャンクっぽいけど、充電池の代わりに直接電源供給したらラジオとしては動きそうな感じ。時間のあるときに試してみます。---子ども(参)を寝かしてるつもりが一緒に寝てました... (^^;;--- 9/23 05:00 ---
September 22, 2015
コメント(0)
-
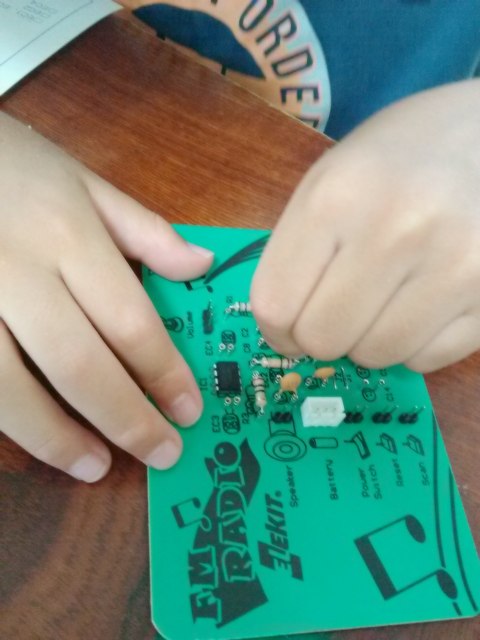
子ども(参)がFMはこラジを作った
子ども(参)は当初、夏休みの自由研究にロボットを作る、と言っていた。のですが、秋葉原に一緒に偵察に行った際に若松通商で見つけたエレキットの「FMはこらじ[JS-621R]」に急遽鞍替え... (^^; 半田付け無しでラジオが作れる、っちゅうところにひかれたようです。で、今日、お盆のお参りが終わってから「一しょに作ろう」と言われたので、どんなもんか様子を見学しました。まずは部品チェック。子ども(弐)ならチェックせずに始めてしまうと思われるところを、子ども(参)はしっかりチェック。この辺は性格の差かな。(^^;; チェック完了後、ICなど半田付けが必須の部品は既に取り付けられてる基板に部品を取り付けていきます。丸ピンソケットが立てられており、抵抗、コンデンサ類をこの穴に差し込むことで、半田付けを不要としています。子ども(参)が組み立て中よく考えてあるなー、と思ったのは、ケースへの取り付け。基板、スピーカ、電池ボックスの固定は最初に部品が入ってたぷらケースを利用、スイッチ、ボリューム類の取り付けは紙箱へ押し込み、返しで外れないようにしてました。不要部材は出ないし、キッチリ固定されるし、これはイイです。組立完了!電池をセットし、スイッチを入れると... しばらく無音で心配になりましたが、局をサーチしてたようで、無事に音楽が流れてきました。子ども(参)は、やったー、と大喜び。やっぱり、自分で作ったモノが動くのはうれしいんでしょう。後は箱をデコってオリジナルラジオにするんやけど、子ども(参)も疲れたのか、明日か明後日にやる、っちゅうことです。これで自由研究も完了の目処がついてヨカッタです。:-)---使用されてるICは刻印が消されてる(説明書の回路図にも型番が無い)ので分からんのですが、中国製のFM用オートスキャンICが何種類も出てるのでそのうちのひとつと思われます。IC使うとラジオの原理的なところがイマイチ分からんので、教育的にはあまりよろしくないのですが、小学3年生としては止む無しか... (^^;;--- 17:15 ---
August 14, 2015
コメント(0)
-
色々手伝いの日やった
今日も暑い。未だに室温は30度台... 溶ける... (^^;---昼から小学生向けのラジオ組立教室の手伝いに行きました。最初は見学だけのつもりやったのが、いつの間にかスタッフ扱いに... (^^;; 来てた子供達は半田付けも初めての子がほとんどでしたが、ちょっと練習したらみんな上手にできるようになってビックリ。子供達にとって一番大変やったのはスパイダーコイルを巻くところやったみたいで、ここはかなり個人差が出てました。慎重派と積極派で巻き終わる時間にだいぶ差が出てました。でも、不思議なもので基板に部品を半田付けしてラジオが完成するのは、みんな大体同じ時間でした。やっぱり、最後に電池を入れて、イヤホンを耳にして、スイッチ入れて、ラジオが聴こえたときの子供達の表情がイイですね~。やったー、という顔をする子、にたっと笑ってる子、とにかくみんな嬉しそうでした。今日でものづくりの楽しさを知って、これから色々楽しんでくれればいいなぁ、と思いました。---夕方からは小学校の夏祭りの手伝い。自転車置き場の整理やったけど、パズルみたいでおもしろかったです。あそこに何台、こちらに何台、離れたとこの担当者とサイン交換して、誘導して、空きが出たら管理して... とナカナカ頭使う作業でした。っちゅうことで、今日は色々手伝いの多い一日でした。しかし、暑い...--- 20:30 ---
July 25, 2015
コメント(0)
-
DE13を発見した(^^;
今日はそれなりで帰宅は20時過ぎ。手回し発電機の付いたDEGEN DE13がこないだから行方不明になってたんやけど、今日発見しました。日当たりのいい窓際に置いてありました。太陽電池も付いてるのでこれで充電しようと窓際に置いたのをすっかり忘れてたようで。(^^; まぁ、これで短波帯も電池を気にせずまったり聴けるようになる... かな?? 太陽電池での充電って1日、2日かかるからねー。(^^;;--- 21:50 ---
May 13, 2015
コメント(0)
-
駆け足で秋葉原を回った(^^;
今日は子ども(参)を連れて秋葉原に行った。嫁はんは勉強会、子ども(壱&弐)は友達と遊びに行ったので、子ども(参)だけどこも行かんのもなんやし... って、こじつけか。(^^;でも、子ども(参)の目的はポケモントレッタやったりするので、秋葉原の滞留時間は短かったです... PCNET:ThinkPad X100eの具入りが6千円弱で数台。VC-A起動せずが具無しで強気の6千円弱で1台。キーボード不良なSS RX2が具無しで4千円弱で1台。液晶割れが残念なThinkPad X220Tabletが7千円台半ばで1台。約9インチ液晶で1280x768でタッチ付きに魅かれて、工人舎のAtomなミニPCが具入り4千円強を買ってしまいました。(^^;aitendo:DSPラジオICC9620を買いました。C9613はラジオキットになってるけど、モノラルなので、ステレオ出力のC9620にしました。データシートだけやとイマイチ理解が進まんので、C9613のラジオキットの回路図を参照することになると思います。"C9620 is a hand-tune digital display and free debugging single radio chip"、とデータシートに書いてるけど、周波数デジタル表示対応するためにはI2C経由でごにょごにょせんといかんみたいなピン配置です。でも、I2CのIDやアドレスマップは非公開なのね... 単に動かすだけなら何とかなりそうやけど、デジタル表示は難儀しそう(無理そう??)です。以上、必要最小限しか回れませんでした...---子ども(弐)はポケモントレッタでアルティメットクラスのレックウザと何度も戦うも、結局、途中で入ってきたハンターの子供に獲られてしまって、号泣... (^^;; まぁ、またチャンスはあるわいな。--- 21:50 ---
April 26, 2015
コメント(0)
-

リスラジで聴くかわさきFMにハマる(^^;
今日はそれなりで帰宅は20時ごろ。コミュニティFM局が番組不足を補うために(?)、ノンストップ音楽番組を流してることが多いことに気付いて、サイマル放送を色々渡り歩いてたのですが、遂に1970~1980年代の歌謡曲、洋楽のノンストップ番組をやってる局にたどり着きました!かわさきエフエム(79.1MHz)です。サイマル放送サイトは、リスラジです。リスラジで、CATEGORY:[全国のラジオ局]CHANNEL:[関東][かわさきFM]を選ぶと聴けます。Firefoxやとこんな感じMUSIC SELECTIONっちゅうのが、1960~2000年の和洋懐メロを流してる番組のようです。0時から7時までは、パラダイス! (^^; 一応、00分には時報が入って、「音楽をお楽しみください」とかいうアナウンスが流れますが... 40~50代の人のツボにはハマるかも。--- 20:35 ---
January 19, 2015
コメント(0)
-
RTL2832U搭載のUSBワンセグTVアダプタのドライバ切替をしてみた
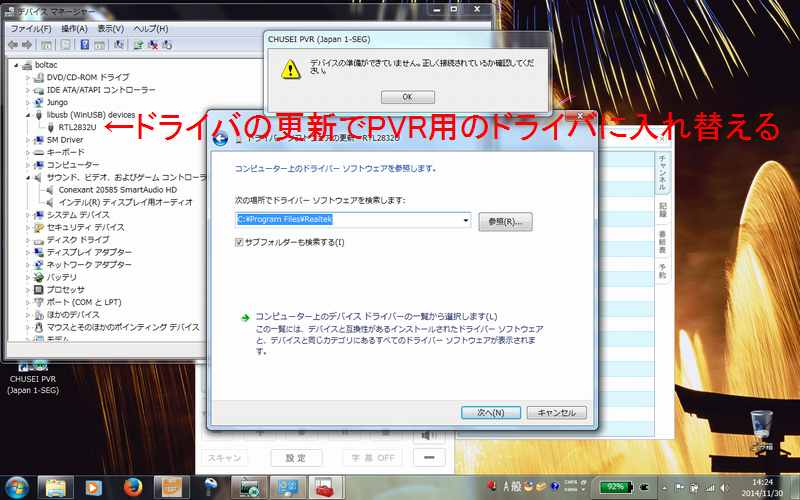
今日は曇りがちの晴れ。そこそこ温い。PCNETでUSBワンセグTVアダプタ(LT-DT309)が680円やったのでThinkPad X201のテレビ化のために買ってみました。ドライバをインストールしてさて使えるか、とPVRとかいう視聴ソフトを起動してみると、「デバイスの準備ができていません」と言われます??SDR#を使うためのドライバが悪さしてたRTL2832Uを搭載したワンセグアダプタをSDR化するためのドライバを入れてたのですが、今回のLT-DT309もたまたま搭載チップがRTL2832Uやったので、ワンセグ視聴用のドライバがインストールされなかったようです。っちゅうことで、上図のように、libusb内にあるRTL2832Uを右クリックしてドライバの更新を行います。ワンセグTVに付属のインストーラがC:\Program Files\Realtekに格納されているので、その場所を指定して更新。すると、PVRでアダプタを認識してワンセグTVを観ることができました。SDR#でSDRとして使いたいときはSDR化のためのドライバをzadigっちゅうソフトウェアでインストールし直して切り替えることにしました。zadigでドライバインストールするだけでよいこのようにめんどくさいけども、LT-DT309をワンセグTVチューナとしてもSDRとしても使えるようになったのでヨシとしましょう。---RTL2832U搭載のUSBワンセグTVアダプタとしてaitendoで売ってるのがありますが、最近値上がりして1千円ぐらいしてます。現状やと、LT-DT309がこの手のアダプタとして最安かもしれません。--- 14:55 ---
November 30, 2014
コメント(0)
-
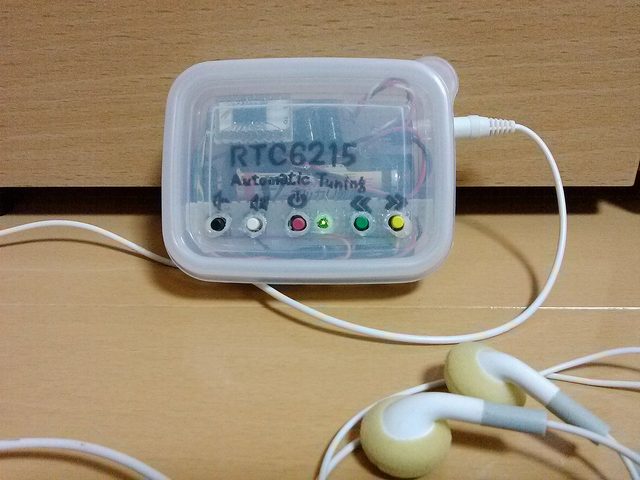
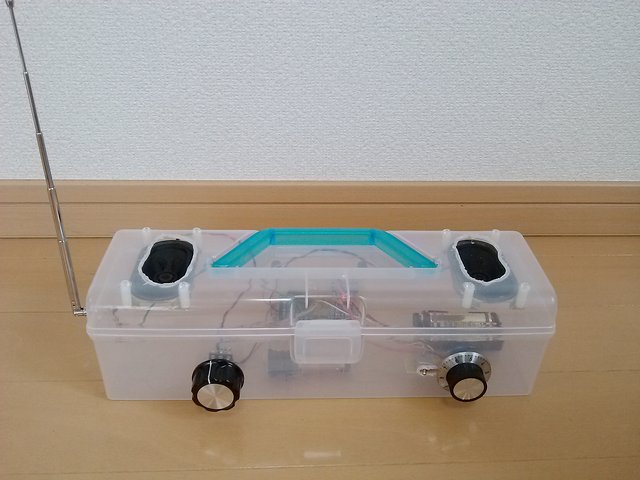
RTC6215ラジオをケースに入れた
昨日作ったRTC6215を使ったFMオートチューニングラジオを100円均一の食品保存容器に入れた。容器の大きさは約8cm×6cm×3cmです。バッテリの持ちを考えて単三電池2本にしたので、メイン基板は電池1本分ぐらい。まぁ、周辺回路が少ないので十分載りますが。操作用のスイッチ基板にプルアップ/ダウン抵抗と表示用のLEDを載せて線でびろびろつなぎました。これをケースに入れるんやけど、材質がポリプロピレンなので古い半田ごてで穴を開けて加工しました。見栄えがイマイチやけど、何とかモノを中に詰め込むことができました。ケースに入れたRTC6215 FMラジオ昨晩は感度がイマイチやなぁ、と思ってましたが、1階のリビングで雨戸が閉まっていたせいかもしれません。2階で昼間聴いたところでは、昨晩聴こえなかった弱めの局も聴こえました。ただ、ステレオにならずモノラルやったりしますが...100円(+ピッチ変換基板50円)と数百円の部品で割と実用的な仕上がりになったので満足です。--- 20:25 ---
December 1, 2013
コメント(0)
-
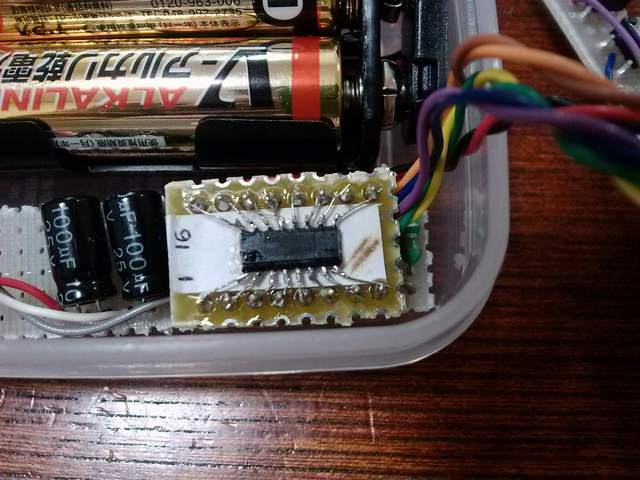
RTC6215を使ってラジオを作った
今日は晴れてたけど寒かった。そろそろ冬やね。もうすぐ12月やし。---こないだaitendoで買ったワンチップデジタルラジオ(FM)[RTC6215] を使ってFMラジオを作ってみました。aitendoからデータシートをダウンロードして最後のページに載ってる回路で組みました。RTC6215自体は1.27mmピッチなので、そのままでは2.54mmピッチのユニバーサル基板には載りません。特売のピッチ変換基板を買っとけばよかった... と思っててもしゃーないので、無理やりピッチ変換しました。一応16ピンDIPサイズに収めた老眼に鞭打って(^^)作業したので疲れました。仕上がりも汚いし...これができてしまえば、後は難しいところはありません。水晶をなるべくピンに近く配置してコンデンサもできるだけ最短で配線するぐらいかな。今回は100円ショップに売ってる食品保存容器の一番小さいのに入れようとしたので、細長い基板にかなり詰め込みましたが、もうワンサイズ大きい容器に入れるのであればゆったり作れます。まだちゃんとケースには入れてない実はここに至るまでにスイッチ基板を作り直してます。スイッチの向きを間違えたので、全スイッチが常にオン状態になってました。(^^; あと、SEEK+/-のプルアップはちゃんとすること。これが1つ外れてただけやのに、電源が入りませんでした。おそらくLEDのプルダウンも必須と思われます。さて、使い勝手ですが、電源スイッチ(PDN)を1秒押しせんと電源が入らないのはありがたいです。どっかにあたっただけで電源が入って電池が無くなった... っちゅうのが無くなります。シーク中にLEDが点滅するのもいい感じ。作った回路がイヤホンアンテナになってるので、感度はイヤホンの長さ次第、っちゅう気もします。ローカル局であれば問題なくステレオ受信できました。気になるのは音量のでかさ。一番小さくしても私には少し大きすぎます。寝るときに聴くにはもう少し音を小さくしたいところ。まぁ、100円のICでオートチューニングのステレオFMラジオが作れるとは、ありがたい世の中になったもんです。--- 26:15 ---
November 30, 2013
コメント(0)
-
子ども(弐)の自由研究のラジオが完成した
今日は朝から雨が降ったり止んだりで割と涼しい。子ども(弐)がバラック配線したラジオをケースに入れました。穴あけは半田ごてで手抜き...スピーカの穴とか小さい穴をたくさん開けるのかと思ってたけど、大きな穴を開けました。バリ取りも丁寧にしてたのでネジは割と素直に入ってくれました。つまみも手持ちの複数の中から選んで取り付け、完成。音量調節とかチューニングとかをペンで書き込むのかと思いきや、「このままでいい」とのこと。シンプルさを取ったのか、単にめんどくさくなったのか... (^^;まぁ、無事に宿題が終わったのでひと安心です。--- 13:50 ---
August 25, 2013
コメント(0)
-

子ども(弐)の夏休みの宿題(ラジオ)を作った
今日も暑かった...昼間暑かったけど、夕方から風が出てきて少し涼しくなりました。今はだいぶマシかな。---子ども(弐)が夏休みの宿題に作るっちゅうてたaitendoのM6952 DSPラジオモジュールとTDA2822アンプモジュールを使ったラジオ製作を行いました。回路図全部の配線を子ども(弐)にやらせるのはナカナカ難しそうやったので、どの辺までこちらが作成しておくか悩みました。(^^; 結局、M6952周辺とTDA2822モジュール周辺を基板上にあらかじめ作成し、子ども(弐)には、電源SW、音量調整、チューニング、バンド切替SW、スピーカー、それとアンテナへの配線だけ半田付けさせる格好に落ち着きました。ラジオモジュールとアンプモジュールは共に連結ピンを半田付けしてソケット挿しすることにして、子ども(弐)はソケット周りに作成した半田付け用ワイヤ(?)にビニール線を絡ませて半田付け。コテをあててから大体五つ数えて半田を流すように指示したら、まぁまぁの感じで半田付けできました。子ども(弐)はいつも私が半田付けしてるのを見て難しいと思ってたようですが、自分でやってみて割と簡単にできるっちゅう印象を持ったようです。基板からの配線は子ども(弐)が担当電池をセットしてスイッチを入れると一発動作して、子ども(弐)は大喜び。この感動が大事なんよなぁ。これからケース加工して子ども(弐)がイメージするラジオにまとめ上げるのが大変そうやけど、そこは子ども(弐)の腕のみせどころです。--- 21:50 ---
August 16, 2013
コメント(0)
-
DVB-T/DAB/DAB+受信機[R820T-Y]はDVB-T+DAB+FM R820Tと同等品のようだ
こないだケモノの数字な値付のDVB-T/DAB/DAB+受信機[R820T-Y]をaitendoで買った。ドライバとしてzadig.exeを使ってWinUSBに設定するとSDR#で使えるようになりました。configureのゲイン設定がDVB-T+DAB+FM R820T高性能受信機[R820T]と同じなので、aitendoのページを見比べてみると... どうもR820T-YはR820Tからリモコン用の赤外線受信機を省いただけな感じです。記載されてる基板の写真を見てもパターンに部品が載ってないだけに見えるので、Ich ADCの入力(pin1&2)周辺のパターンも同じなんではないかしら。R820T-YはR820Tほど筐体の勘合がゆるゆるではないので(^^)開けるのに難儀しそうですが、値段が安い分、改造には向いてるのかもしれません。そのうち開けてみよう。--- 23:30 ---
August 5, 2013
コメント(0)
-
USBハブがノイズ源やった...
今日は少し早めで帰宅は19時過ぎ。RTL-SDRドングルDVB-T+DAB+FMはUSBコネクタ周りがゴツいので隣のポートが使えなくなってしまいます。そこで、安いUSB2.0ハブを買って接続したのですが... これが恐ろしくノイズをばら撒いてます。ノイズフロアが20dBぐらい上がりました... (^^;USBハブにRTL-SDRドングルを接続しなければいいかっちゅうと、USBポートにつないでるだけでノイズ源になってしまいます。うーむ、RTL-SDRドングルをつないでるときに使えないとなると買った意味があまりないなぁ。(^^;;--- 20:05 ---
August 5, 2013
コメント(0)
-

DVB-T+DAB+FMのダイレクトサンプリング+ループアンテナで中波帯がだいぶ改善した
DVB-T+DAB+FM(RTL-SDR)のダイレクトサンプリング改造をして中波帯がSDR#で聴けるようになった。でも、適当にでっち上げたシールデッドループでは関東ローカル局が関の山でした。半壊状態でもループアンテナを使えばどうか、っちゅうことで、70cm×70cmループにエアバリコンをつないで試してみました。イマイチQが低くて同調点がぼやけてますが、信号強度はだいぶ改善しました。SNRは悪いですが... (^^; 何とか同調させると毎日放送(1179kHz)も聴けるようになりました。SNRは悪いですが... (^^;;毎日放送(1179kHz)受信中スペクトルを見てる限りでは9kHzステップでかなり受信できているようです。ループアンテナを作り直したらまともに受信できるかも?--- 22:55 ---
July 31, 2013
コメント(0)
-
DVB-T+DAB+FMにダイレクトサンプリングモード用の改造を行った(他力本願)
aitendoのDVB-T+DAB+FMに載ってるRTL2832Uのダイレクトサンプリング用の改造を行った。RTL-SDR Direct Sampling ModeのページにあるHardware modの写真はDVB-T+DAB+FMのモノなので、この通りにピン1とピン2(ich+とich-)につながってるチップコンデンサのランドにヨリ線をつなぎました。差動ピンなのでヨリ線にしてみたけどこれは気休めかも... (^^; この線をケースの適当な隙間から外に出してアンテナ端子としました。いい加減な配線やけど... (^^;適当なアンテナが無いので、このアンテナ端子にテレビアンテナを暫定的につないでMW/SWを受信してみました。SDR#のConfigureボタンを押してSampling ModeをDirect sampling(I branch)に設定してからSTARTを押します。SDR#の設定AFN(810kHz)を受信中RTL2832UのIch用ADCでアンテナ入力を直接サンプリングしてるので感度はアンテナで決まってしまいます。まぁ、テレビアンテナの流用でも中波のローカル局なら普通に受信できる感じ。短波帯はやっぱり感度が低いですが、11605kHzの台湾国際放送はそこそこ受信できました。RTL2832Uを使ったUSBドングルはダイレクトサンプリングモードで使うとさらに遊べておもしろいです。--- 08:45 ---
July 27, 2013
コメント(0)
-
LT-DT306BK + SDR#でも動作した
今日は少し早めで帰宅は19時過ぎ。RTL-2832Uを使ってると思われるワンセグUSBドングル(LT-DT306BK;アンテナ無し)を以前、某リサイクルショップで買ったのを思い出して、SDR#でSDR化できるか試してみました。デバイスIDがaitendoのん(DVB-T+DAB+FM R820T)とは違うのでドライバをインストールせんとあきませんでしたが、ちゃんと動作しました。アンテナ端子はMCX。この手のワンセグUSBドングルでは標準的なのかも。ゲインコントロールが20dBぐらいまでしかないけど、ベースの感度が全体に高い目なのでFM放送は大体入りました。全体にDVB-T+DAB+FM R820Tより感度は低めでSNも少し悪い感じです。でも、まぁ100円か200円で買ってるんやし、動けばもうけもん、と考えましょうか。--- 19:35 ---
July 24, 2013
コメント(0)
全192件 (192件中 1-50件目)
-
-

- パソコンサポーターがすすめるパソコ…
- ◎中古 ノートパソコン パナソニック …
- (2024-09-24 08:46:29)
-
-
-

- ブログ更新しました♪
- 楽天ブログでガイドライン違反を避け…
- (2024-09-26 21:00:12)
-


