
2011年07月の記事
全14件 (14件中 1-14件目)
1
-

チェーンスライダー
TLM220Rのチェーンスライダーの取り付け。パーツリストを見ると分かった。やっぱりスイングアームを外さなければならない。スイングアームに取り付けた後に、スイングアームをフレームにボルト留めとなる。本当は、後からの取り付けが面倒な箇所なので、新しいチェーンスライダーに交換するのが良いのだろうが、あんな硬質ゴム部品に4,000円もかける気がしない。
2011.07.31
コメント(0)
-
蒜山ツーリング
7月24日に藤さんGOLDWINGと矢さんBMW R100RSで真夏の蒜山を満喫すべくツーリングに出掛けたようです。矢さんは貴重な休みを利用して、セローの組立に入っていたようであるが、藤さんの誘いとあって、組立中の部品や工具をほっぽり出して、家族の事も返り見ず一人で楽しんで来たらしい。う~ん。何と羨ましい事か。その頃私は大汗かいて仕事中だった。当日の動画を見ると更に悔しい。http://www.youtube.com/watch?v=2ACYCaB_s0Uhttp://www.youtube.com/watch?v=tDmDE3lHlnE
2011.07.29
コメント(0)
-
リアブレーキ
リアブレーキの組み付けに取り掛かる。ブレーキシューをバネで固定し、ブレーキアームとブレーキカムの打刻点を合わせて組み付けて終了。と、思いきやブレーキアームの下にブレーキインジケーターを入れるのを忘れていた。またまた、バラシて組み直し。パーツリストがあると助かります。
2011.07.28
コメント(0)
-

カーボン
シリンダヘッドを外して、ピストンを下げてシリンダーの確認をしてみる。傷もなく綺麗な表面である。思っていた以上に綺麗であったので、シリンダーのフィンを塗りたかったが、分解はここまでとする。ピストンの頭とヘッド側を磨いて組み込む。このところ仕事以外が忙しく組立は止まったままである。急がねば...忘れてしまう。 左)黒いカーボンがビッシリと付いたピストンとヘッド 右)磨き終わったヘッド
2011.07.27
コメント(2)
-

パーツリスト
TLM220Rのパーツリストが届いた。中古と言うことであったが何故か新品であった。チェーンスライダーは、やはりフォークピボットボルトを外さなければ装着できない。再度の分解だ。またまたフレームに傷が付きそう。
2011.07.20
コメント(0)
-

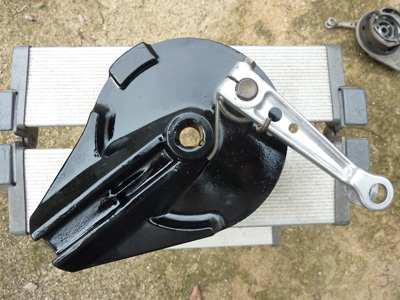
スイングアームと格闘
スイングアームとリアサスの取り付けである。が。またまた、ここで失敗。シャフト穴に栓をしてブラストしていなかったので、砂が大量に入っていたのだ。組み付けて、スイングアームを動かしてみると、ジャリジャリと音が...しまった。と思ったがもう遅い。また、バラして清掃、組み直し。もう暑いのにくたびれるわ。ところで、前に置いてあるゴムパーツは何。チェーンスライダーのようだが、どこに付いていたのだろう。思い出せない。加齢による老化か。ひょっとしてスイングアームを外さないと装着不可?まさか~。と言うことで観念してパーツリストを注文する事にした。ヤフオクで1,800円なり。落札できますように。
2011.07.18
コメント(1)
-

ハンドル取り付け
フロントフォークが左右反対だったので、組み直し。安定させるために、ハンドルを磨いて取り付けてみた。このアルミハンドルは純正ではないような気がするが...どうでしょうねぇ。
2011.07.17
コメント(0)
-

組立
いよいよTLM220Rの組立に取り掛かる。先ずはステム周り、フロントフォーク、フロントホイールだ。フロントフォークまでは出来たのであるが、一人ではホイールを入れるのが大変だ。フロントを吊りたいのだが、吊る場所がない。首を吊る良い枝振りの松の木ならあるのだが....自転車を見ていて思いついた。そうだ、自転車のリム周りを触るときは確かひっくり返して...今ならフレームだけなので、自転車位の重さだ。果たして自転車流組立でフロントができた。あれ~。でも変だぞ。分解前の写真と比べてみると、ブレーキディスクが左右反対だ。と言うことは、フロントフォークも反対だ。全部やり直し。トホホ...。
2011.07.15
コメント(2)
-
タンク塗装
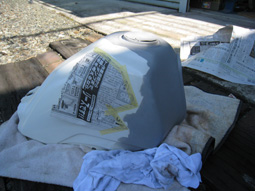
セローのタンク塗装一度は完成したのだが、数日後になにやらブツブツが塗装の下から浮き出てきちょる。ゲッゲー・・・。気になって放っておけないな。納得いかないならいちかばちかやってしまえと腹をくくってブツブツ部分とその周囲の塗装を剥がしてパテを薄付けして下地を整えて再塗装。デカール部分はマスキングしておいてと。どうしても塗装の境目(マスキング部分)に塗料の厚み分の段が付いてしまうためペーパーでごまかしながら最後にはウレタンクリア塗装を厚めにスプレーしてごまかし完成。まあまあ納得とします。いやあ塗装は難しいですね。
2011.07.13
コメント(1)
-
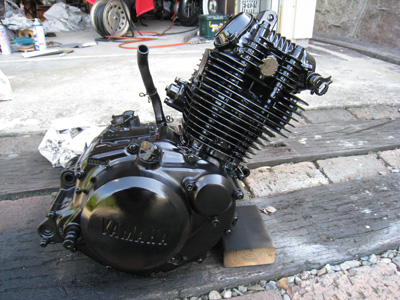
エンジン塗装
セローのエンジンの塗装に挑戦。フィンの部分はオキツモのツヤ有り耐熱塗料で直接塗装し、腰下はデイトナのMCペインター(マルチプライマー)で下地処理の上、普通の黒スプレーで塗装。エンジンはアルミなので普通のプラサフでは剥がれやすいと思い、MCペインターを購入(1缶2000円程度、ちと高い)透明でした。はじかれることも無くきれいに載りました。耐熱塗料はなかなか乾かず、やはりエンジンに火を入れて硬化完成するのかな。とにかくやっとエンジンの塗装が出来たので、次の次くらいではそろそろ組み立てに入れるかも。
2011.07.10
コメント(1)
-

フレーム塗装
TLM220Rの錆び落としが終わって、サフを吹いて一晩おいて朝、見てみたら所々にうっすらと錆が浮いている。エ~。エ~~。水性のサフだからだろうか。それとも薄すぎたのか....急いで、サフの塗り重ねを行うが、塗装をキチンと除去していないところや、下地の処理の甘いところは、サフでは隠しきれない。もう少し念入りに磨いておけば良かったが、後の祭り。このまま2~3日乾燥させて、塗装する予定だったが、乾燥したサフを見ているとどうしても上塗りをしたくなってしまう。欲望に負けて良くないとは知りながら塗ってしまった。白いフレームをもう少し塗りたかったが、5年前に買った塗料が底をつき強制終了となる。今度は2~3日置くことにする。
2011.07.08
コメント(1)
-
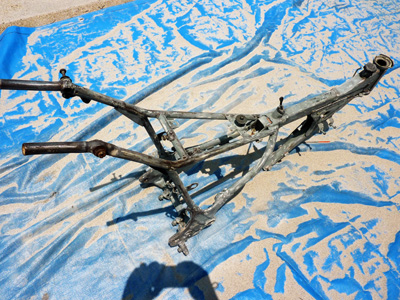
フレーム塗装はく離
いよいよ、フレームの塗装はく離に取り掛かる。リムバーを買ってはみたものの、グラインダーの方が速いので、平面や削れる所は錆取りディスクで。残りの細かな所はサンドブラストする事にした。と言っても、フレームは細かな所が多くグラインダーが使えるのは半分程度だろうか。次はブラストである。錆びや塗料は良く落ちるのであるが、何せ落下式のスポットブラストなので、砂がすぐ無くなる。塗料が少し残った箇所もあったが、作業時間が無くなったので、よしとした。今度は錆びない内に、プラサフを吹いて、雨が降らないようなのでそのまま1晩乾燥させる事にした。
2011.07.06
コメント(2)
-
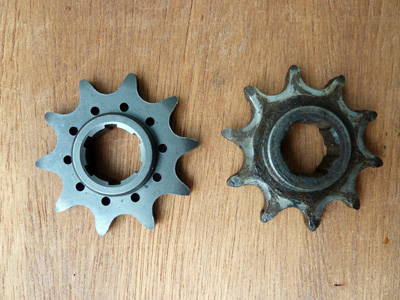
ドライブスプロケット
TLM220Rのドライブスプロケットを外してみると、なんと、刃先が曲がっている。大型バイクなら分かるが、200ccクラスのバイクでも、こんな事になるのですねえ。さすがにこれは使えないので、ネットで検索。株式会社ザム・ジャパン(X.A.M)から購入した。純正は13Tだが、このバイクには10Tが付いていたので、チェーンの長さも考えて同じ10Tにした。2,362円ナリ。
2011.07.03
コメント(0)
-

チャンバー
TLM220Rのチャンバーは足が当たるので、カバーが付けられている。錆が出ており汚いので塗装しようと錆びたボルトをインパクトドライバーで緩めていた。最後の1本になってグニュと変な感覚。アカン。やっても~た。ボルトが途中で折れたのだ。エキストラクターで、折れて残ったネジを救出しようとするが、ビクともしない。こんな頑固なネジはドリルでグリグリの刑にしてやるのだ。ポンチで折れボルトの中央に凹みを付け、ドリルの歯を少しずつ大きくして折れボルトを壊すのだ。最後はメスネジの溝に食い込んだボルトの破片を取り除く。タップが無いので、ステンレスボルトを締め込んでメスネジの溝を復元。えらい時間が掛かってしまった。カバーの中には、ガラスウールの断熱材が入っていた。カバーと断熱材を外して裸になったチャンバーは火炙りの刑だ。焚き火をして、その中に放り込む。朝、見てみると綺麗に焼き上がっている。凸凹をグラインダーで削って、耐熱塗料。
2011.07.01
コメント(0)
全14件 (14件中 1-14件目)
1
-
-
- MINIのある生活(^o^)
- 大阪での盆休みと思ってたら…
- (2024-08-18 09:50:35)
-
-
-
- 【MOTO GP】レース雑感・速報など
- Moto GP 2024 第14戦 エミ…
- (2024-09-21 23:35:06)
-
-
-

- 自動車・バイクのメンテナンス
- オイルとオイルフィルター交換
- (2024-09-17 22:29:03)
-


