
2012年02月の記事
全29件 (29件中 1-29件目)
1
-
タンクのその後
ゼファーのタンクの錆取りが終了したので、ファンヒーターの前で乾燥させ、最後は給油口からドライヤーを突っ込み念入りに水分を取った。花咲かGの威力はやはり抜群で、錆は綺麗に除去された。燃料コックもバラしてみたが、中は至って綺麗であった。汚れも無かったので、パーツクリーナーを吹いて終了とする。ゼファーの燃料コックは負圧式となっているようで、ON(タンクのリザーブ部分を残して燃料を出す。)と、RES(タンクのリザーブ部分から燃料を出す。)と、PRI(負圧なしのだだ漏れ ポジション。ガス欠やキャブレターOH後に強制的に燃料を充填するときに使う。)の3ポジションとなる。OFFのコックが無いバイクは初めてである。タンクを外す時などは、ONにしておけば、燃料パイプを抜いてもガソリンは漏れないのだろう。花咲かGで甦ったタンク分解した燃料コック(ピンボケで失礼)
2012.02.29
コメント(1)
-
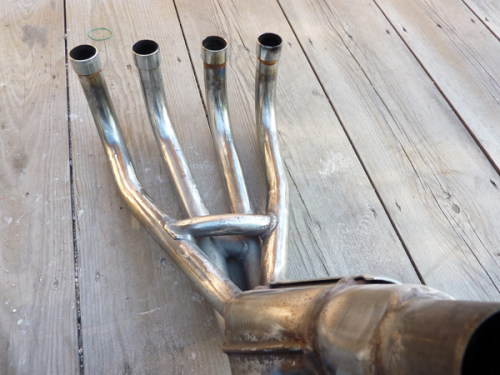
エキゾーストパイプ
ゼファーのエキゾーストパイプが錆びている。ここにサビがあると、バイクがボロに見えてしまうので、取り外して磨く事にした。ジョイントカラーなんぞは、全体が真っ赤に錆びている。グラインダーにナイロンディスクを付けて錆取りを行う。入り組んだところはディスクが入らないので、サンドブラストだ。それにしても、このエキパイ、一見ステンレスのように見えるのだが、赤錆が発生するということは、鉄だろうか。それとも合金だろうか良く分からない。磨きを終えて、取り付けに掛かるが、中の2本のカラーを付けるのに手こずった。何をするにも4気筒はめんどくさい。
2012.02.28
コメント(3)
-
gag修理50
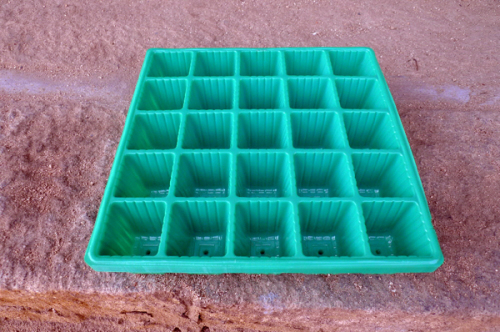
とうとう50回も続けてしまった。最終回である。今日もホームセンターをウロウロ。10枚300円で見つけたのが、種をまいて芽が出るまで植えておくナントカという代物。(写真1)これ、バイクを分解したときネジなどを分けて入れておくのに便利だ、と買ってしまった。完成に近づいたのでもう必要ないかもしれないけど。バイク屋に行って5年の自賠責保険をかけてもらった。これで公道が走れる。(写真2)1年3,000円と考えれば安いかも。ちょっと確認のためタペットカバーを外す。(写真3)エンジンをそっと回してみる。オイルがピュッ、ピュッ、と飛ぶ。ここだけでは分からないがオイルも回っているようだ。ミラー、後方カウルを付け、ガソリンタンクにはハイオクガソリンを4L奢っていざ出陣!。(写真4)アイドリングも2,000回転で安定したのでスタート。100m程走るとプスプスプスーーーー止。あれーっ、なんかガソリンが行っていないような止まり方。あちこち見るがよく分からない。タンクを外しガソリンの流れを確認して再度出発。今度は大丈夫。ホースでも挟まっていたのかなぁ。バイク屋に行って社長の息子に見てもらった。異音も出ていないし、アクセルもよく反応するし、と太鼓判をもらって5kmほど試乗。帰ってきたらキャブがオーバーフロー。またまたキャブをばらすことになる。gagのフロートバルブは真鍮そのもの。HONDAのフロートバルブは薄くゴムが巻いてあった。真鍮そのものだからちょっとのゴミでも付いたら漏れる。再度掃除して組み込んだら漏れも止まった。何度キャブを外し、組み立てたことか。寒い朝でもチョークを引くことなく、静かにキックを踏み下ろすとポロポロポロとエンジンがかかり、1,200回転くらいで回り始める。まことに調子が良い。完成である。昨年10月から初めて4ヶ月かかってしまった。もともと愛着があって始めた修理ではないが、こうやって自分の手で直して走るようになると愛着がわいてくる。みなさん、ありがとうございました。(藤)写真1写真2写真3写真4
2012.02.27
コメント(6)
-
gag修理49
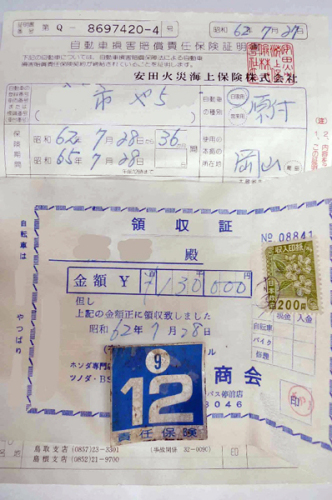
ようやく名義変更をした。原付の名変はカンタン。印鑑2つあればできる。gagをもらってきたとき、前持ち主は「数年動かしていない。その後は室内保管」と言っていた。書類をよく見ると、前前持ち主が昭和62年7月に購入していて領収書まであった。その後前持ち主に渡り、私の許に来たわけだ。ちなみに保険のステッカーは平成9年12月、ということは数年どころではない。少なくとも13年は動いていないわけだ。(写真1)それにしてもエンジン運転音に異音は発生していない。ただ不安なのは、オイルが必要なところに回っているか、だ。オイル通路のどこかが詰まっていたら、そのうちどこかで異音がし始めるだろう。そのときは予備のエンジン(部品取りで買った丸ごと1台!)がある。このgagが完成したら、勉強のためこの予備のエンジンを分解、組み立ててみようかと考えている。このバイク、スポーティー仕様(?!)なのでフェンダーが短い。試乗していたらタイヤがはねた泥があちこちに飛ぶ。隙間が大きいのだ。(写真2)ステアリングポストの下は砂だらけ。(写真3)ちょっとかっこわるくなるが、ホームセンターでゴム板を買ってきてマッドガードを作ってみた。(写真4・5)おじさんにとっては格好よりも実益が優先。組み立てもほぼ完成した。タンクも乗ってハイオクガソリンを入れる。ハイオクは腐りにくいので、置いておく時間が多いときにはこちらを選ぶ。アンダーカウルだけはもう少ししてから取り付けよう。保険をかければ公道デビューだ。(藤)写真1写真2写真3写真4写真5
2012.02.26
コメント(4)
-
gag修理48
1速で静かに走り出す。平坦なところはokである。クラッチもひっついてなかった。ただ、クラッチのミート位置が好みではない。だいぶ奥でつながる。もう少し手前にしようとワイヤーを調整した。平坦なところはいいのだが、上り坂になるとパワーがなくて、エンジンが止まりそうになる。どうもガソリンが薄いか足らないような気がする。キャブのピストンを外して、ニードルの位置をあげてみるがあまり改善しない。メインジェットが完全に掃除できていないのかもしれない。メインジェットの詰まり方は尋常ではなかった。そこで、再度メインジェットを取り外して穴を覗いてみた。メインジェットの穴が小さいような気がする。そこで細いドリル刃でもんでみることにした。真鍮を削り本来の穴を大きくしてしまったら元も子もないので、本当はドリルは使うべきではないのだが・・・。何種類かあてがってみて0.8mmがいいようだ。(写真1)真鍮を削らないように慎重に手で回すとドリルの頭が出てきた。ン、ゴミが乗っておる。(写真2)これだ、と何度か手でグリグリしたらゴミは出てこなくなった。(写真3)穴もきれいに整ったと思われる。(写真4)ついでに再度フロートの高さ調整をして、メインジェットを組み込んだ。ニードル位置は上から2段目に変えた。エアースクリューは1.5回転戻しで始めたが、どちらかに少し回してアイドリング回転が一番上がるところで止める。後に手に入れた諸元表では1回転と7/8戻しが標準だった。キャブ内部が正常であれば回転がゆっくり上下するはずだ。果たして、・・・大成功である。エンジンは8,000回転まで吹き上がり、坂道も難なく上がるようになった。アイドリングも2,000回転で安定している。本来はもう少し低いはずだが、この回転が調子いい。ただ、難点はライディングポジションである。おじさんにセパハンはきつい。(藤)写真1写真2写真3写真4
2012.02.25
コメント(2)
-
gag修理47
走行試運転中のガソリン供給は、ガソリンタンクでは邪魔になってしょうがない。どうしようかと考えてホームセンターへ。買ってきたのはプラスチックのオイラーである。120円ほどと安いので買ってすぐに穴を開けてやった。これにゴムホースを挿し、適当なところに吊し、穴からガソリンを入れる。(写真1)ゴムホースの先は当然ガソリンコックである。アイドリングも落ち着いてきたが、キャブからガソリンが漏れる。どうもレベルが高いようだ。もう一度外し、フロート室を開けた。フロートバルブを押している爪をすこし広げて再度組む。(写真2)買っておいたチェーンを付ける。箱から出して当ててみるとずいぶん長い。ピンを抜いてコマを落とさねばならない。グラインダで削ってもいいのだが、ここはバイク屋へ行こう。で、社長に特殊工具でピンを抜いてもらった。(写真3)ものの30秒!。再度持って帰り組み付ける。回転方向を間違えないようジョイントし、チェーンの張りを調整して愈々試乗である。走るためには走行中もガソリンを供給しないといけない。タンクは付いていないのでとった方法がこれ。(写真4)左ミラー根元にオイラーをくくりつけてやった。ちなみにミラーが無いと根元がびびってやかましいので、折れたミラーの根元を仮付けしてある。さぁ、これで試乗だ。ブイーーーン、ブイーーーン、あれっおかしいぞー。(藤)写真1写真2写真3写真4
2012.02.24
コメント(2)
-
ホーン再装着
ゼファーのホーンが壊れていたので、手持ちのボンゴフレンディーのホーンを付けたのだが、ラッパ形のために、タンクに干渉はするわ、音は悪いわで、今一つだったのだが、福さんから手持ちのデリカスペースギア用のホーンがあるとの連絡あり。早速、その日の内に貰ってきた。デリカのホーンは端子が筒状のギボシであったので、福さんがギボシに電気コードを付けてくれていた。なんでも、平端子まで付けようと思ったのだが、生憎メス端子しか無かったそうであるが、ここまでやっていただければ有り難い限りである。平端子を購入し、取り付けに掛かる。今度は厚みも無いので、オイルクーラー裏の定位置にピッタリだ。ホーンを鳴らしてみると、パ~ン。と大きな良い音が出る。福さんのお蔭でホーンは解決した。デリカのホーンに平端子を付けたところ定位置のオイルクーラー裏に装着したホーン
2012.02.23
コメント(3)
-
gag修理46
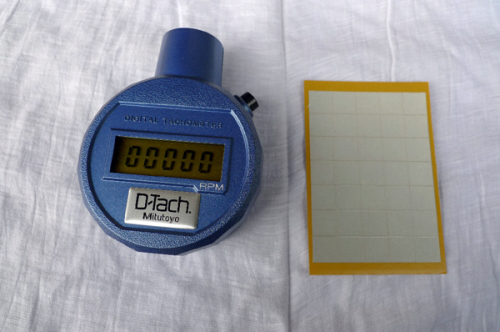
gagに付いていた社外品と思われるタコメータは正確なのだろうか。どうやって計ればエンジン回転数が分かるだろうか。以前所持工具の中で回転数を計る計器を紹介した。(写真1)これを使ってみよう。この計器が信号を拾うためには反射テープを回転する物に貼らなければならない。フライホイールなどはオイルに浸っていて貼れないしどこに貼ろうかと考えた結果、ドライブスプロケットに貼ることにした。エンジンを回し計測してみた。(写真2)これから計算でクランクの回転数を導き出す。諸元をネットで調べると、このエンジンの1次減速比は3.842、1速3.400、2速1.933、3速1.315、4速1.095とあった。とすると1速の総減速比はかけ算で13.0628、4速は4.20099と出た。写真は463rpmを指している。このとき4速、タコメータは2,000rpmを指していた。463rpm×4.20099=1,945rpm!なんとこのタコメータはほぼ正確である。タコメータ4,000回転時4速でドライブスプロケットは920rpm、同じく6,000回転時1,400rpm、計算するとそれぞれ3,870rpm、5,889rpmとなり、他のギヤでも計算してみたけどこれまたほぼ正確であった。このエンジンは7,000rpm時5.2PSらしい。よって7,500rpm以上回さないようにしよう。(藤)写真1写真2
2012.02.22
コメント(5)
-
gag修理45
何度かエンジンをかけ、10ン年前のオイルも攪拌されたので新しいオイルと交換する。このエンジン、原付のくせにオイルフィルタを装備している。(写真1)オイルを抜いてみた。数百ccは入っていたようだ。さすがに真っ黒である。(写真2)オイルフィルタを交換するため、フィルタケースの蓋を緩めようとドライバで回すのだが回らない。頭をなめそうなのでインパクトレンチを使って緩めた。(写真3)残ったオイルを拭き取りきれいに掃除し、新しいフィルタを組み込んで蓋をする。ついでになめないようにステンレスキャップボルトに替えた。(写真4)真ん中の大きなボルトは何の役目をしているのだろう。外したとき見たけど刺さっているだけ。内側にバネがありフィルタを押しているけどボルトの必然性が無い、よくわからん。ケースにはオイル量600ccの鋳込みがある。600cc入れてゲージを見たけど届かない。もう少し足してゲージの真ん中あたりでやめた。150ccくらい足しただろうか。エンジンを回してみたら少し重い感じ。10w-30を入れたのだが、抜いたオイルは古くなって粘度が落ちていたのかもしれない。(藤)写真1写真2写真3写真4
2012.02.21
コメント(5)
-
gag修理44
キャブの調整にかかる。エアスクリューの戻し量は、サービスマニュアルがないのでわからん。で、とりあえず1.5回転戻しではじめる。そのままではエンジンはかからず、チョークを引けばかかる。アイドリングというより4-5,000回転で回転が上がったり下がったり、チョークを戻せば止まる。少し暖まればだいぶましになるけど、やはり不安定。ちょっと混合気が薄いようだ。キャブのジェットニードルを外してみた。クリップの位置は5段中、上から2段目だった。(写真1)ニードルが下がってガソリンの量が少ないのかな。一段上げて真ん中にして組んでみた。(写真2)今度は回転は高いもののフラフラは収まった。アイドリングストップスクリューで回転数を下げて、2,000回転ぐらいで落ち着かせる。でもこの回転計、合って のかなぁ。回転計のコードはIGコイルの一次側につながっている。ピックアップはクランク軸だから1回転毎に信号を送っているはず、とすれば、合ってるか。でもなんか実際の回転数より表示が高いような気がする。アクセルを開けると回転は上がるが、回転落ちが悪い。もう少しキャブを調整しよう。 ライトを付けてみた。ちゃんと点灯するし上下も切り替わる、テールランプや照明もok、ヨシヨシ大丈夫。最後にバッテリー両端にテスターを当ててみた。エンジン停止状態では、電圧は6.55Vだった。(写真3)エンジンが回ると電圧は7.47V。(写真4)発電状態もいいかんじ。(藤)写真1写真2写真3写真4
2012.02.20
コメント(4)
-
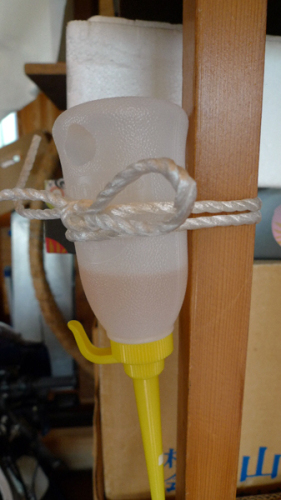
gag修理43
今日はいよいよキックを踏むぞ。その前にフューエルストレーナを付けなければ。簡単な網のストレーナはガソリンタンク内にあったのだが、予備の方だけについていた。そこで原付には似合わないようなストレーナを買ってしまった。コックからキャブに行くホースの中間に付けた。コックをゴミが通過するかどうか分からないが、まっ、いっかーてなもんである。ガソリンタンクはまだつけるわけにいかないので、適当なポリタンクにガソリンを入れてホースをつなぐ。(写真1)キャブのチャンバー室のビスを緩めると、ストレーナにガソリンが通り、チャンバー室下からポタポタ。(写真2)これでガソリンが来た。新しいプラグに替えてもう一度火が飛ぶか確認し、キックを踏む、圧縮もそこそこある。エンジン始動3点セ トが揃ったところでいよいよスイッチオーーーーン。ニュートラルランプ点灯。キックを、踏む、踏む、踏む。かからない。そりゃーキャブのエアー調整なんぞはエエ加減なんだから、と思いつつ踏む、踏む、踏む。更にチョークを引いて踏む、踏む、踏む、とワオオオーーーン、と突然エンジンがかかった。なかなか元気のいい音がした。慌ててチョークを戻すと、プスプスプスーーー止。チョークを操作しつつ撮ったのがこれである。(写真3)タコメータも生きておった。何回かエンジンは回ったが、当然アクセルに反応はしない。少し暖まったらエンジンオイルやフィルタを交換して、キャブの調整をしなければ。(藤)写真1写真2写真3
2012.02.19
コメント(5)
-
gag修理42
おおーっランプが点いたぞ。ニュートラルとサイドスタンドのランプが点灯した。(写真1)ストップランプは足ブレーキと手ブレーキで点灯確認。(写真2)ホーンも鳴る。ウインカーも点滅、上々である。最後にプラグを外し、エンジンの上に置いてキックを踏んでみる。パチパチと火花が飛んで点火系も大丈夫である。エンジンを回してみないと前照灯、発電系統、充電系統などは分からない。バックミラーは最後に付けることにする。このミラーはなかなか貴重品らしい。車体から飛び出すので、組み立て中や調整中、知らぬ間に体が当たって折ってしまうと涙がチョチョ切れる。マフラーを付けて終わりにする。次回はいよいよエンジン始動だ。(写真3)キャブにつなぐホースは他にもある。ガソリンがオーバーフローしたときに、下に落とすためのパイプを買いにホームセンターへ行く。最初白い3φのシリコンホースを買ってきた。オイルokとあった。ガソリンに浸けてしばらく置いてみると侵されぶよぶよになった。okじゃない!と次に燃料用ホースを買ってきた。燃料用と書いてあるのにガソリンだめ、とあった?。こっちは大丈夫みたいだ、値段はシリコンホースの半額。看板が違うぞ!。(藤)写真1写真2写真3
2012.02.18
コメント(3)
-

gag修理41
配線図を用意しておいたが、これくらいの配線だったら、配線図を見ることなく組み立てが出来る。色を間違えないようにして、コネクターは合うコネクター同士をつなげばいい。メスコネクタが緩くなっている場合もあり、ペンチですこしかしめながら結線していく。最後にバッテリーをつなごうとして、ハテナ?バッテリーの青線(アース)はオスコネクタ。車体側もオスコネクタ。(写真1)バッテリーの赤線(プラス)もオスコネクタ。車体側もオスコネクタ。(写真2)なんじゃこれは。バッテリーの種類を間違えたかも。でもまぁ、これくらいなら修正がきく。橋渡しの短い線を製作しておしまい。(写真3)バッテリーをつなぐ前に確認しておかねばならないことがある。それはアース。アース線がきちんと電気的にフレームにつながっているかを見ておかねばウインカーが点かない、てなことになる。フレーム側に切られているネジはすべてタップでさらっておいた。テスターを当てて、すべてのアースポイントで電気的に通じているかを見ておく。最近のデジタルテスターは、導通があるとピーッと鳴る機能が付いているので便利だ。すべてを確認してバッテリーをつないでキーをひねる。(藤)写真1写真2写真3
2012.02.17
コメント(2)
-
gag修理40
ガソリンタンクからガソリンコックに行く8φの汎用ゴムホースを以前買っておいた。gagのガソリンタンクからは外に向かってガソリンが落ちる短いパイプが出ている。ゴムホースをこれに挿そうとしてもささらない。ホースの穴が小さいのである。でもコック側はささる。むりやり挿さねばならないのか、と思いつつ部品を頼むときに純正を注文しておいた。果たして、袋を開けてよく見れば、なんと純正ホースはタンク側(写真左側)がコック側(写真右側)より太めに作られていた。(写真1)これでは汎用ホースは入らないわけだ。少し長めに作られているので切って使うように、と注意書きがあった。いよいよフロントブレーキホースをつなぐ。ホースは中に詰まりがあり、外したときに掃除して通るようにしておいた。ひび割れなどはないので使えるだろう。キャリパーとマスターをホースでつなぎ、バンジョーボルトを締める。初め、下側を開けておいてフルードを入れたら落ちていくかな、と思ってやってみたが落ちなかった。ブリーダースクリューにパイプをつなぎ、セオリー通りレバーをコキコキしてもフルードは出てこない。しかたないからホースの解放端を口に咥えて吸いながらコキコキ。お、出てきた出てきた。ここまでくればしめたもの、フルードを足しながら締めたり緩めたり。まだ泡が出てるぞ。(写真2)泡が出なくなったのを確認して、フルードを満たし完了。(写真3)(藤)写真1写真2写真3
2012.02.16
コメント(2)
-
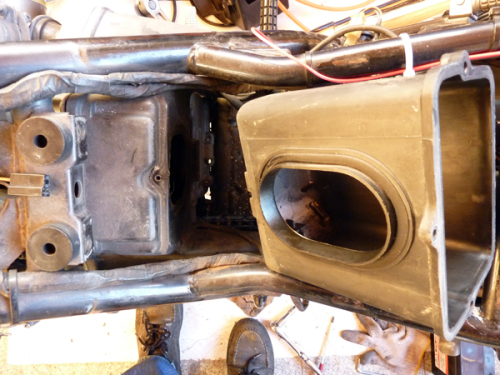
gag修理39
早速組み立てにかかる。オーバーホールしたキャブレターを、インシュレータを間に挟み取り付ける。インシュレータの所から空気が入ると、エンジンに不調をきたすのでパッキンはインシュレータを挟むように2枚付けた。ばらしたときは1枚しか入ってなかったような気がする。油を染みこませておいたチョークワイヤとアクセルワイヤをつないで完成。作動性も問題なくスムースに動く。(写真1)コネクターを取り替えたメインワイヤーハーネスを車体に沿わせて取り付け、結線していく。タコメータから来た線は長かったので、適当な長さに切りコネクタを圧着。間違えないように付けていた付箋の通り結線する。(写真2)当然ながらエアクリーナエレメントはぼろぼろだったので、買っておいたスポンジを切ってエンジンオイルに浸し、固く絞って使う。(写真3)この金具より一回り大きく切らなければならなかったのに、このままの大きさで切ってしまった。まぁ、使えないことはないのでそのままエアクリーナボックスに入れて、キャブレターとつなぎフレームに固定する。(藤)写真1写真2写真3
2012.02.15
コメント(2)
-
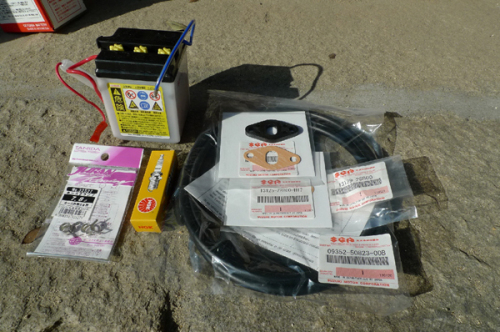
gag修理38
ちょっと気になることがあり、解決するまでgagが触れなかった。その問題も昨日で解決し、部品も入ったので組み立てよう。今日は天気もいいし暖かい。用意した部品はこれ。バッテリーやプラグ、インシュレータ、ゴムホースなどである。(写真1)以前、車用品店でいい物を見つけた。ホースクランプである。(写真2)gagに限らずバイクのガソリンホースは針金状のホースクランプである。ガソリンコックにはこのように使われている。(写真3)これでも問題はないのだろうがたまたま見つけ、針金クランプより良さそうなので買ってきた。直径8φのホース用で2個で210円とちょっと高かった。ガソリンコックに新品ホース共々取り替えてみた。(写真4)何かしっかり止まったようで安心感がUPした。(藤)写真1写真2写真3写真4
2012.02.14
コメント(2)
-
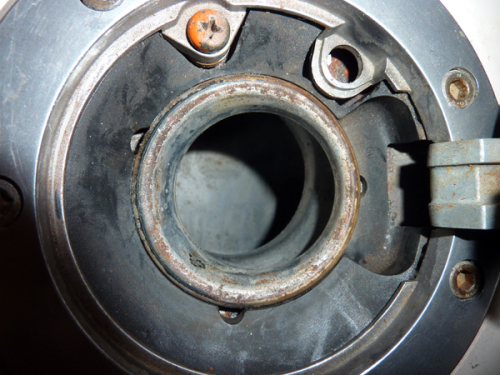
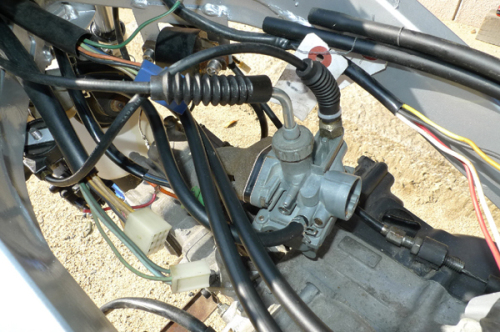
キャブ取り外し
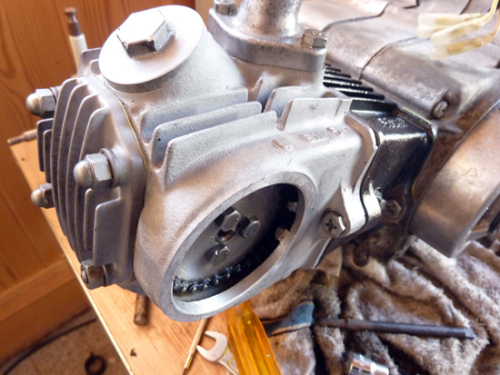
ガソリンタンクのサビの状態と藤さんの「フロートチャンバーだけでも外して掃除したらええよ。」の一言で、キャブを取り外す事にした。ホントは4連キャブは外すのも取り付けるのも、大事となるのでやりたく無かったのだが...以前ドリームCB350Fの4連キャブを外すときにインシュレーターが固くて、タイヤレバーで悪戦苦闘した経験がある。ゼファーのキャブを外すには、先ずバッテリーを抜き取る。これがまたケースにキッチリ嵌っているので、真上に引っ張り上げられない。+-端子に針金を付けて持ち上げる。次は、両側のサイドカバーを外して、タンク取り付けステーを外す。次に、エアークリーナーボックスを外すとインシュレーターからエアクリボックスに接続するケースが後ろに少し動く。次に、エンジン側のインシュレーター取り付けバンドを緩める。後は両手でキャブを持って渾身の力でエンジン側から引き抜くのだが、少しコジルようにすると抜けてくる。CBに比べるとアッサリ抜けた。拍子抜けだ。外したキャブは車体から横に抜き取る。キャブのオーバーホールをするには、アクセルワイヤー2本を外すのだが、今回はフロートチャンバーを外すだけなので、ワイヤーは付けたままだ。フロートチャンバーにはガソリンが満タンになっている筈なので、4箇所のボルトを慎重に緩める。外したフロートチャンバーを見てみると、赤い粉状のものが見える。4つとも同程度に堆積していたので、綺麗に掃除する。ジェット類はあまり汚れていなかったので、そのままにして、組み上げた。キャブを元に戻すのだが、まず、エンジン側から装着した。エアクリ側のインシュレーターにはバネのバンドが付いているのでずらせておいたが、なかなか上手く取り付けられない。先にエアクリ側から装着するのだろうか。それでも何とか装着し、バネバンドを付けるのだが、中の2本がむずかしい。手の指が引きつりそうになりながら、装着完了。もうやりたくない。エアークリーナーボックスを外したところエンジン側のインシュレーターが外れたところフロートチャンバーを外したところフロートチャンバーの中の状態
2012.02.13
コメント(3)
-
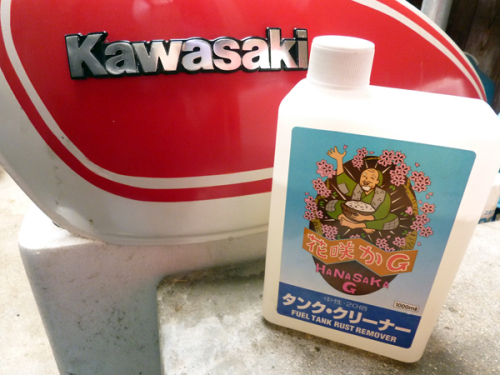
タンククリーナーが....
ゼファーのタンクの錆取りに掛かる。オマケで付けていただいた希釈済みの花咲Gをポンプで汲み出して見ると、何と真茶色であった。普通、花咲Gで処理すると黒く濁る筈なのだが、何をどう処理したのだろうか?何れにしても余りに汚いので、却ってタンクが汚れそうと思い、新品の花咲Gタンククリーナーを買ってきた。中のガソリンを抜いて見ると、底の方からオレンジ色の液体が出て来る。思った以上に錆が蔓延している。燃料コックを外して、台所の洗剤を入れて水洗いを繰り返す。錆が酷いようなら、ナットを数個入れて洗うのだが、そこまでする必要はなさそうだ。洗浄が終わったところで、燃料コックの穴を布製のガムテープで二重に塞ぐ。気温が低いので、温水器で沸かした湯と共に花咲Gを注入。タンクのキャップまで入った所でガムテープからの漏れが無いことを確認して終了。そのまま放置して翌朝見てみたら、アレ~。タンクの中が空っぽだ~。15Kgの水圧にガムテープが負けていた。幸い、タンクの下には発泡スチロールの箱を置いていたので、中身は全部箱の中に落ちていた。やはり、きちんとした栓を作らないとダメだ。そこで、手持ちのZ金具にドリルでボルト穴を2つ開け、留め金具を作成。次に、古いタイヤチューブをハサミでZ金具の大きさに切り、ドリルで同じ位置に穴を開けてパッキンを作成。ボルト2本で装着して完了。再び花咲Gの希釈液を注ぐ、1時間程おいて様子をみたら、漏れてない。大丈夫のようだ。気温が低いし、今度は希釈液を温められなかったので、2日間放置する事にした。花咲Gタンククリーナー(左)Z金具で作った留め金具(中)古チュープで作ったパッキン(右)取り付けボルト
2012.02.12
コメント(2)
-
ハンドルグリップ
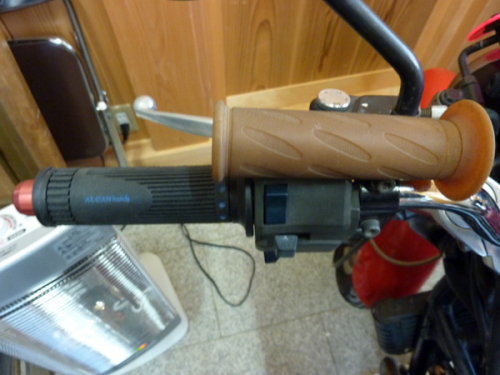
ゼファーのベージュのグリップ。暴走族風で不評であったために交換する事にした。バイク7で1,280円のワゴンセール特価品をゲット。このハンドルにはアルミのグリップエンドが付いているので、グリップは貫通式の選択となる。左は難なく装着できたが、右側はスロットルグリップパイプが付いているので、きつくて入れにくい。ゴムハンマーで叩きながら何とか入れる事ができた。僅かにグリップが長いが、運転に支障はないのでまあ良いだろう。手元が黒くなって引き締まった。
2012.02.11
コメント(2)
-
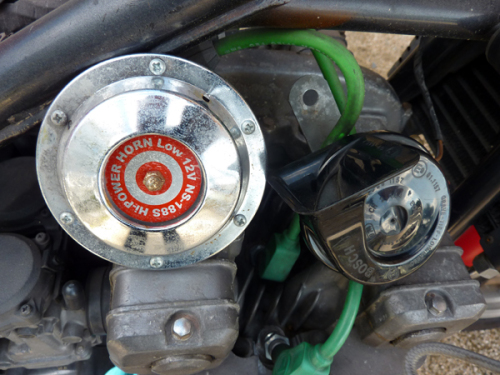
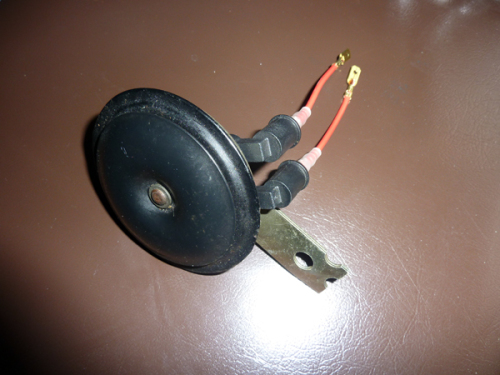
ホーンが....
ゼファーのライトの修理が終わったので、ホーンを鳴らしてみる。.........。鳴らしてみる。.......。鳴らない。へっ。スイッチの不良か。配線か。ホーン本体か。原因を探るべく、本体を外して電気コードに繋いでバッテリーに直に接続してみると、鳴らない。本体が壊れている。これも私の手落ちで、確認していなかった。さて、どうする。と思案していたところ、以前ボンゴフレンディーで信号無視の車を避けきれず事故を起こした時に、助かった右側のホーンを仕舞ってあったのを思い出した。車用なのででんでん虫のラッパ型である。純正か前オーナーが付け替えたかは定かではないが、メーカーはBOSCHであった。電気コードに繋いでバッテリーに接続してみると、今度は鳴る。ステーを外して付けようとしたのだが、でんでん虫は厚みがあるので、エンジンに当たってしまう。仕方がないので、少し外側に角度を変えて装着した。ガソリンタンクの右前に少し当たるが、プラスチックなので傷は付かないだろう。鳴らしてみると、ブオーンと少しこもったような音がする。ラッパがタンクの下で反響するのか、車用なので電圧が違うのかよく分からないが、装着する前にバッテリーに繋いだ時にはもう少し良い音だったような気がするのでこもり音のようでもあると思うのだが....。車検はどうであろうか。音の大きさや、高低の基準があるのだろうか。それとも音が出れば良いのであろうか。因みに前回の車検の時には音は計っていない。行ってみてのお楽しみにしよう。左が壊れていたホーン。右がBOSCHのホーン。
2012.02.10
コメント(3)
-
ライトが....
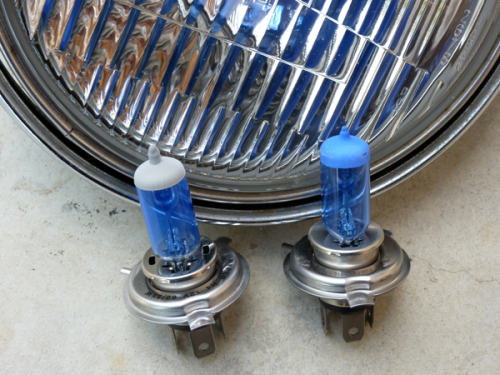
ゼファーのタンクを洗浄する前に、少し乗ってみた。ナナハンに比べると矢張り車体が軽い。低速のトルクが大分違う。悪く言えばスカスカだが、高回転にすれば、元気に走れる。このエンジンは高回転型だ。ゼファーはブンブン回して走るタイプのバイクのようである。(あたりまえか)続いて各所の点検。確かライトは点いていたよなあと思いながら、ハイビームスイッチを入れると点灯。ロービームスイッチを入れると消灯。なんで...。ライトのメインスイッチはどこだ。ハンドル回りを舐めるように探しても見あたらない。どういう構造になっているのかわからない。そこで、フト思い出した。そう言えば平成産のバイクは危険防止のために、ライトは常時点灯が義務付けられているので、エンジンを掛ければライトが点くのだ。古いバイクしか乗ったことが無いので、無くて当たり前のライトスイッチを探してしまった。それならロービームが点かないと言うことは、球切れか。早速ヘッドランプをバラす。バルブを引っ張り出して見ると、切れてるし~。以前ミニカトッポBJを廃車にした時に、付けていたPIAAのバルブを外して保管していたのを思い出した。比べて見ると12V50/65Wで幸いなことに同じだ。装着してエンジン始動。点いた。ハイもローもバッチリだ。やれやれ。次は何があるのだろうか。左がローが切れたバルブ。右がPIAAのバルブ。
2012.02.09
コメント(5)
-
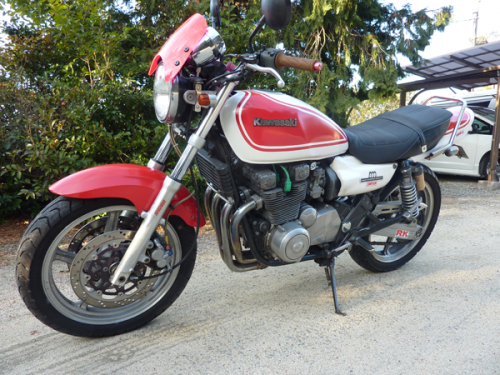
kawasaki ZEPHYR400
長男がバイトで貯めた虎の子の18万円で、ヤフオクにてバイクを買ったので、昨日引き取りに行って来た。平成3年式kawasakiゼファー400である。1979年に登場したZ400FXがルーツであり、共用部品も多いようである。エンジンは4ストローク DOHC 2バルブ 空冷直列4気筒46馬力。後に発売された4バルブ仕様のZEPHYRχ53馬力よりも音が良いのでkawasakiファンは古いのを好むそうである。オマケでスーパートラップマフラー、フロントフェンダー、タイヤ付きリアホイール、リアインナーフェンダー、希釈済みの花咲Gタンククリーナー20Lを付けて貰った。さて、これから車検整備をするとするか....。オマケの部品
2012.02.08
コメント(4)
-
しろーとには無理修理
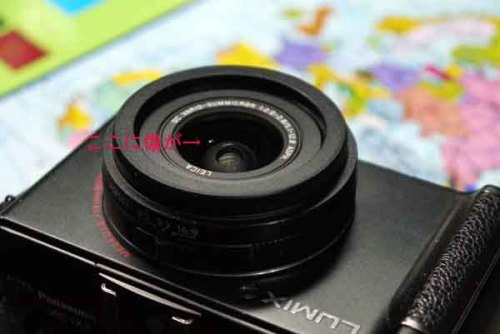
いつも使っているデジタルカメラ、Panasonic DMC-LX3のレンズ(前玉)に傷がついた。前年10月初めのことである。さすがにこれは自分では修理できない。カメラ屋に持っていっておよその修理代を聞いたら約2万円とのことであった。うう~ん。このカメラ、実はかの有名なドイツのライカと共同で作っていたようである。ライカのHPを見てみると、操作ボタンのロゴ(書体)が違うくらいで、あとはそのまんま。レンズもLEICA VARIO-SUMMICRONとある。望遠側に不 満はあるけれど3年ほど使ってきた。レンズの先にフィルターが付かないので、使わないときはレンズキャップをしておかなければならない。鞄に入れて持ち歩いていたときにキャップが外れ、何かに当たったのだろう。悩みながらほっていたのだが、意を決して修理することにした。改めて見積もりを取ると15,000円くらいだった。ついでに手持ちのギフト券があったので、それも使うことにして実支出は7,000円でできた。但し、修理に出したのが1月16日、手元に帰ってきたのが2月5日、20日以上かかった。最近は修理の進捗状態をHPで見ることが出来て、無くなっていた側面のちっちゃなプラスビスの入手に時間がかかっていたようだった。(藤)
2012.02.07
コメント(2)
-
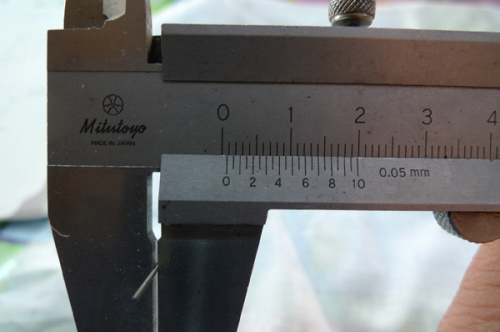
タペット調整
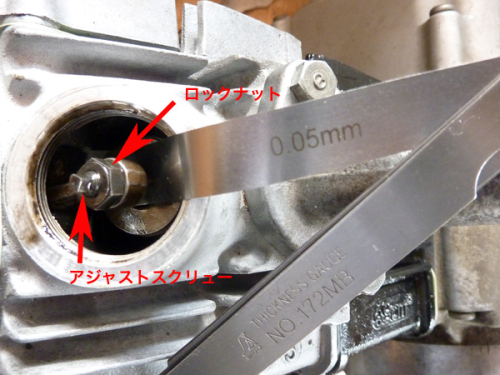
バルブタイミングの調整を済ませ、シリンダーヘッドのエンジンカバーを装着。これで組立は完了。最後にタペット調整だ。タペットキャップをメガネレンチで外すのだが、エンジンが固定されていないので、力を掛けにくいのに加えて、何故か非常に固く締まっているので、メガネをあてがってハンマーでどつくと、キャップを少しナメてしまった。こりゃあかん。面倒だが、インパクトレンチを引っ張り出して緩める。ガンと一発だ。最初から使えば良かった。タペット調整にはシックネスゲージを使用する。ノーマルヘッドではバルブクリアランスは吸気、排気とも0.05ミリだ。吸気側に0.05ミリのシックネスゲージを突っ込むと入らない。クリアランスが狭すぎる。ロックナットを緩めて、再びシックネスゲージを突っ込みながら、アジャストスクリューで調整する。ゲージを引き抜く時に軽く抵抗がある程度に調整。続いて吸気側。こちらは丁度良いクリアランスが取れていたので、そのままでOKである。
2012.02.06
コメント(3)
-
バルブタイミングの調整
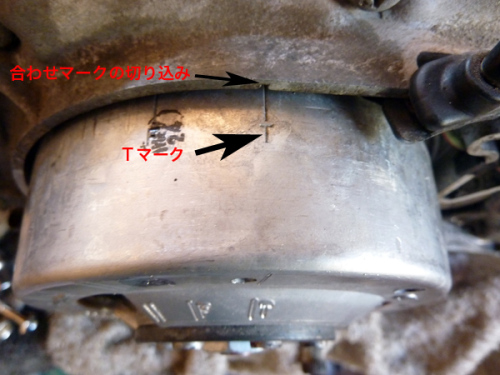
忘れていたノックピンを取り付けて、再び組立。シリンダーヘッド左右のエンジンカバーを付ける前に、バルブタイミングの調整を行う。カムスプロケットの表側には0マークが付いている。このマークをシリンダーヘッドの合わせマーク(凹)に合わせるのだが、先に、フライホイールのTマークをクランクケースの合わせマーク(凹)に合わせた状態で、カムスプロケットの0マークをシリンダーヘッドの合わせマーク(凹)に合わせて、カムスプロケットボルトを取り付けた方がやりやすい。ズレた場合は、チェーンを一コマずつ浮かせて合わせて行く。要するにフライホイールのTマークとカムスプロケットの0マークが同時にそれぞれの合わせマークに合っていれば、バルブタイミングが取れている事になるのだろう。フライホイールのTマークとクランクケースの合わせマークカムスプロケットの0マークとシリンダーヘッドの合わせマーク
2012.02.04
コメント(3)
-

ノックピンが....
シリンダーヘッドが装着できたので、純正の古いシリンダーを仕舞おうと手にとって見たら、アレ~。ノックピンがはまったままだ。クランクケースのノックピンはケースにそのまま付いていたので、外す必要がなかったのだが、シリンダーのノックピンは外して付け替えなければならなっかたのである。忘れていた。ガックリである。折角組み立てたのに.....。シリンダーのノックピンを装着するには、また、カムチェーンを外さなければならないのだ。クランクケースのノックピンは前から見て、スタッドボルトの右上と右下に装着するのだが、シリンダーのノックピンは、左上と右下に装着するようになっている。仕方がないので、また、バラした。古いシンリンダーに付いているノックピンを引き抜いたついでに磨いて、装着した。やれやれ。因みに、クランクケースのノックピンは短く、シリンダーのノックピンは長いので、共用はできない。純正シリンダーにはまったままのノックピンスタッドボルトの左上と右下に装着されたノックピン
2012.02.03
コメント(3)
-
シリンダーヘッドの取り付け
シリンダーにシリンダーヘッドを取り付け、スタッドボルトに例の変則ナットとワッシャーを位置を確認して締め付ける。締め付けトルクは1.2kg/mなので、指で一杯まで締めてソケットレンチを使用し、掌トルクで軽くグッ、グッくらいで止めて置く。クランクケースとシリンダー及びシリンダーとシリンダーヘッド取り付けボルト各1本も1.2kg/mである。ここは、スパナで程ほどに締める。カムスプロケットはシンリンダーの中に半分ほど入れて、カムチェーンに掛けながら、ボルト穴に合わせて行く。チェーンのテンションが掛かっているので、スプロケットをドライバーでシリンダーヘッド側に押し出しながら、ボルト穴に合わせる。3箇所の穴が合ったところで、素早くボルトを入れる。後は左右のエンジンカバーとガスケットを取り付ければ完了である。
2012.02.02
コメント(2)
-
嬉しいお知らせ
笏取り虫のブログ、文字は容量制限が無いのだが、写真や動画は50MBが上限で、それを超えると有料契約となる。長く使うために画像の枚数や容量を節約して来たが、40MBに近づいて来ておりそろそろ、他のブログに乗り換える準備をしようと思っていたら、2月1日から楽天ブログのシステムが変更になり、50MBの他に楽天写真館に保存した5GBが無料で使えるようになった。何と、現在の最大容量の100倍である。何と有り難い事だろう。これで当分大丈夫である。今後は写真の数や容量を少し上げてみましょう。
2012.02.01
コメント(1)
-
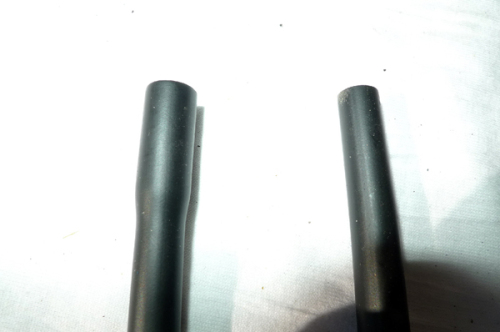
燃焼室
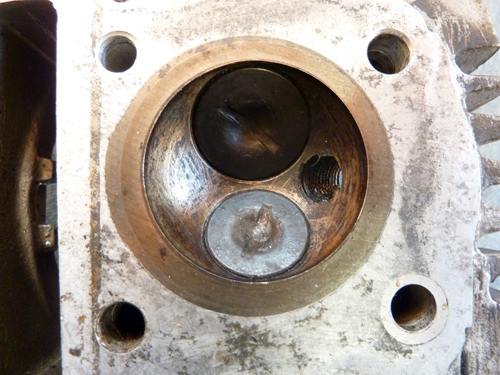
シリンダーガスケットを装着したら、次はシリンダーヘッドを取り付ける。その前に、カーボンで真っ黒になった燃焼室を掃除した。カーボンが焼き付いて固着しているので、根気がいる作業だ。排気バルブより吸気バルブの方が少し大きい。色も違うようだが、材質が異なるのだろうか。
2012.02.01
コメント(3)
全29件 (29件中 1-29件目)
1
-
-

- ☆☆ 車・バイク 大好き ☆☆
- VFRのブレーキパッド
- (2024-09-16 21:41:24)
-
-
-

- 自動車・交通
- このカーシャンプー使いやすい!
- (2024-09-20 00:29:15)
-
-
-

- 【MOTO GP】レース雑感・速報など
- Moto GP 2024 第13戦 サン…
- (2024-09-09 00:53:19)
-


